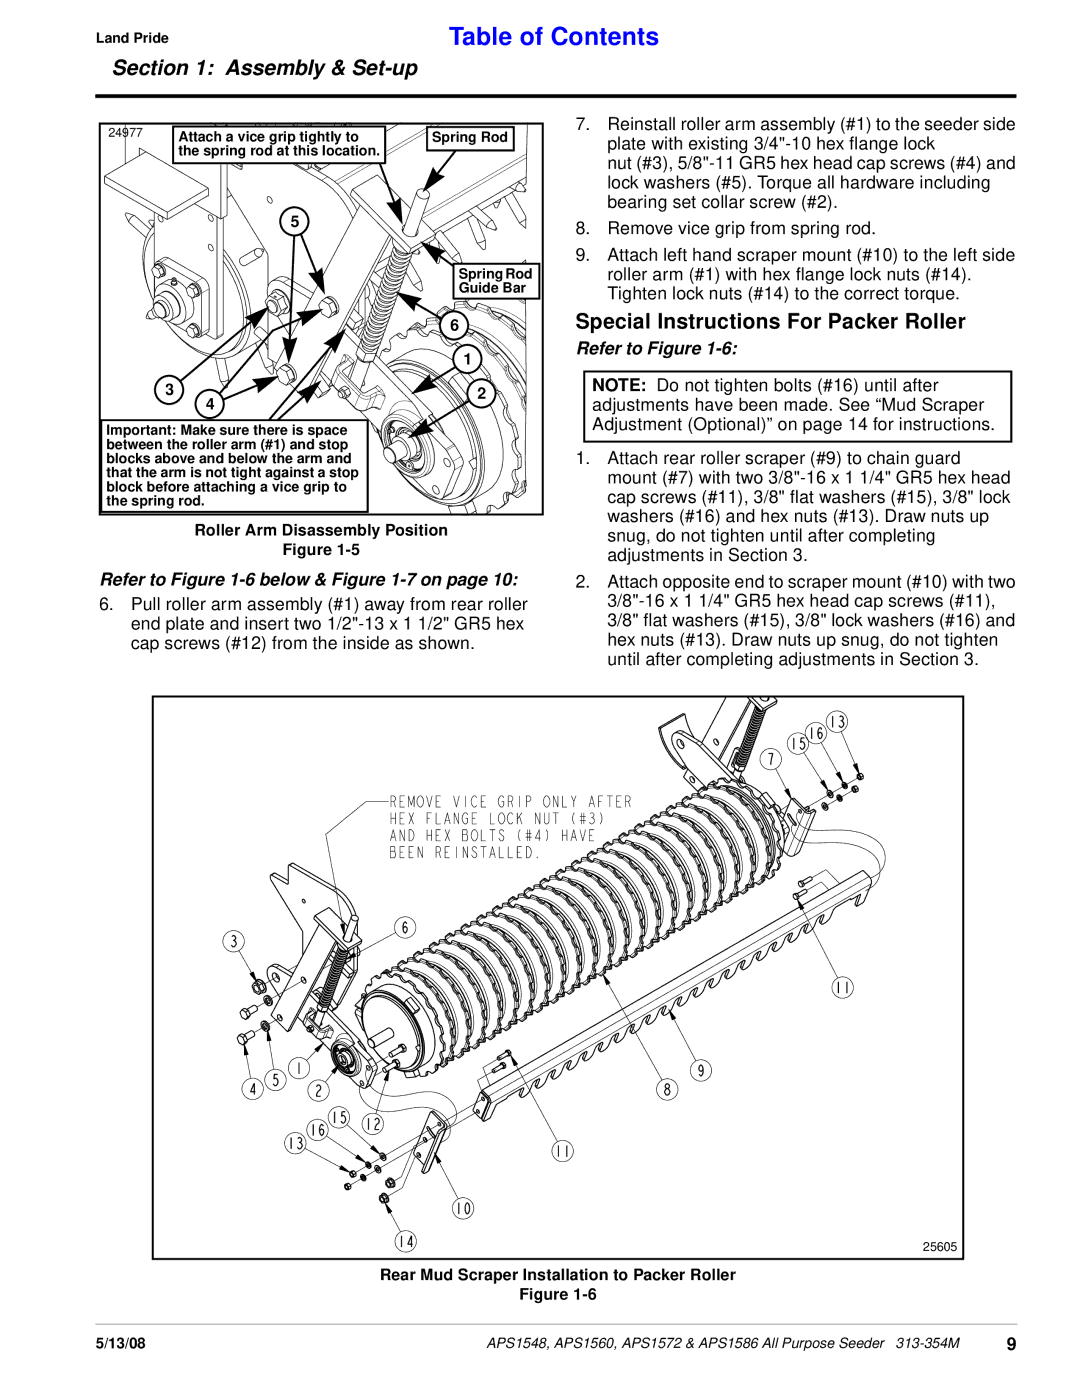
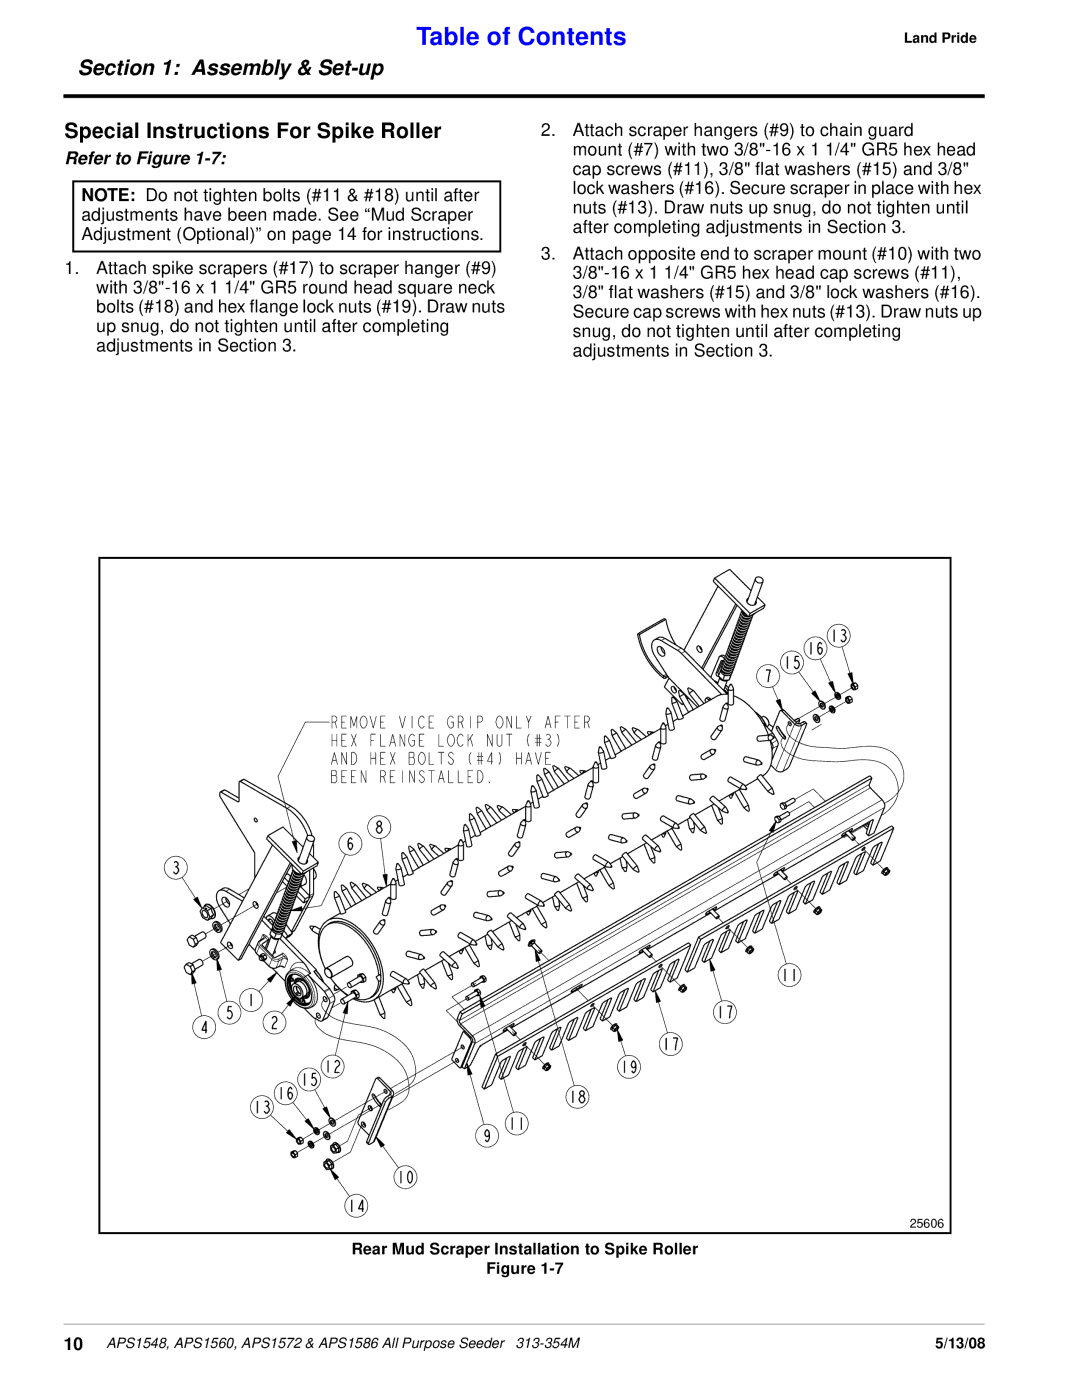
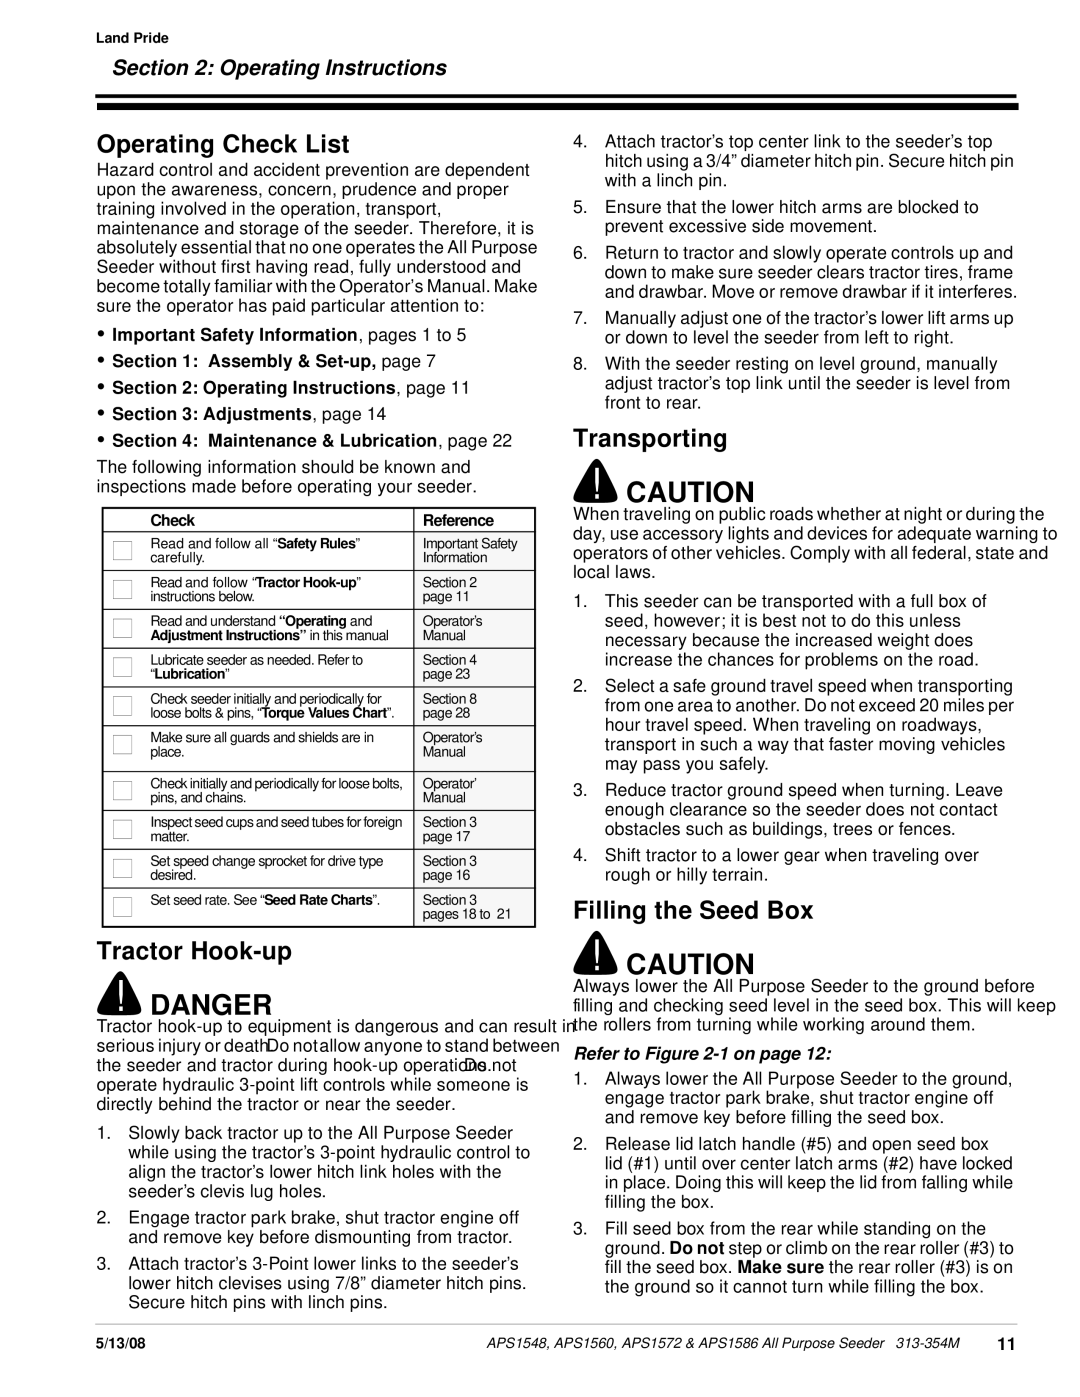
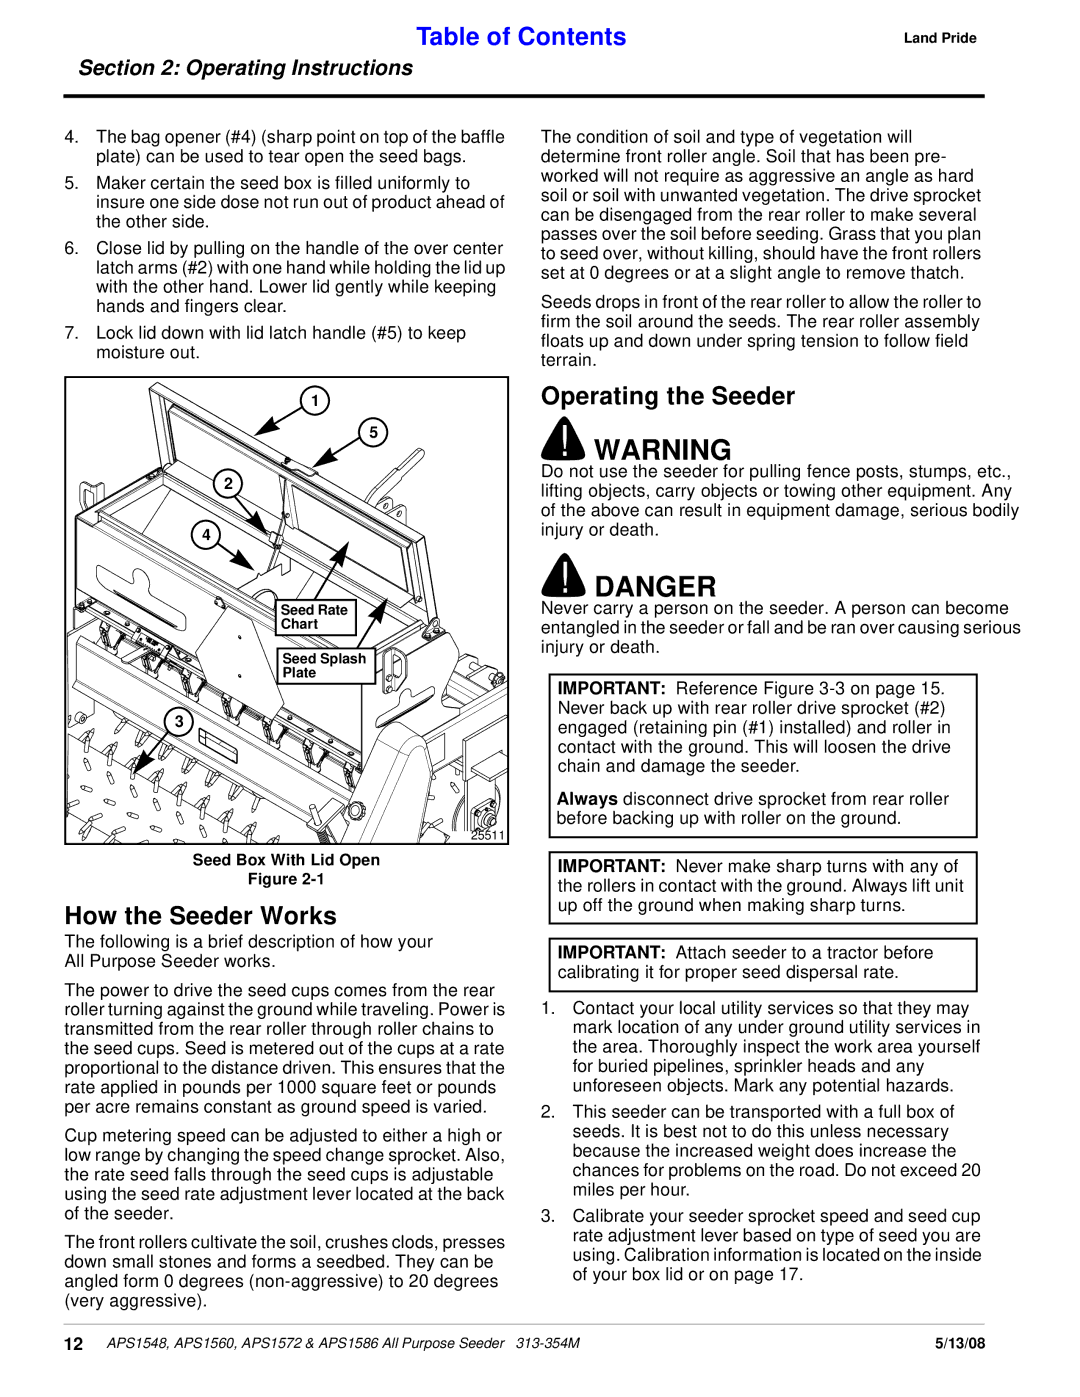
Land Pride APS1548, APS1560, APS1572, APS1586 Parking the Seeder, General Operating Instructions

Page 15

Land Pride

Table of Contents

Section 2: Operating Instructions

4.Make sure each seed cup door handle is set at the same height across the seeder. The highest position is usually used for grass seeds.

5.Be sure all bolts and nuts are tight.

6.Be certain all guards are in place and secure.

7.Clear area to be seeded of rocks, branches and other foreign objects. Mark any potential hazards.

8.Tall grass and weeds should be mowed before seeding.

9.Never allow anyone to ride on the seeder.

10.Adjust front rollers to desired angle. Make some practice runs with drive sprocket disconnected to determine the best roller angle for your application.

11.Do not back up while seeder is on the ground unless rear roller is disconnected from drive sprocket.

12.Disconnect rear roller from drive sprocket before backing up seeder to clean front and rear mud scrapers of debris.

13.Disconnect drive sprocket if more than one pass is required to prepare a seed bed before seeding.

14.Reconnect drive sprocket when ready to seed.

15.Do not make sharp turns while the seeder is on the ground.

16.Seeding should not be done in wet conditions as soil will stick to the rollers.

17.At first begin seeding at a slow forward speed and shift up until the desired speed is achieved. Maximum speed to plant seed will vary according to soil conditions.

18.After seeding the first 50 feet, stop and check to see that the seeder is adjusted properly.

Parking the Seeder

The following steps should be done when preparing to store the seeder or unhitch it from the tractor. See also “Section 4: Maintenance & Lubrication” on page 22 for additional information on long term storage of your seeder.

1.Park the All Purpose Seeder on a level, solid area.

2.Lower seeder to level ground or onto blocks supporting the seeder just above ground level.

3.Shut off tractor engine and engage parking brake.

4.Un-hook 3-point hitch from tractor. Reinstall hitch pins and linch pins in seeder hitch for storage.

5.See “Cleaning and Storing” on page 22” if the seeder is not going to be used for a long time.

General Operating Instructions

Once you have read the Operator’s Manual, properly installed the seeder to the tractor’s 3-point hitch, ran through the Operating Check List, filled the box with seed, and calibrated the unit for proper seed rate delivery, it’s time to do some serious seeding.

The All Purpose Seeders have ground driven seed delivery systems. The power to drive the seeder comes from the forward momentum of the tractor. As the tractor moves forward the ground driven rear roller transfers power via chain driven sprockets to the seed metering system. Seed rate remains constant and in direct proportion to the distance traveled and is affected very little by actual ground speed.

As the front spiked rollers pass over areas to be seeded they open up the soil profile. The more critical the angle adjustment on the front rollers, the more aggressive the cultivating action will be. Seed is then delivered at the precise predetermined rate through the wind guarded seed drop area between the front and rear rollers. The rear roller then presses seed into firm contact with the soil to promote a superbly high germination rate. Seeding should not be attempted in wet or muddy conditions.

Now that you understand how it works, it is time to begin seeding. You may want to make a few passes with the seeder drive sprocket disconnected just to make sure your front rollers are adjusted to the proper angle and to determine correct ground speed for cultivating the soil profile to your expectations. Ridging of loose soil is possible when the front rollers are set at and angle and your ground speed is to fast. Slow your ground speed to eliminate ridging. Re-engage the seeder drive sprocket once you are satisfied that the proper amount of soil opening action is being achieved.

You should already have removed any large stones or obstacles from the area you plan to seed. Line the tractor up for the first pass and choose a tractor gear selection that will deliver a ground speed of approximately

3-5 mph. Lower the three-point hitch and seeder slowly to the ground and begin driving forward, slowly at first until you get comfortable with what you are doing. As you approach the end of the lane you are seeding, slow down and come to a stop while simultaneously raising the seeder off of the ground. With the seeder raised, line up for your next pass and repeat the process. Look back often and avoid making very sharp turns with your seeder on the ground if you expect to develop a uniform seeding pattern. The more experienced you become the better you will get at developing beautiful seed plots and beautiful lawns.

Whenever you are done seeding always clean the seeder out and perform all maintenance prescribed in the Operator’s Manual. Never leave seed stored in the hopper for prolonged periods. Never dismount your tractor without first coming to a full stop, turning off the tractor, and setting the park brake. Never allow riders on the tractor when working with any rear mounted implement installed.

With a little practice you should get very good at developing lush green stands of grass with your Land Pride All Purpose Seeder.

5/13/08

APS1548, APS1560, APS1572 & APS1586 All Purpose Seeder 313-354M

13

Image 15
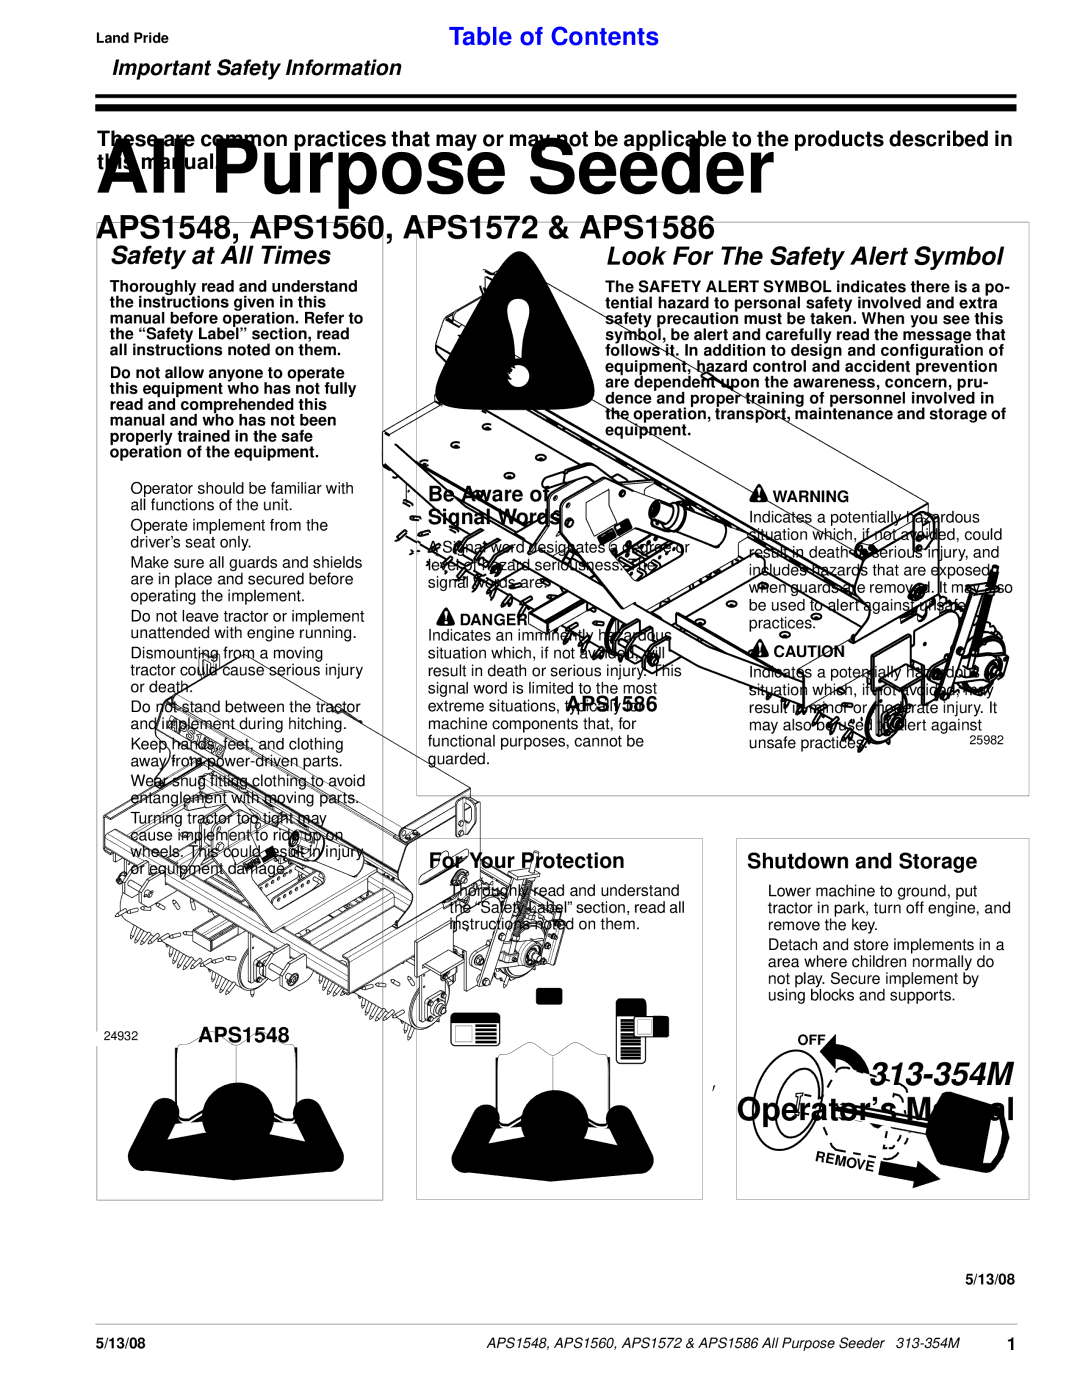
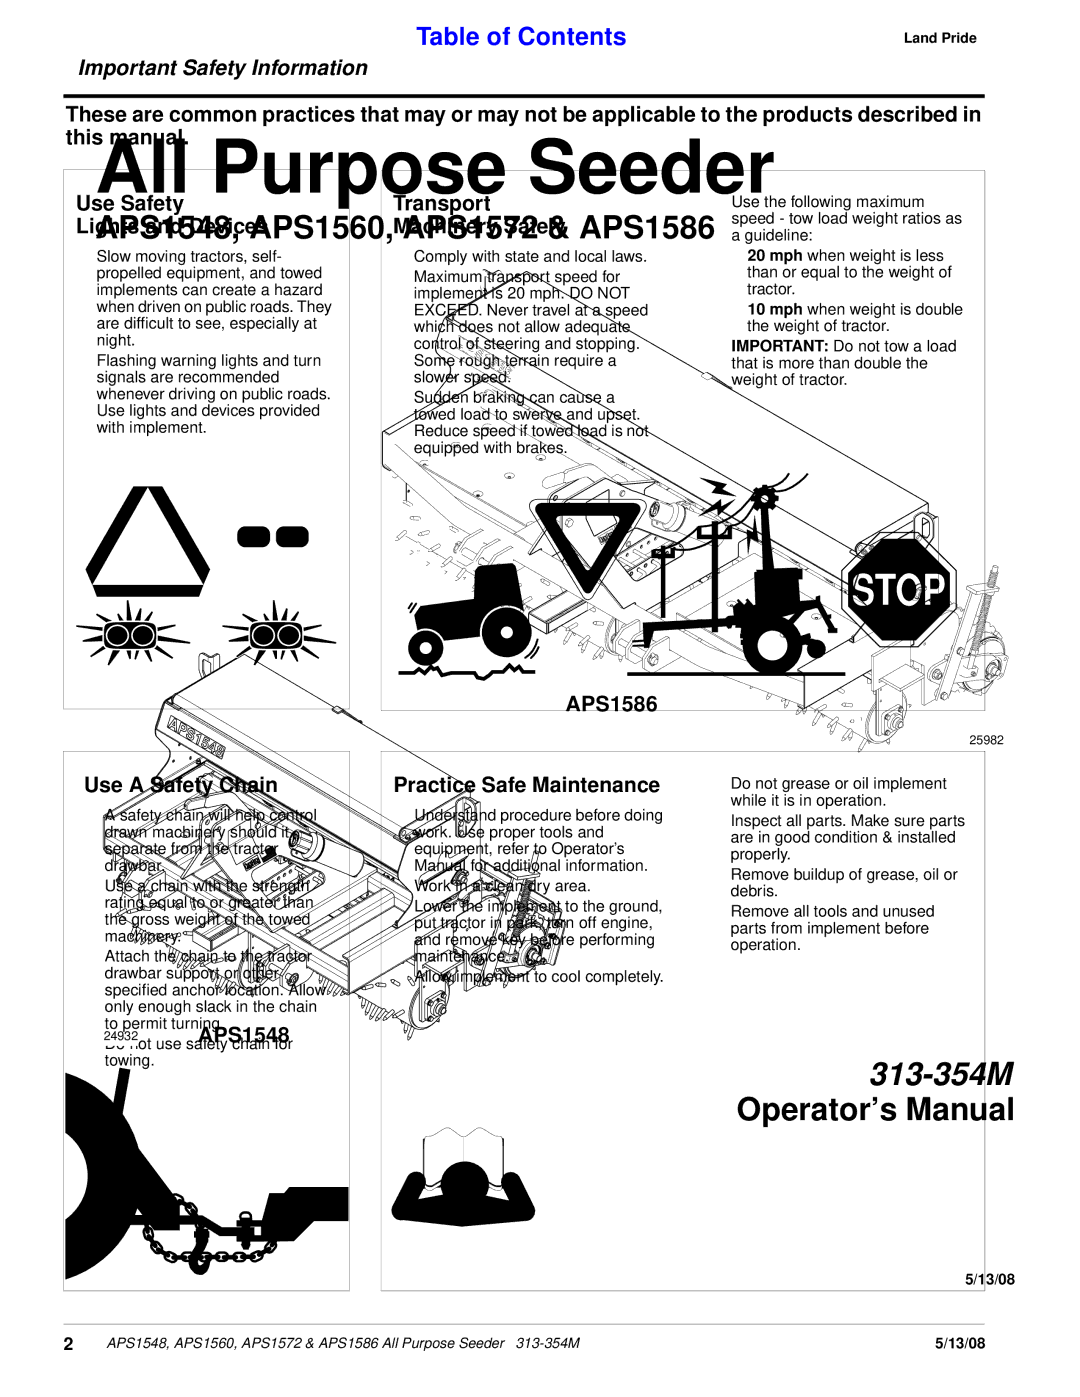
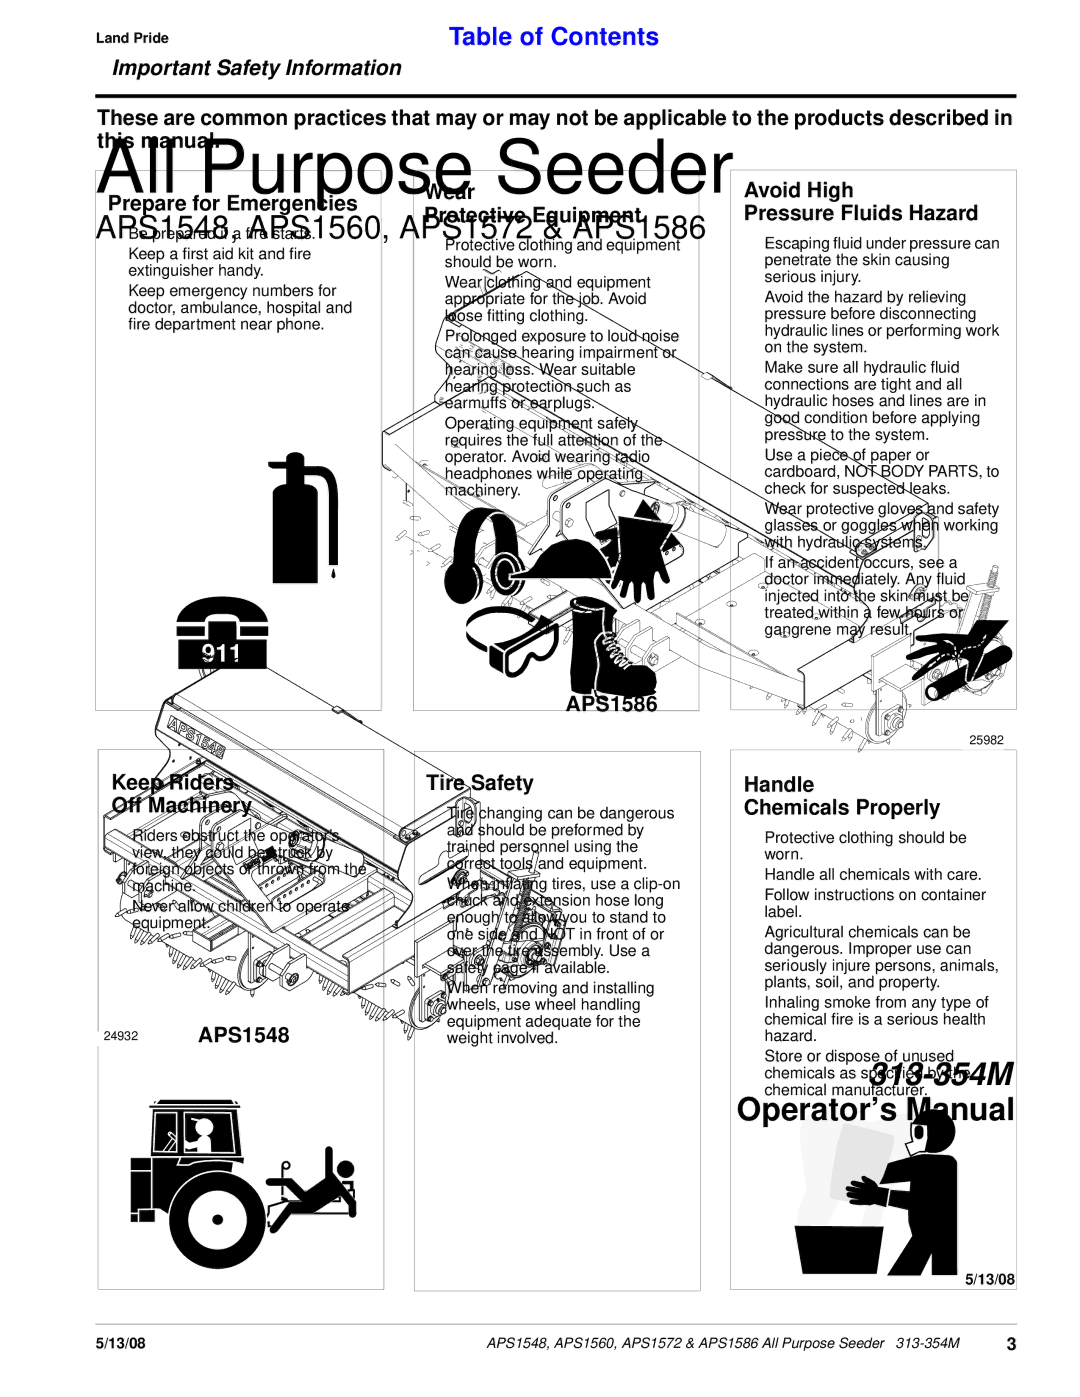
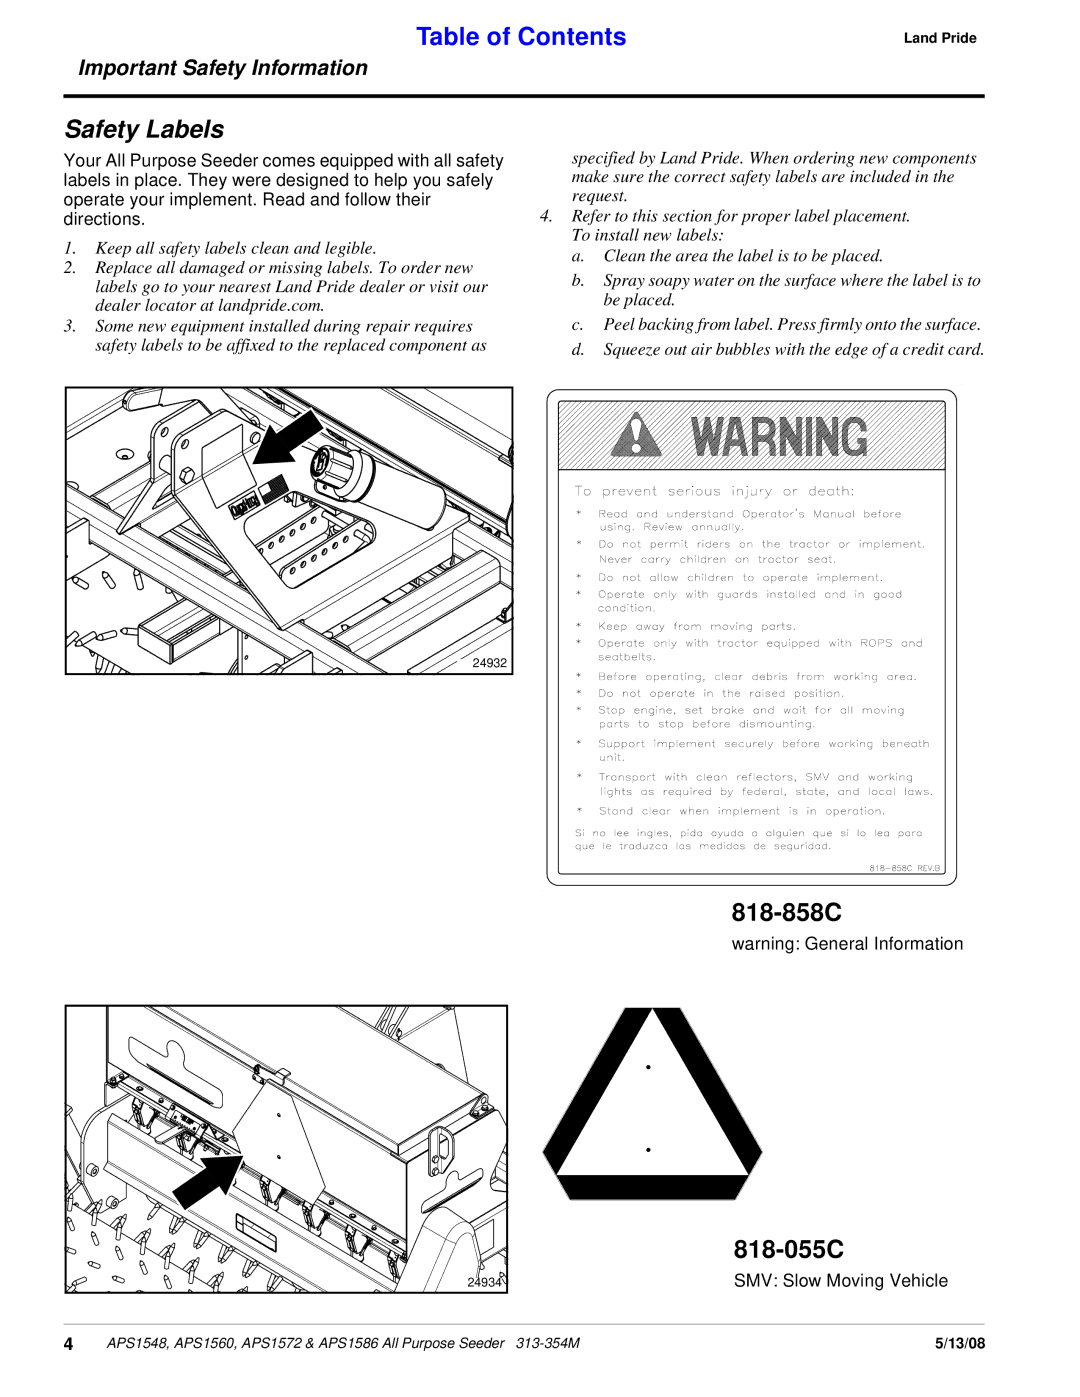
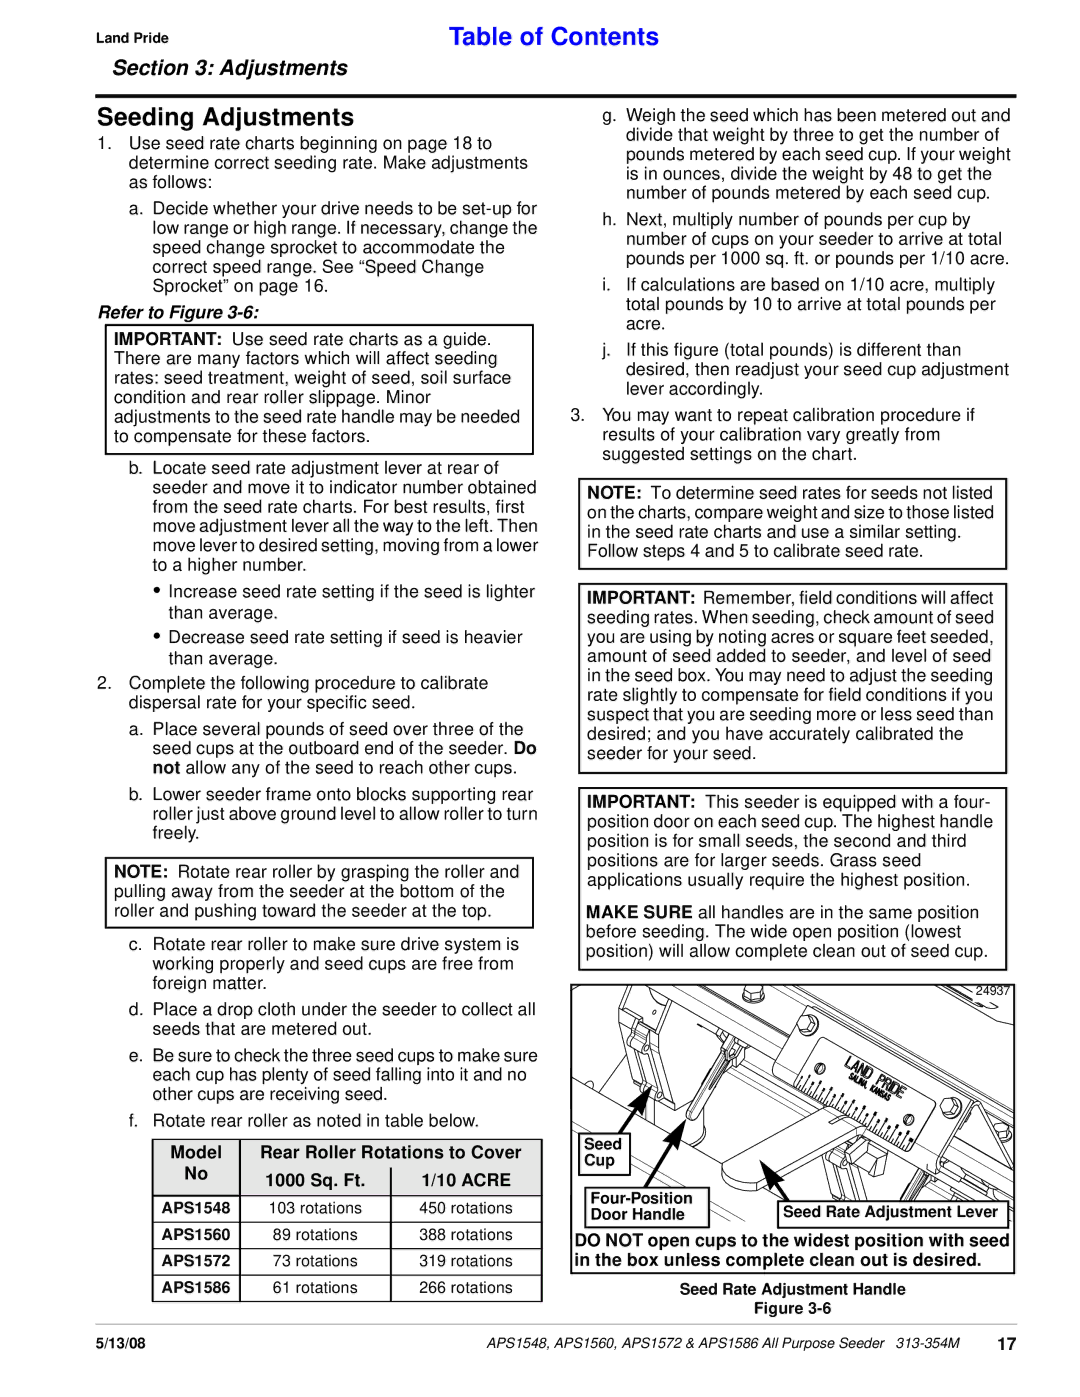
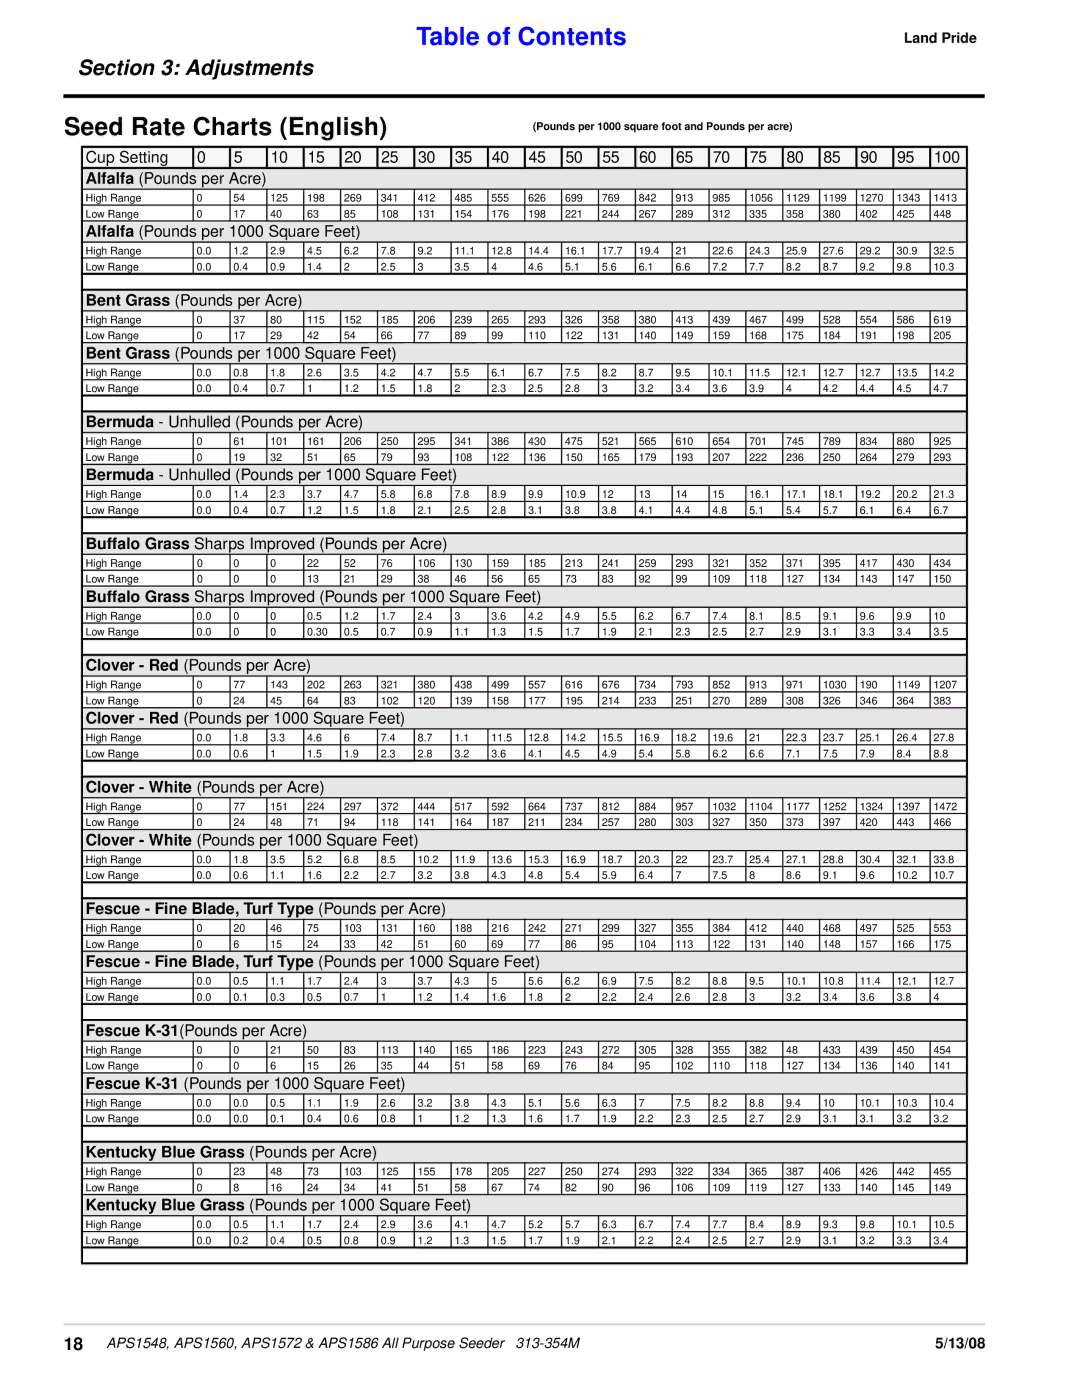
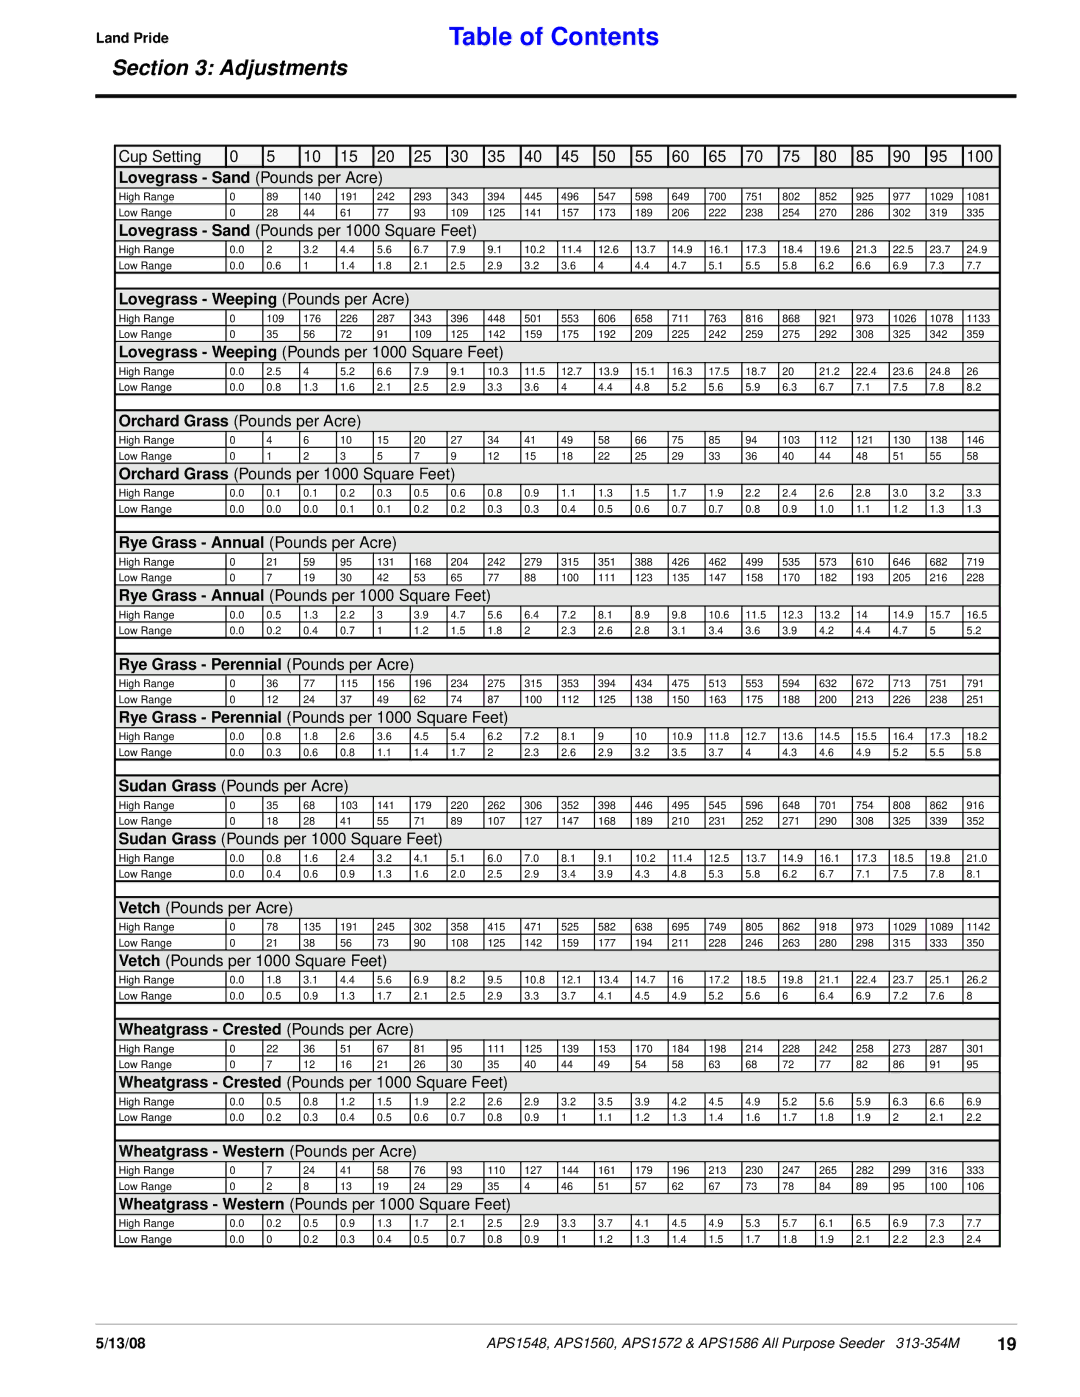
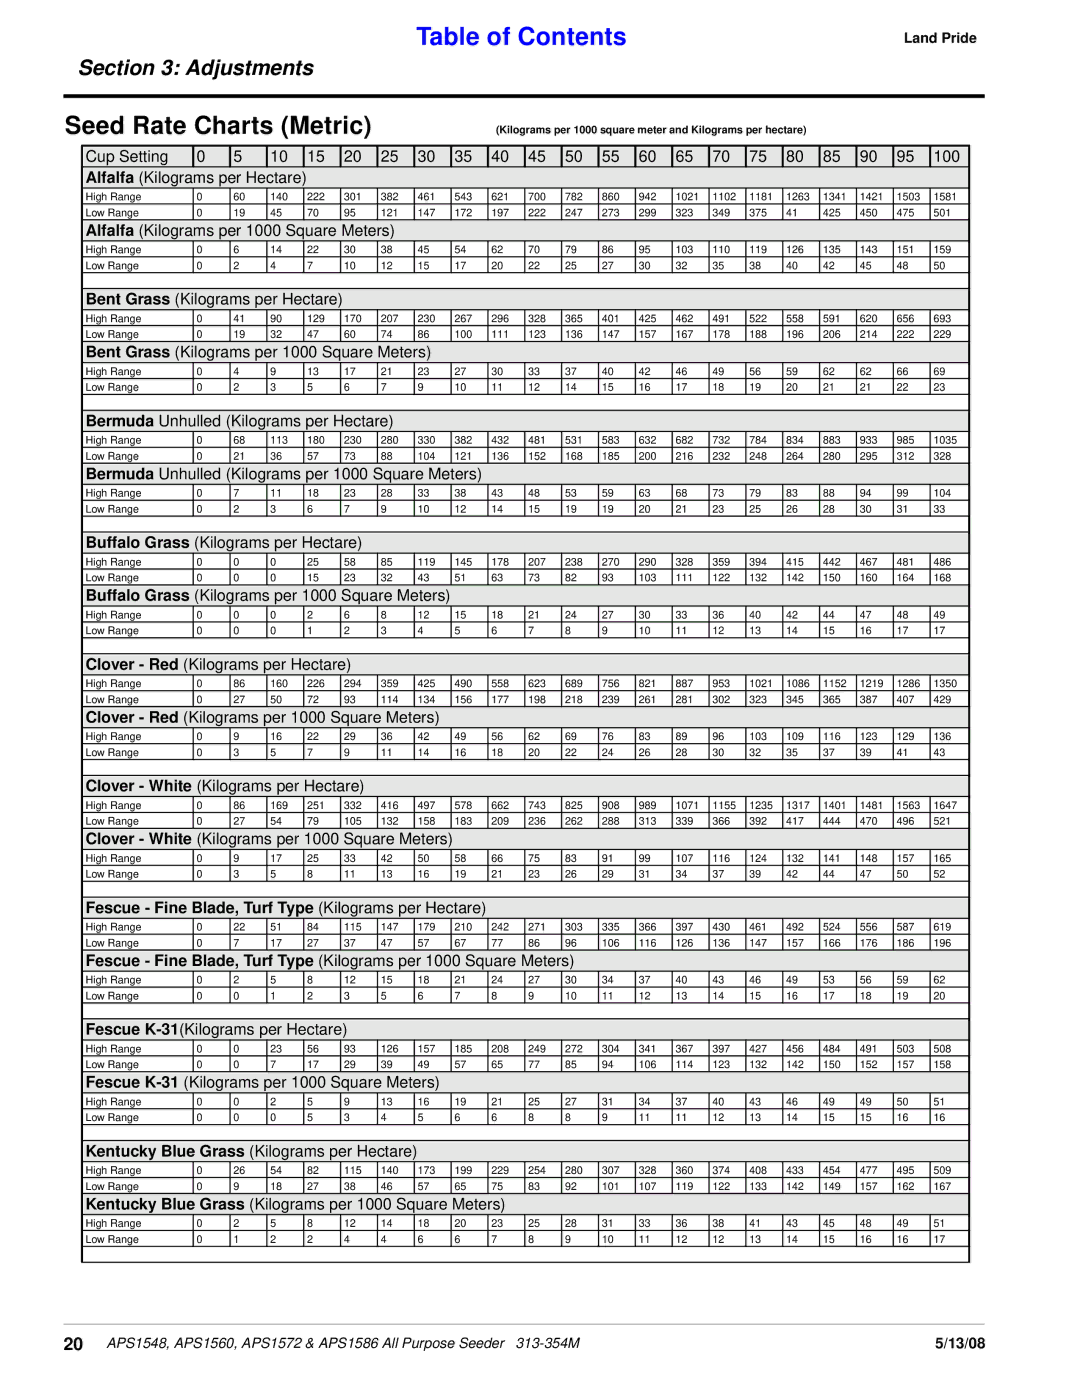
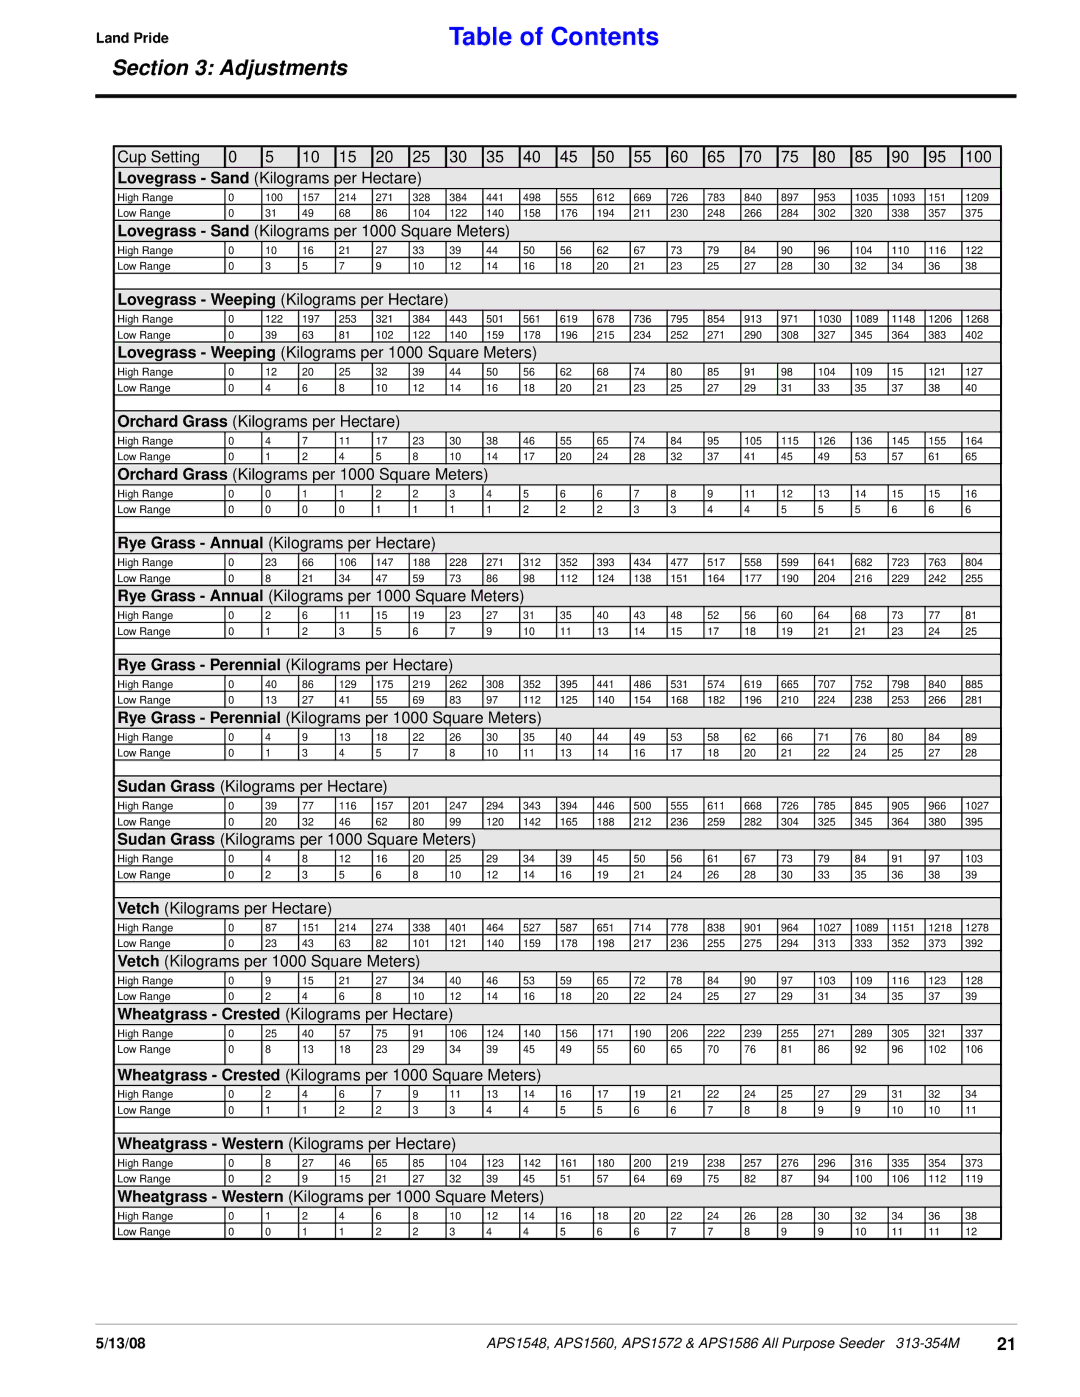
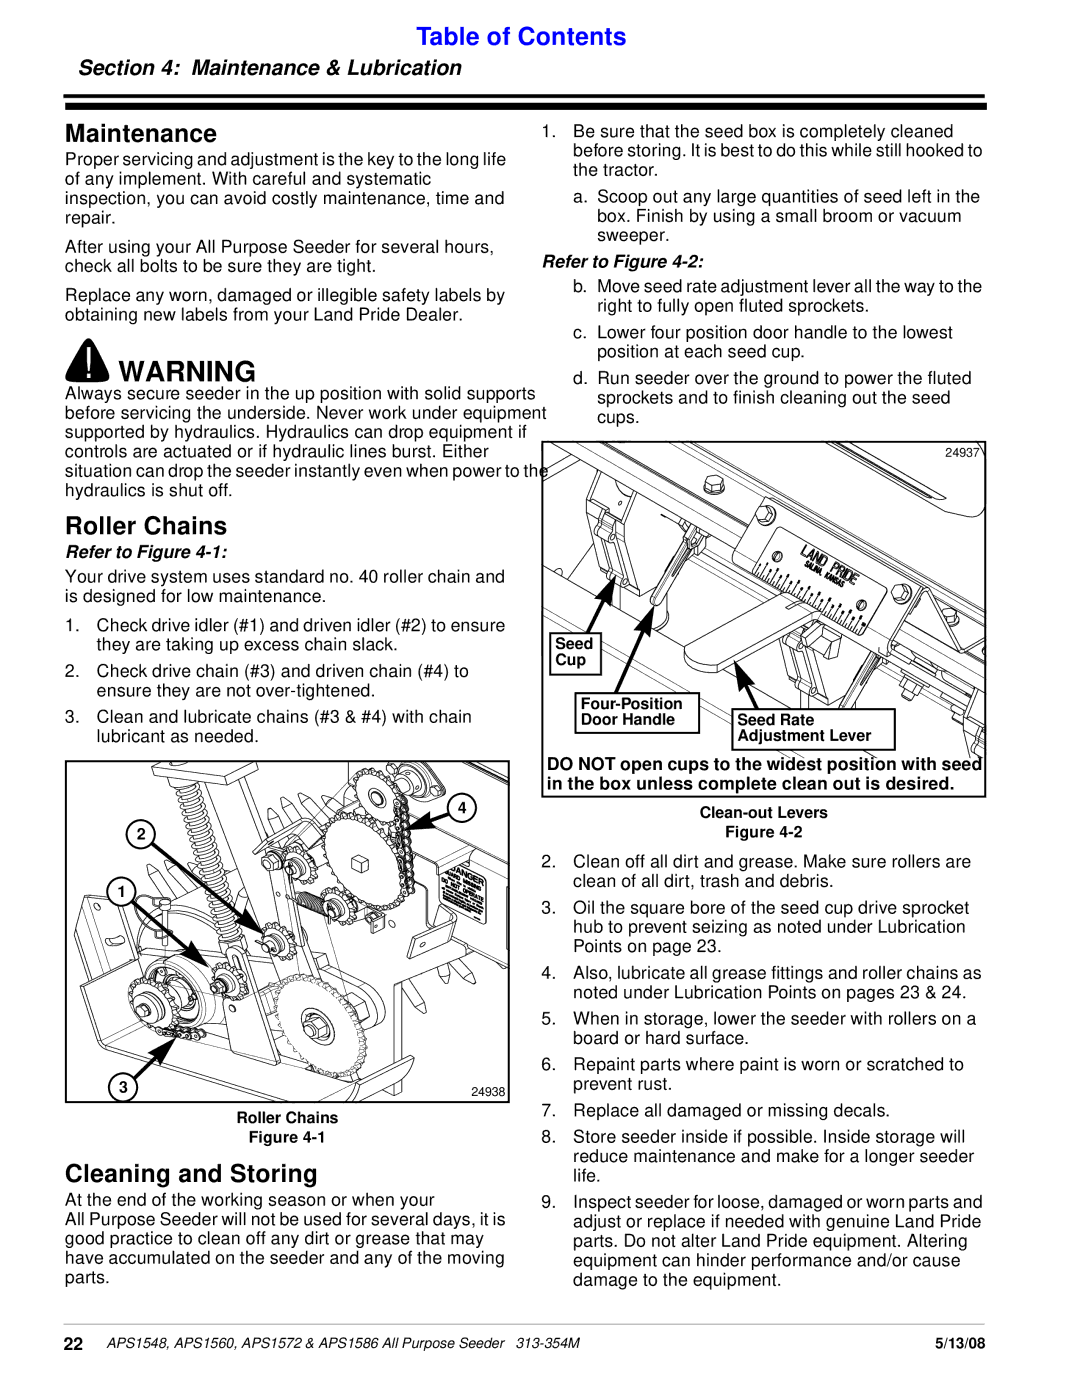
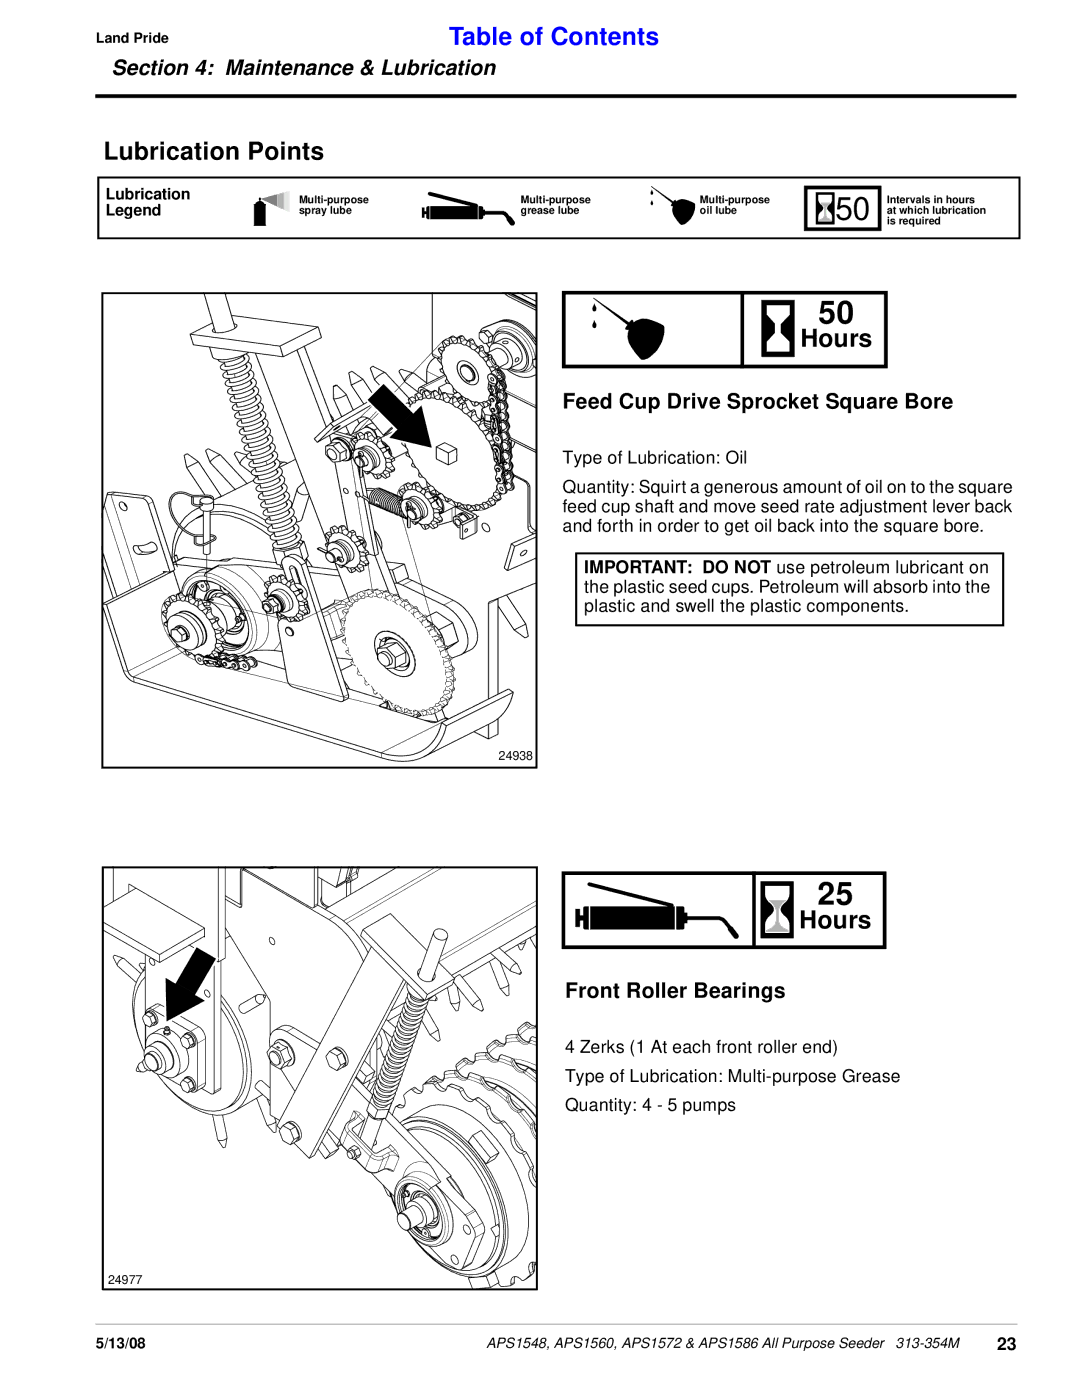
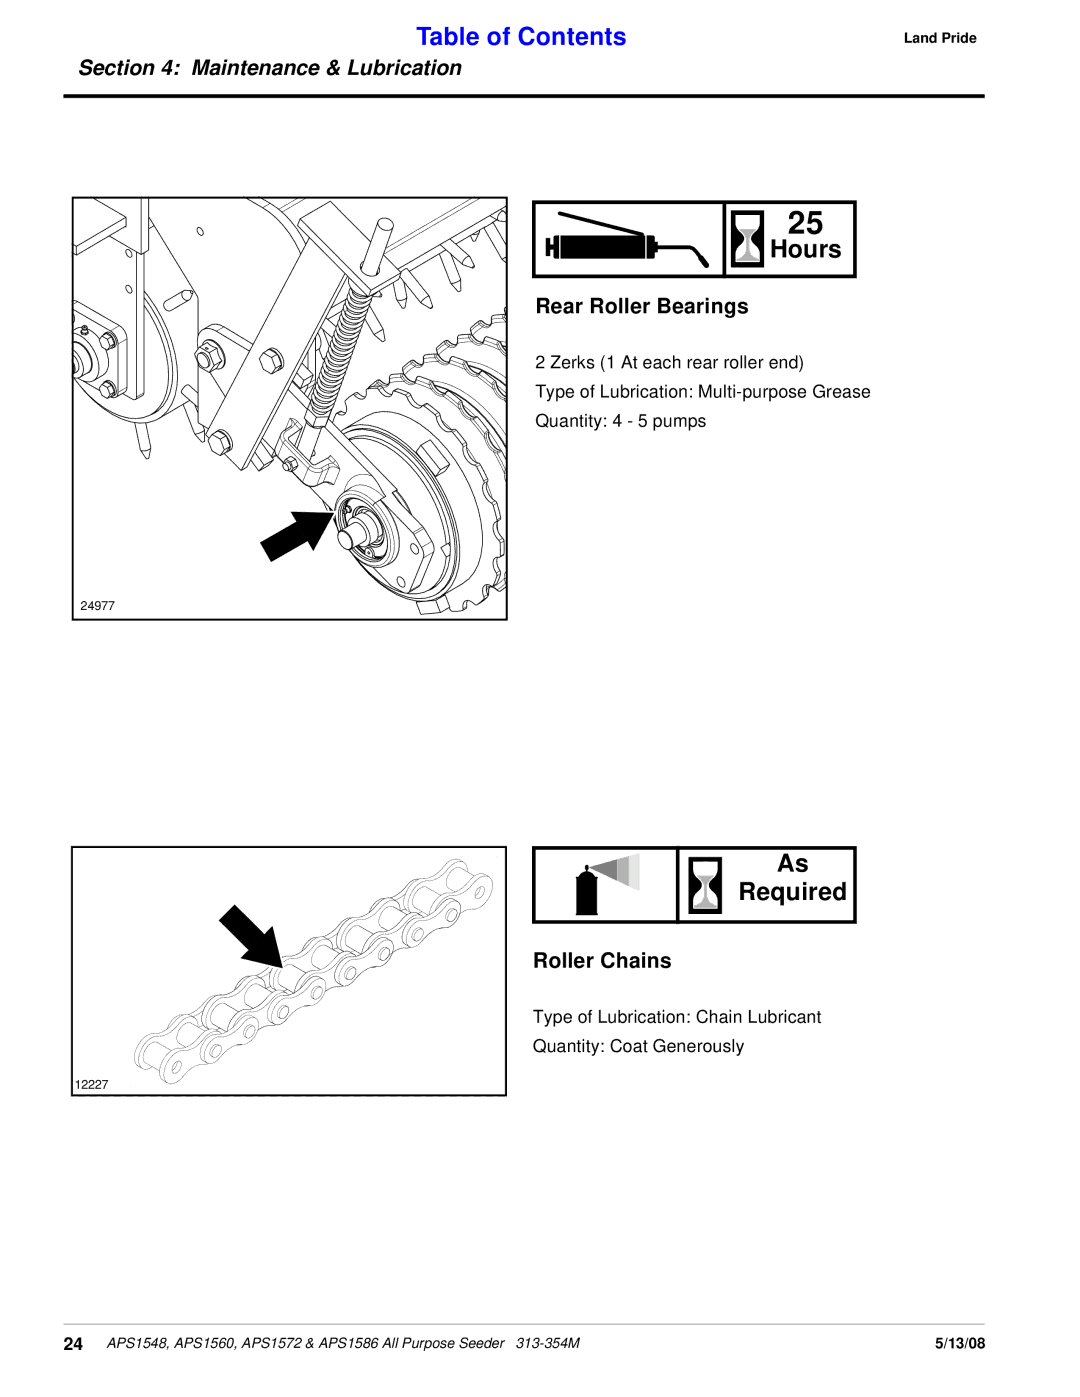
Contents 24932 APS1548 APS1586Table of Contents Safety at All Times Use a Safety Chain Practice Safe MaintenanceTransport Machinery Safely Keep Riders Off Machinery Tire SafetyWear Protective Equipment Avoid High Pressure Fluids HazardSafety Labels 818-254C 838-111C 818-543CIntroduction Using This ManualApplication Owner AssistanceSling Bracket Pre-Assembly ChecklistAssembly & Set-up Tractor RequirementsRear Mud Scraper Mud Scraper Installation OptionalLand Pride Mud Scrapers Front Mud ScrapersRoller Arm Disassembly Position Rear Mud Scraper Installation to Packer RollerSpecial Instructions For Packer Roller Special Instructions For Spike Roller Rear Mud Scraper Installation to Spike RollerFilling the Seed Box Operating Check ListTransporting Tractor Hook-upHow the Seeder Works Operating the SeederSeed Box With Lid Open General Operating Instructions Parking the SeederRear Mud Scrapers Front Roller Angle AdjustmentMud Scraper Adjustment Optional AdjustmentsDisengage Drive Chain Drive Chain Engagement35T Sprocket Speed Change SprocketHigh Range Set-up Low Range Set-upModel Rear Roller Rotations to Cover 1000 Sq. Ft Acre Seeding AdjustmentsSeed Rate Charts English Fescue Fine Blade, Turf Type Pounds per AcreFescue Fine Blade, Turf Type Pounds per 1000 Square Feet Wheatgrass Crested Pounds per Acre Lovegrass Sand Pounds per AcreRye Grass Annual Pounds per Acre Rye Grass Perennial Pounds per AcreFescue Fine Blade, Turf Type Kilograms per Hectare Seed Rate Charts MetricLovegrass Weeping Kilograms per 1000 Square Meters Roller Chains MaintenanceCleaning and Storing Maintenance & LubricationLand PrideTable of Contents Required Rear Roller BearingsRoller Chains Specifications & Capacities APS1548 & APS1572 All Purpose SeederDescription APS1548 APS1560 APS1572 APS1586 Features and Benefits Features BenefitsAPS1548, APS1560, APS1572 & APS1586 Models Troubleshooting Troubleshooting ChartProblem Cause In-tpi Torque Values Chart For Common Bolt SizeAppendix Additional Torque ValuesFront & Rear Rollers Considered wear items WarrantyCorporate Office P.O. Box Salina, Kansas 67402-5060 USA

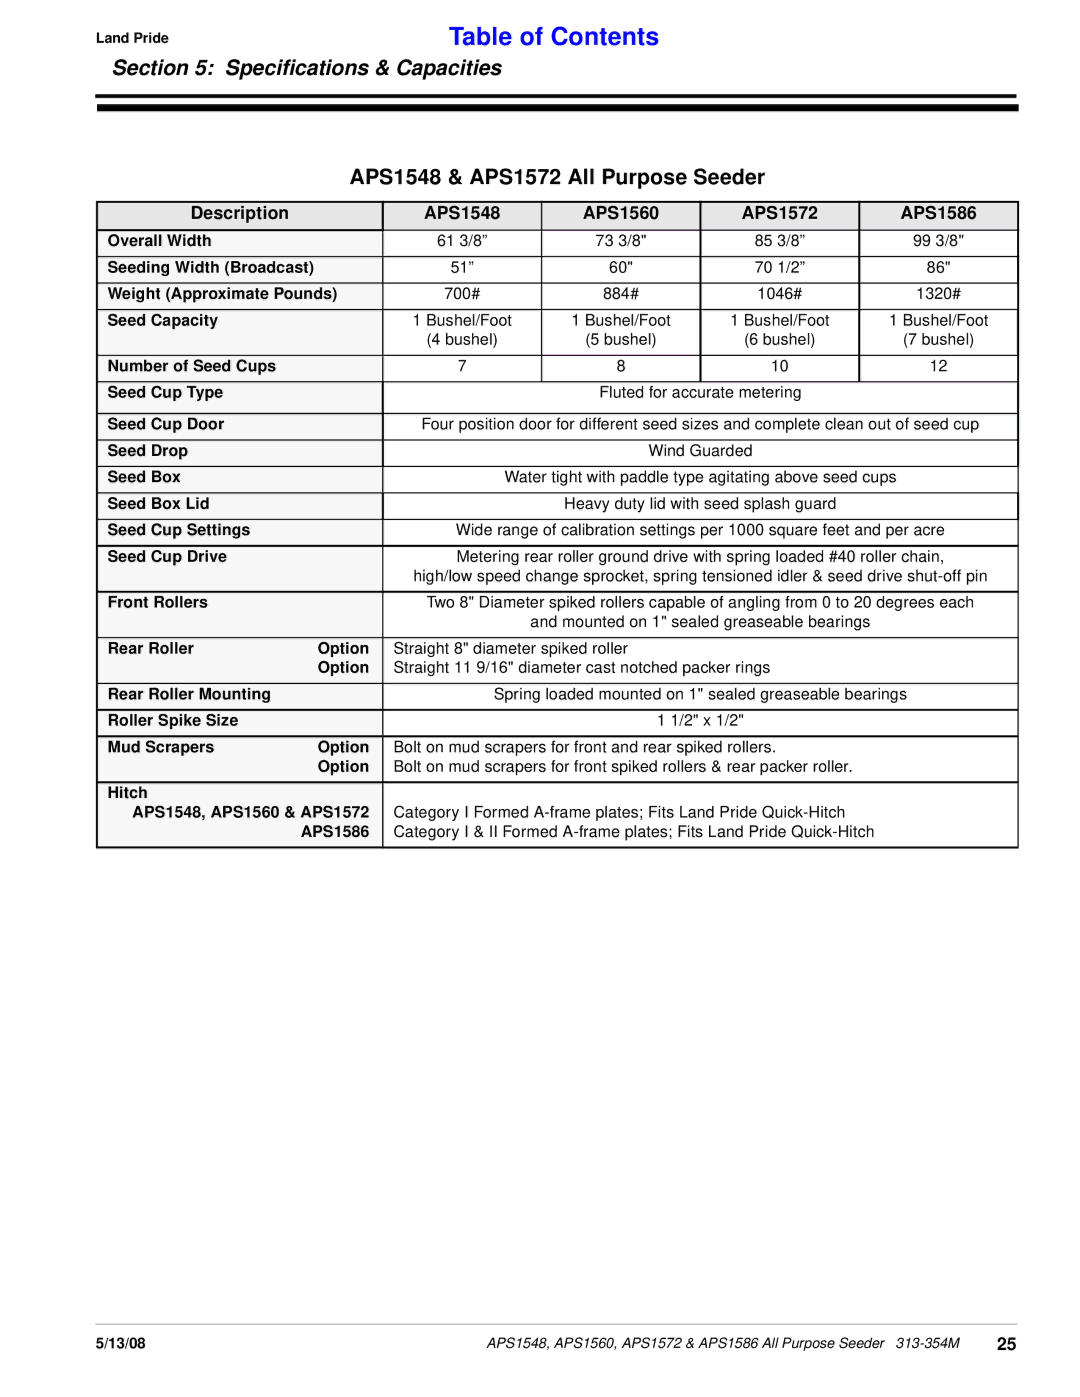
APS1548, APS1586, APS1572, APS1560 specifications

Land Pride, a well-known name in agricultural and landscape equipment, offers a range of premium tillers designed to enhance productivity and performance in various farming and landscaping applications. Among their impressive lineup, the APS1548, APS1586, APS1560, and APS1572 models stand out due to their robust features and user-friendly technologies.

The APS1548, with a width of 48 inches, is an ideal choice for smaller gardens or compact tractors. It provides exceptional performance in tilling and soil preparation, helping to create a fertile foundation for planting. Equipped with heavy-duty tines, the APS1548 ensures efficient soil penetration, breaking up tough ground and turning it over with ease.

Moving up in size, the APS1560 boasts a working width of 60 inches, making it suitable for medium-sized tractors and larger areas. It offers similar heavy-duty construction, with reinforced tines capable of handling various soil types. The APS1560 is designed for precision and reliability, ensuring that your planting beds are thoroughly prepared for optimal crop growth.

The APS1572 takes it a step further with its 72-inch wide working area, ideal for larger fields and more intensive farming operations. Its increased coverage means less time spent tilling and more efficient operation. This model excels in durability, featuring a robust frame and high-quality components that ensure longevity, even under tough working conditions.

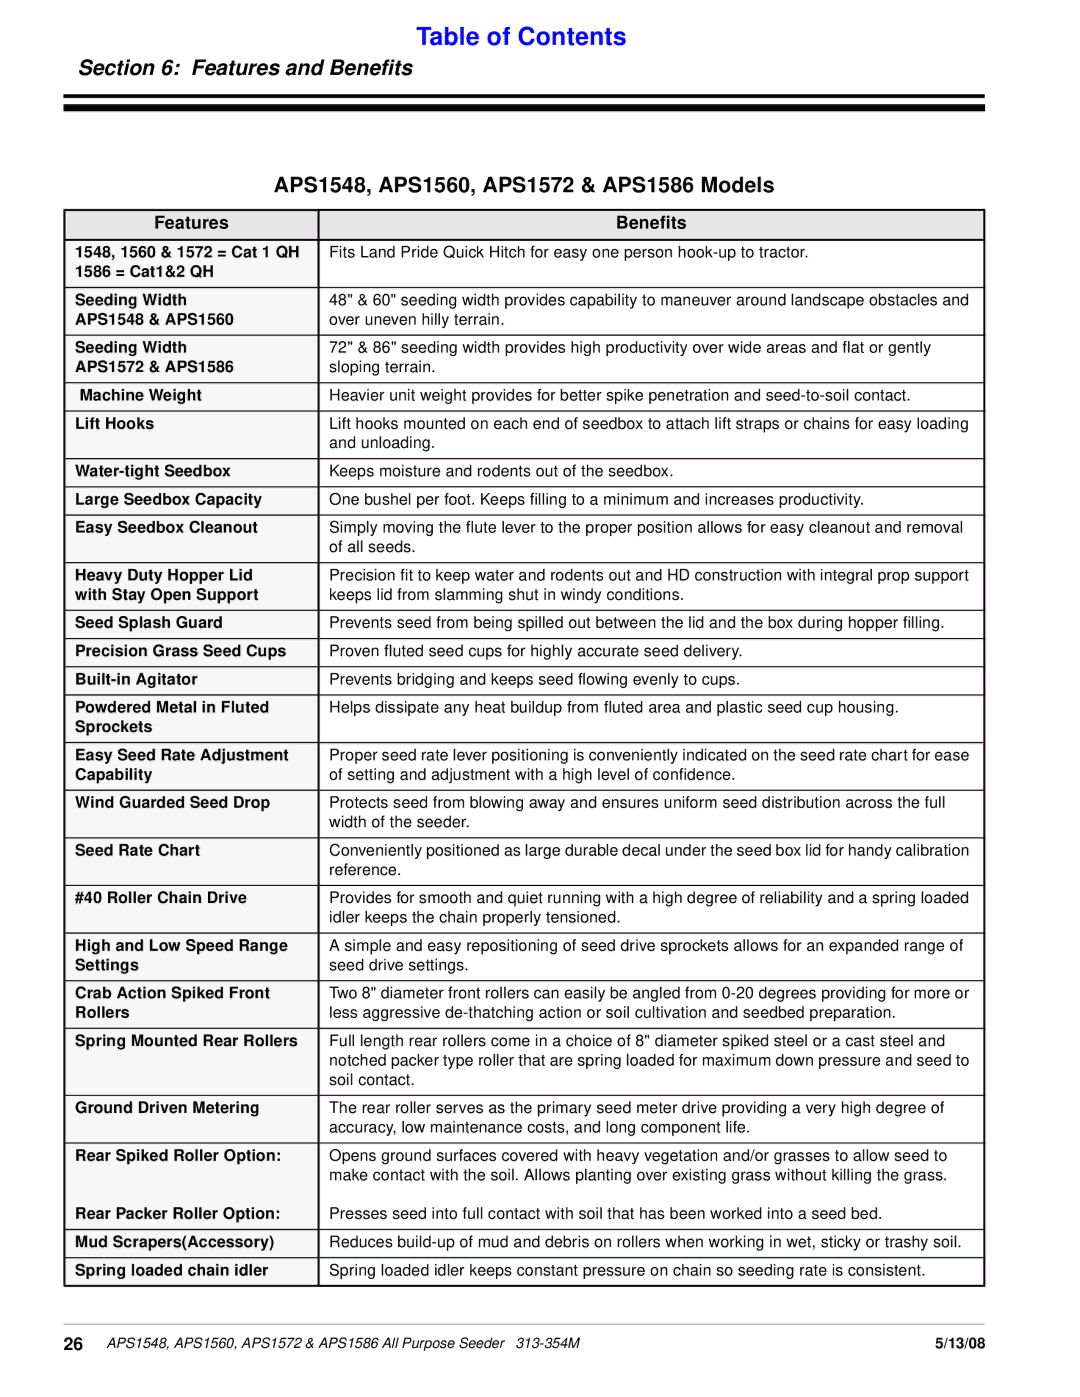
The APS1586, at 86 inches wide, is targeted towards large-scale farmers and landscapers who demand high efficiency. This model can cover extensive areas quickly and effectively, making it a perfect choice for commercial operations. It integrates advanced technologies, such as quick-hitch compatibility, allowing for easy attachment and detachment to maximize productivity.

All models feature adjustable tilling depths, enabling users to tailor their operation to specific soil conditions. Additionally, the tines can be easily replaced, providing extended service life and reducing maintenance costs. Land Pride’s commitment to quality is evident in the construction of these tillers, ensuring they withstand the rigors of daily use while providing consistent performance.

In summary, the Land Pride APS series—comprising the APS1548, APS1586, APS1560, and APS1572—represents a strong lineup of tillers that cater to a variety of agricultural needs. Their robust construction, user-friendly design, and thoughtful features make them a valuable investment for farmers and landscapers seeking to improve their productivity and soil health.