BEFORE USE (continued)
Part Names (continued)
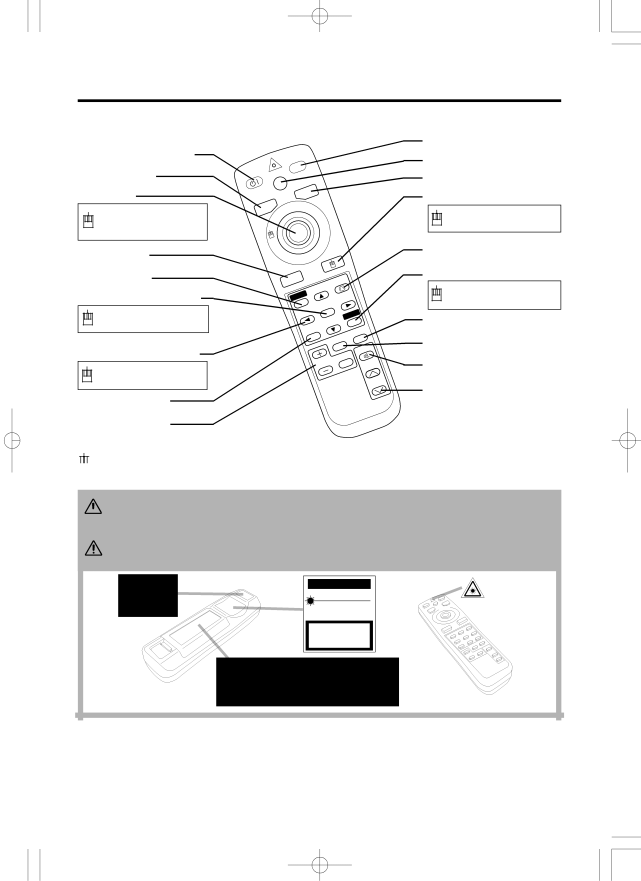
STANDBY/ON Button
BLANK Button
LASER Button
VIDEO Button
Disk Pad
Used to operate the mouse shift function and left click function.
AUTO Button
STANDBY/ON | LASER |
| |
| RGB |
VIDEO | |
RGB Button
MOUSE / RIGHT Button
Used to click the right mouse button.
KEYSTONE Button
MENU Button
MENU SELECT Button
Used to click the left mouse button.
![]() ,
, ![]() ,
, ![]() ,
, ![]() Button
Button
Used to operate the mouse shift function.
POSITION Button
AUTO | KEYSTONE | |
| ||
MENU |
| |
MENU | SELECT | |
RESET | ||
| ||
POSITION | PinP | |
| FREEZE |
MUTE
MAGNIFY | OFF |
VOLUME
RESET Button
Used to click the right mouse button.
PinP Button
FREEZE Button
MUTE Button
VOLUME Button
MAGNIFY Button | REMOTE CONTROL | |
TRANSMITTER | ||
| ||
| (Refer to P.9 "OPERATIONS") |
![]() These functions work when the mouse control function is activated. Remember, the POSITION, BLANK ON and MENU ON functions disable the mouse control function.
These functions work when the mouse control function is activated. Remember, the POSITION, BLANK ON and MENU ON functions disable the mouse control function.
WARNING • The laser pointer of the remote control transmitter is used in
![]() place of a finger or rod. Never look directly into the laser beam outlet or point the laser beam at other people. The laser beam can cause vision problems.
place of a finger or rod. Never look directly into the laser beam outlet or point the laser beam at other people. The laser beam can cause vision problems.
CAUTION • Use of controls or adjustments or performance of procedures other than those specified herein may result in hazardous radiation exposure.
AVOID EXPOSURE-
LASER RADIATIONS IS
EMITTED FROM THIS
APERTURE
C A U T I O N
LASER RADIATION-
DO NOT STARE INTO BEAM
MAX. OUTPUT: 1mW
WAVE LENGTH: 650nm
CLASS2 LASER PRODUCT
LASER RADIATION
DO NOT STARE INTO BEAM
CLASS2 LASER PRODUCT
MAX. OUTPUT: 1mW
WAVE LENGTH: 650nm
Complies with 21 CFR 1040. 10 and 1040. 11 except for deviations pursuant to Laser Notice No.50, dated 2001.7.26
SMK CORPORATION
PLACE OF MANUFACTURER: A
NOTE • Keep the remote control transmitter away from children and pets.
•Do not give the remote control transmitter any physical impact. Take care not to drop.
•Do not place the heavy objects on the remote control transmitter.
•Do not wet the remote control transmitter or place it on any wet object.
•Do not place the remote control transmitter close to the cooling fan of the projector.
•Do not disassemble the remote control transmitter.