Panasonic PT-L735E dimensions Accessories, PT-L735NTE only, Use only the specified batteries

Page 5

When inserting the batteries, make sure the polarities (+ and -) are correct.

BIf the batteries are inserted incorrectly, they may explode or leak, and fire, injury or contamination of the battery compartment and surrounding area may result.

Use only the specified batteries.

BIf incorrect batteries are used, they may explode or leak, and fire, injury or contamination of the battery compartment and surrounding area may result.

Do not mix old and new batteries.

BIf the batteries are inserted incorrectly, they may explode or leak, and fire, injury or contamination of the battery compartment and surrounding area may result.

Do not put your weight on this projector.

BYou could fall or the projector could break, and injury may result.

BBe especially careful not to let young children climb onto the projector.

Disconnect the mains lead plug from the mains socket as a safety precaution before carrying out any cleaning.

BElectric shocks can result if this is not done.

Do not install the accessory wireless card to any device other than the card slot of the projector. (PT-L735NTE only)

BIf this is not observed, damage to the device may result.

Ask an Authorised Service Centre to clean inside the projector at least once a year.

BIf dust is left to build up inside the projector without being cleaned out, it can result in fire or problems with operation.

BIt is a good idea to clean the inside of the projector before the season for humid weather arrives. Ask your nearest Authorised Service Centre to clean the projector when required. Please discuss with the Authorised Service Centre regarding cleaning costs.

We are constantly making efforts to preserve and maintain a clean environment. Please take non repairable units back to your dealer or a recycling company.
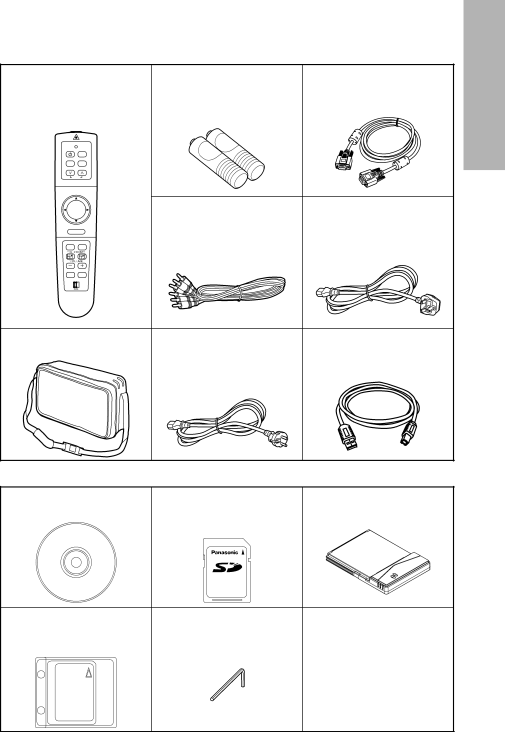
Accessories


Check that all of the accessories shown below have been included with your

Preparation

projector.


Remote control unit

AAA batteries for

RGB signal cable

(N2QAEA000015 x1)

remote control unit (x2)

[3.0 m (9´10˝),


K1HB15FA0001 x1]


POWER AUTO SETUP


RGB

LASER


VIDEO

MENU


PAGE


Video/Audio cable

Power cord for U.K.


[3.0 m (9´10˝),

(K2CT3FZ00001 x 1)


R-CLICK ENTER

K2KA2FA00001 x 1]


FREEZE SHUTTER


FUNC1

STD


Computer

Projector


Carrying bag

Power cord for

USB cable


(TPEP010 x1)

Continental Europe

(K1HB04FD0002 x 1)


(K2CM3FZ00001 x 1)


PT-L735NTE only

CD-ROM

SD memory card

Wireless Card

(TQBH9004 x1)

(8 MB,

(N5HBD0000024 x1)


RP-SD008BEZ0 x1)


Protective case for SD

Hexagon wrench

memory card

(TKLA0701 x1)

(RP-SDCC0 x1)


8-ENGLISH

ENGLISH-9

Image 5
Contents Model No. PT-L735NTE LCD Projector Commercial UsePreparation Dear Panasonic CustomerModel number PT-L735NTE / PT-L735E Important the Moulded Plug U.K. onlyPrecautions with regard to safety ContentsInsert the mains lead plug securely into the mains socket Do not handle the mains lead plug with wet handsDo not place the projector into water or let it become wet Do not place liquid containers on top of the projectorDo not put your weight on this projector AccessoriesPT-L735NTE only Use only the specified batteriesBefore use About the wireless card and SD memory card PT-L735NTE onlyDo not touch the surfaces of the lens with your bare hands About the screenLocation and function of each part Projector control panel Remote control unitPT-L735NTE only Wireless card SD memory card Projection methods Setting-upProjector position Projection distancesExample of connecting to video equipments Example of connecting to computerConnections Monitor Computer for Control use# Presspower.the Main Power switch to turn on Turning on the power$Press the Power button Turn on the power of all connected devicesTurning off the power Press the Auto Setup button RGB Input indicatorPOSITION, DOT CLOCK, Clock Phase Projector statusEnlarging the picture D.ZOOM Pausing a picture FreezeTurning off the picture and sound momentarily Shutter Mode switch Computer/Projector Wireless mouseLaser beam pointer ButtonsMenu screens On-screen menusMenu operation guide Picture Mode Adjusting the pictureReturning a setting to the factory default Bright ContrastColor TintClock Phase Adjusting the positionDOT Clock PositionOSD Position Auto SetupAspect ResizingChanging the display language Audio adjustmentOption settings Auto Power OFF Lamp PowerRGB/YPBPR BlackboardSetting up the Security function Change Text Text DisplayLogo Display Logo ClearLamp indicator Lamp indicator Temp indicatorLamp Power RemedyLamp unit replacement period Turn off the power Lamp unit replacement procedure+ Select the Lamp RUN Time by pressing the F or G buttons Press and hold the Enter button for approximately 3 secondsCleaning and maintenance Before calling for serviceBefore carrying out cleaning and maintenance, be Sure to disconnect the mains lead plug from Mains socketOptions SpecificationsRemote control unit Appendix List of compatible signals Connector pin wiringProjection dimensions calculation methods Using the Serial connector Trademark acknowledgements Dimensions