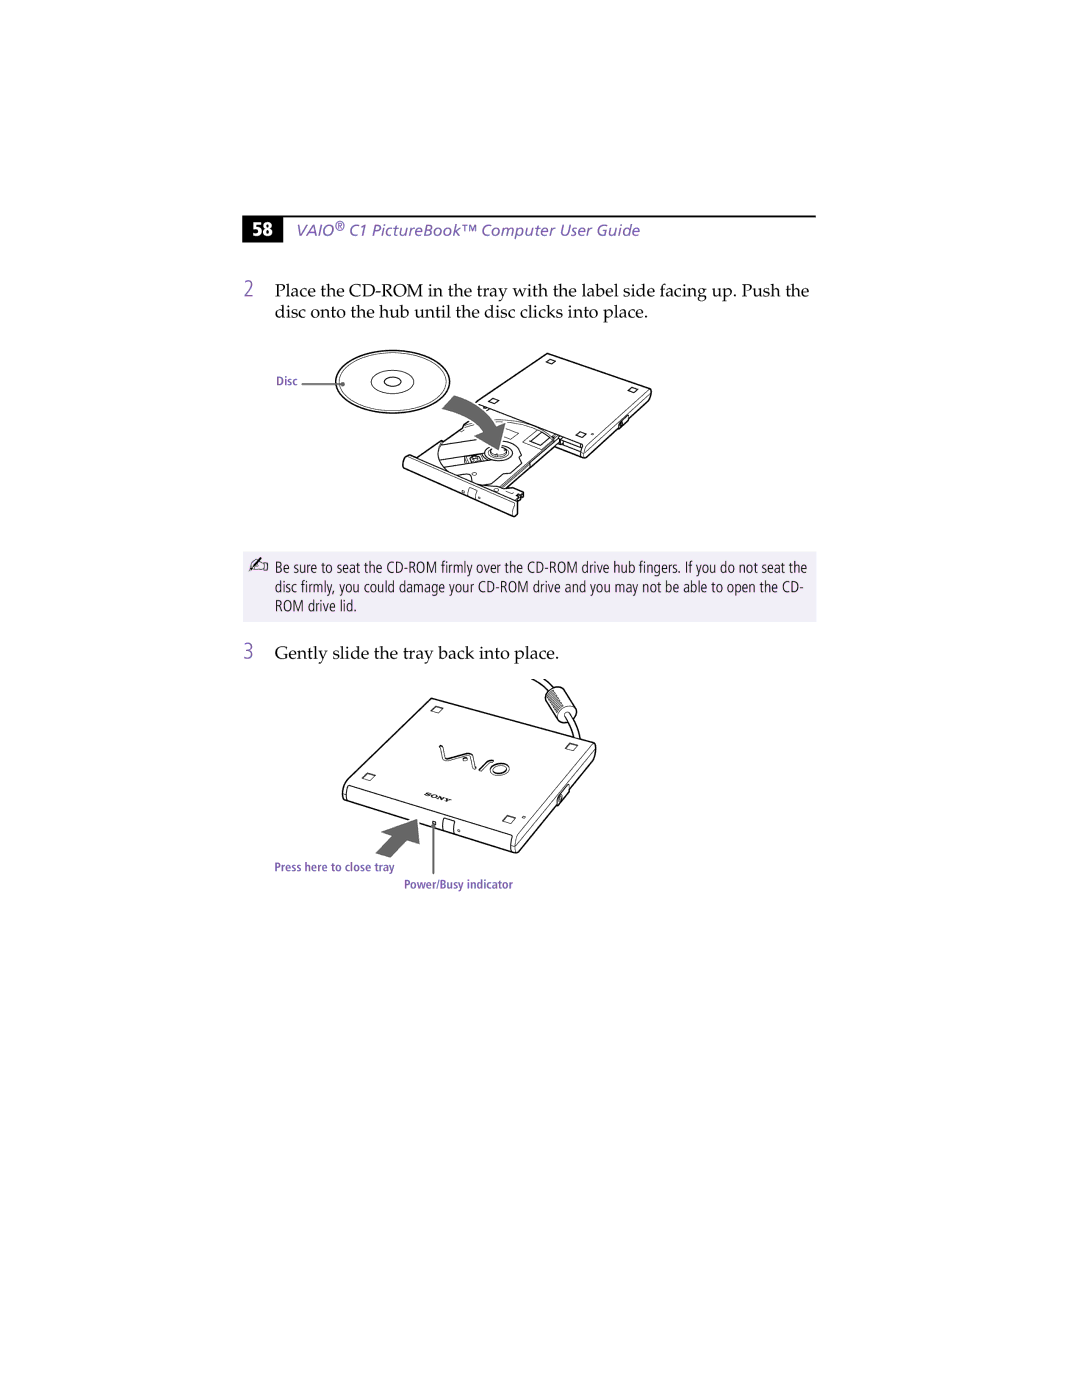
Sony PCG-C1XS manual Gently slide the tray back into place

Page 70

58

VAIO® C1 PictureBook™ Computer User Guide

2Place the CD-ROM in the tray with the label side facing up. Push the disc onto the hub until the disc clicks into place.

Disc

Be sure to seat the CD-ROM firmly over the CD-ROM drive hub fingers. If you do not seat the disc firmly, you could damage your CD-ROM drive and you may not be able to open the CD- ROM drive lid.

3Gently slide the tray back into place.

Press here to close tray

Power/Busy indicator

Image 70
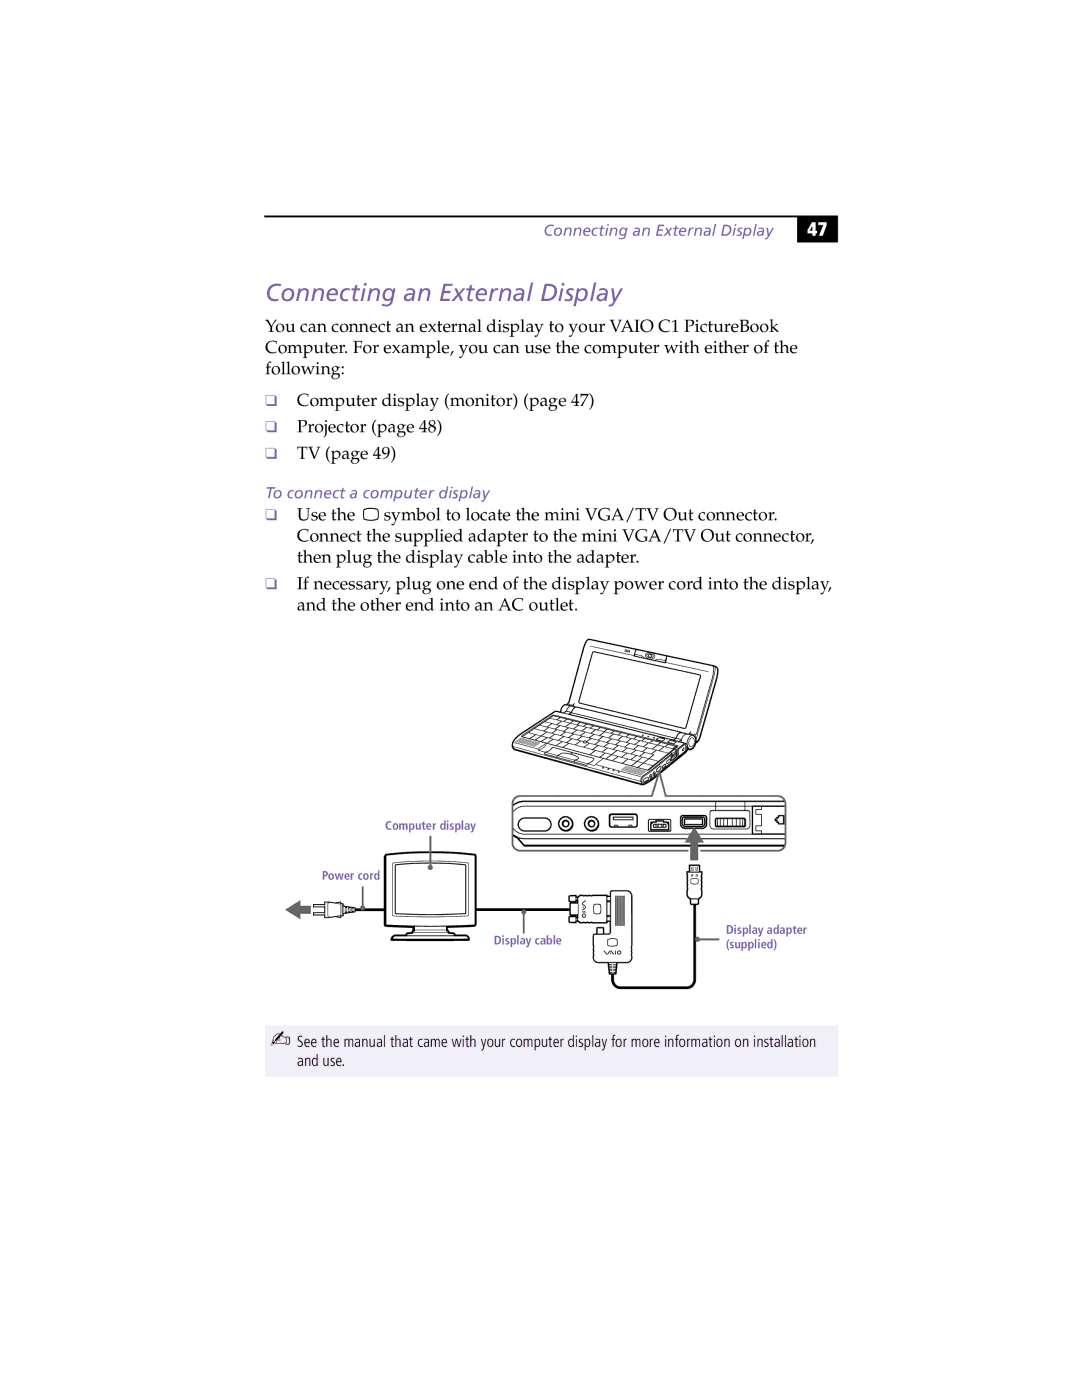
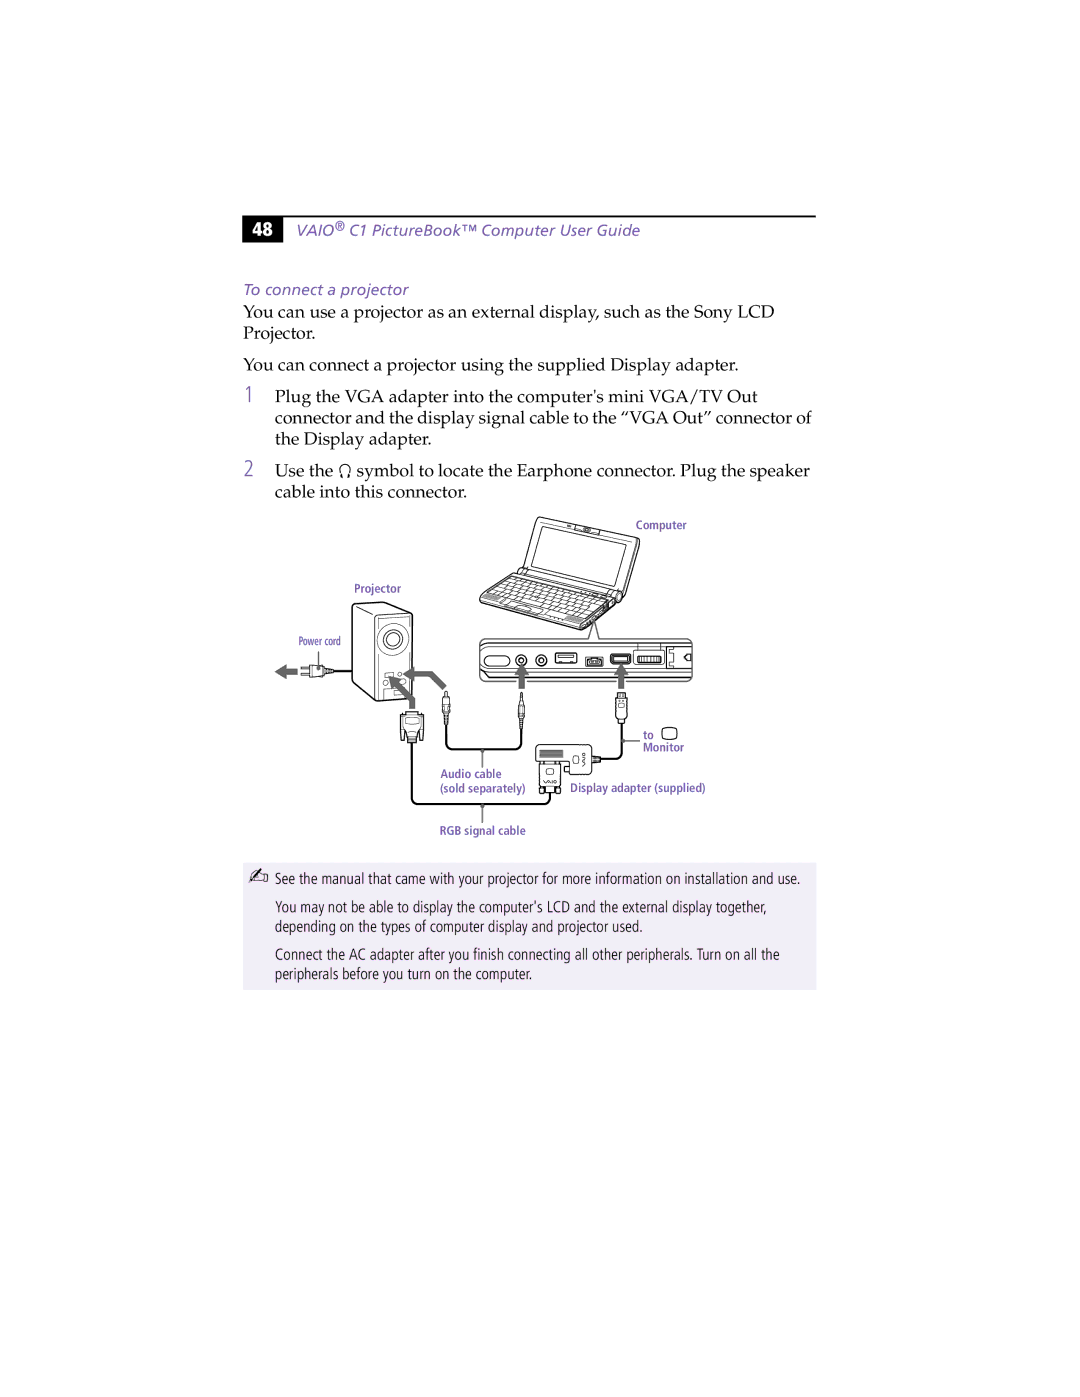
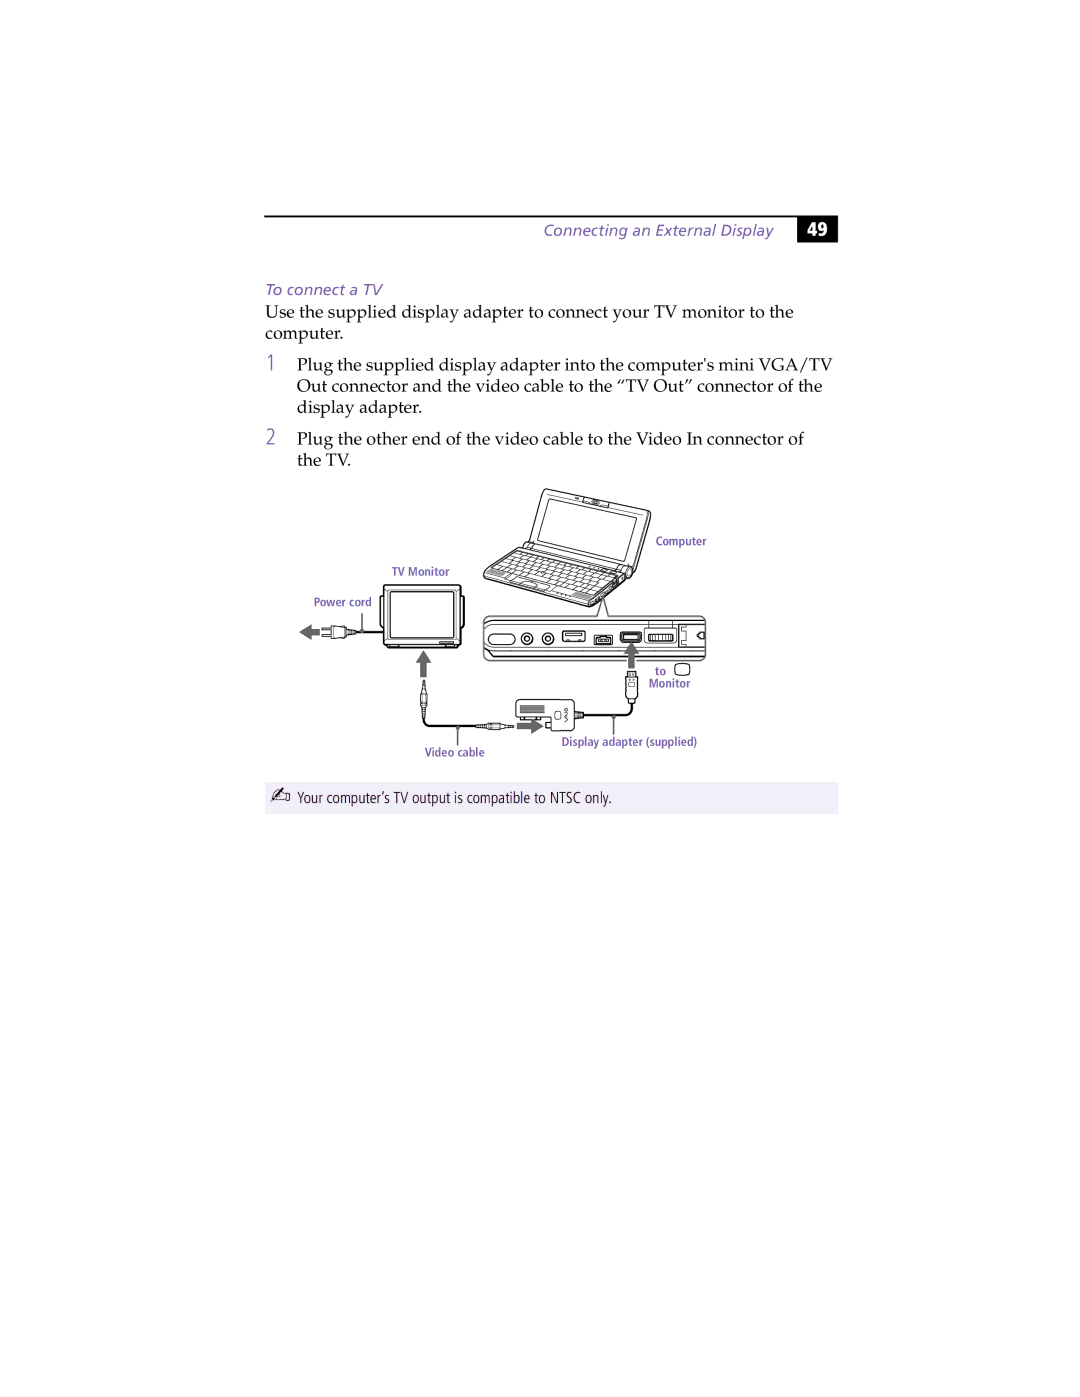
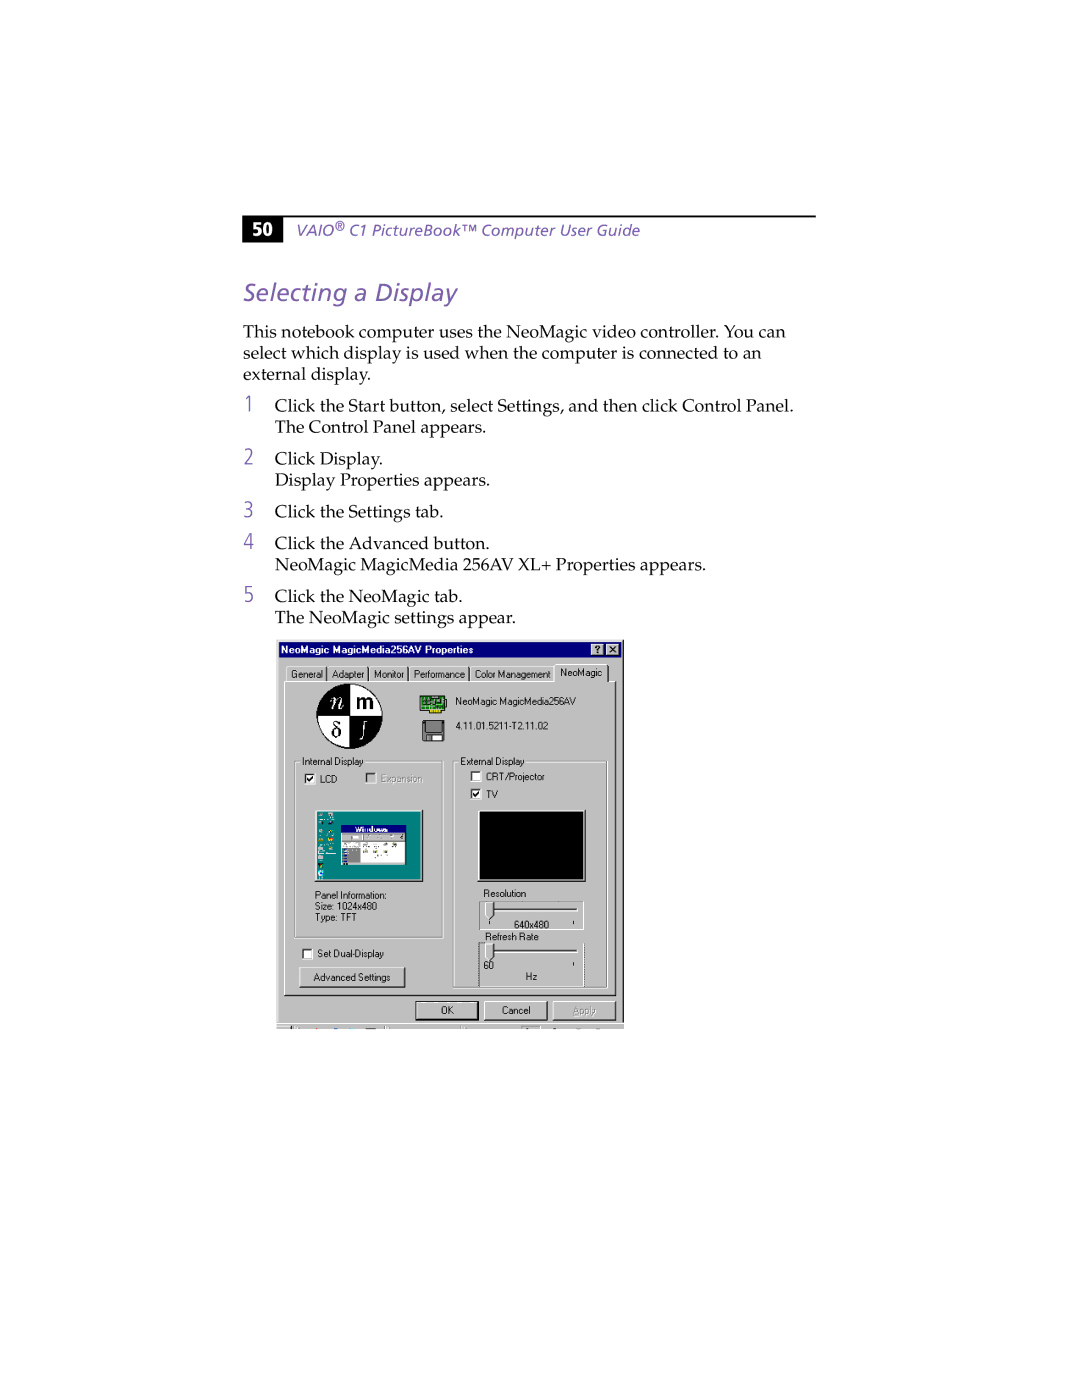
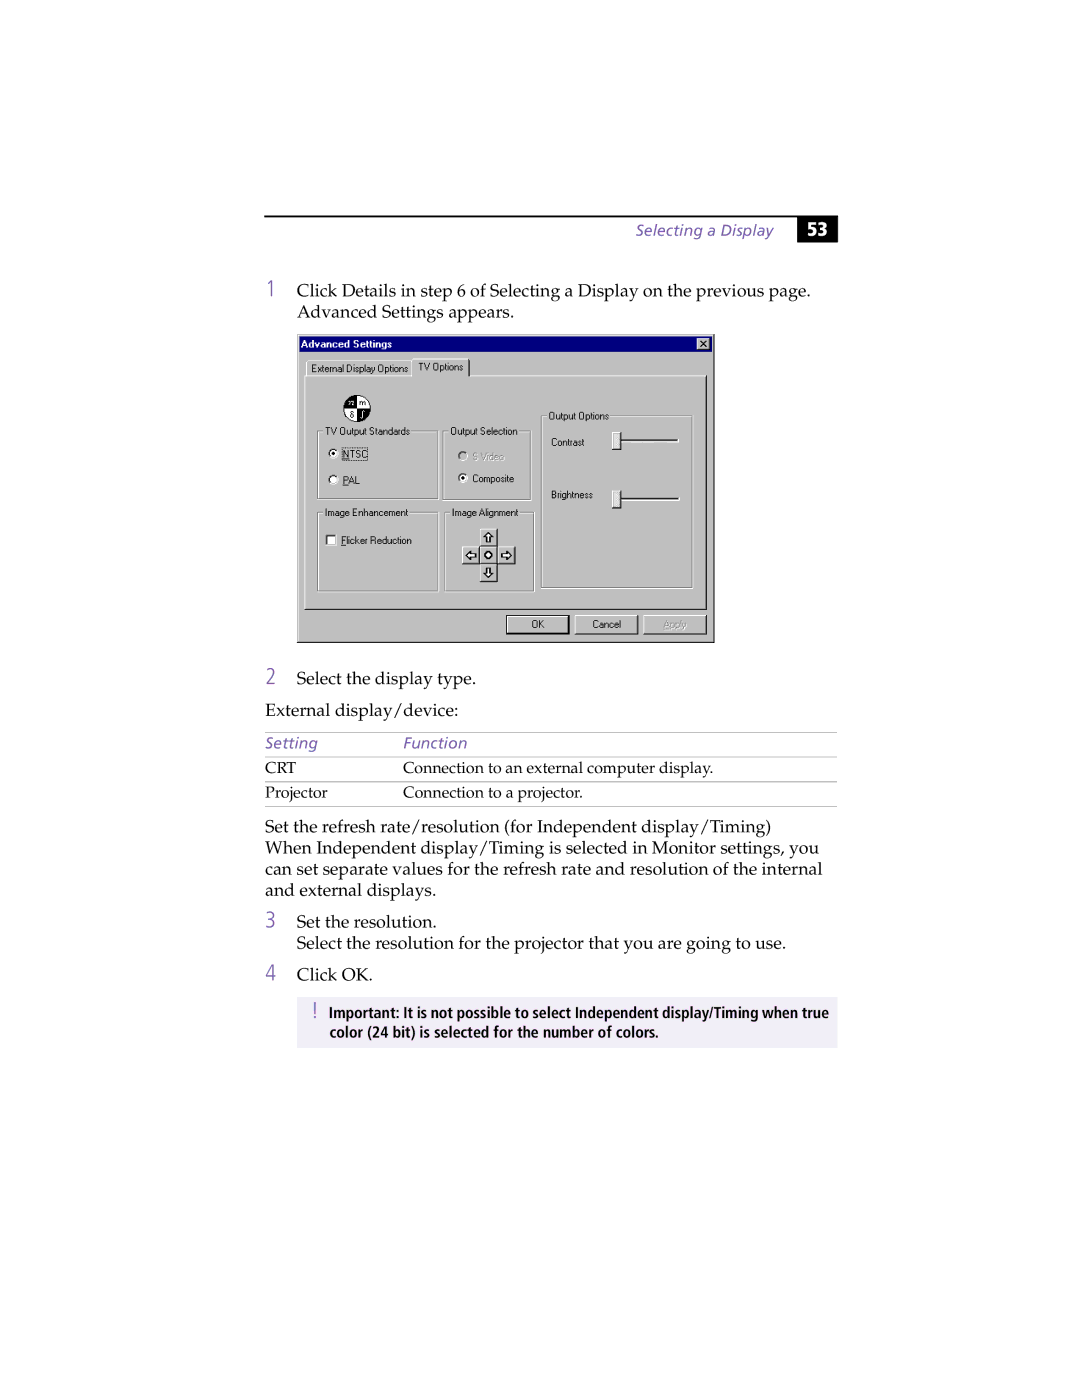
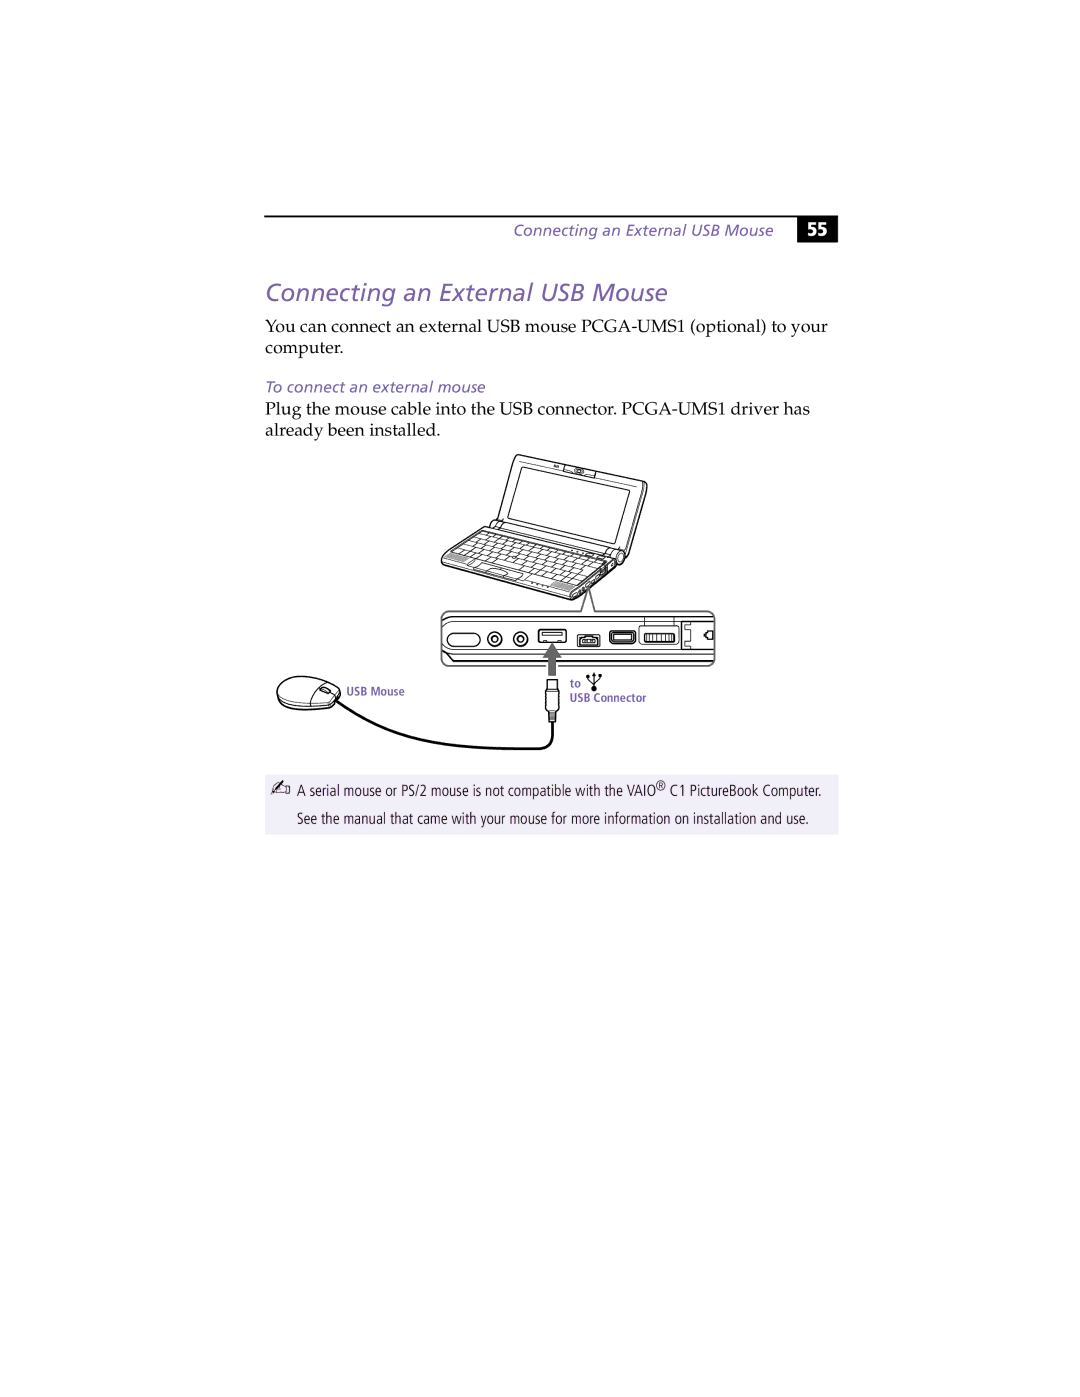
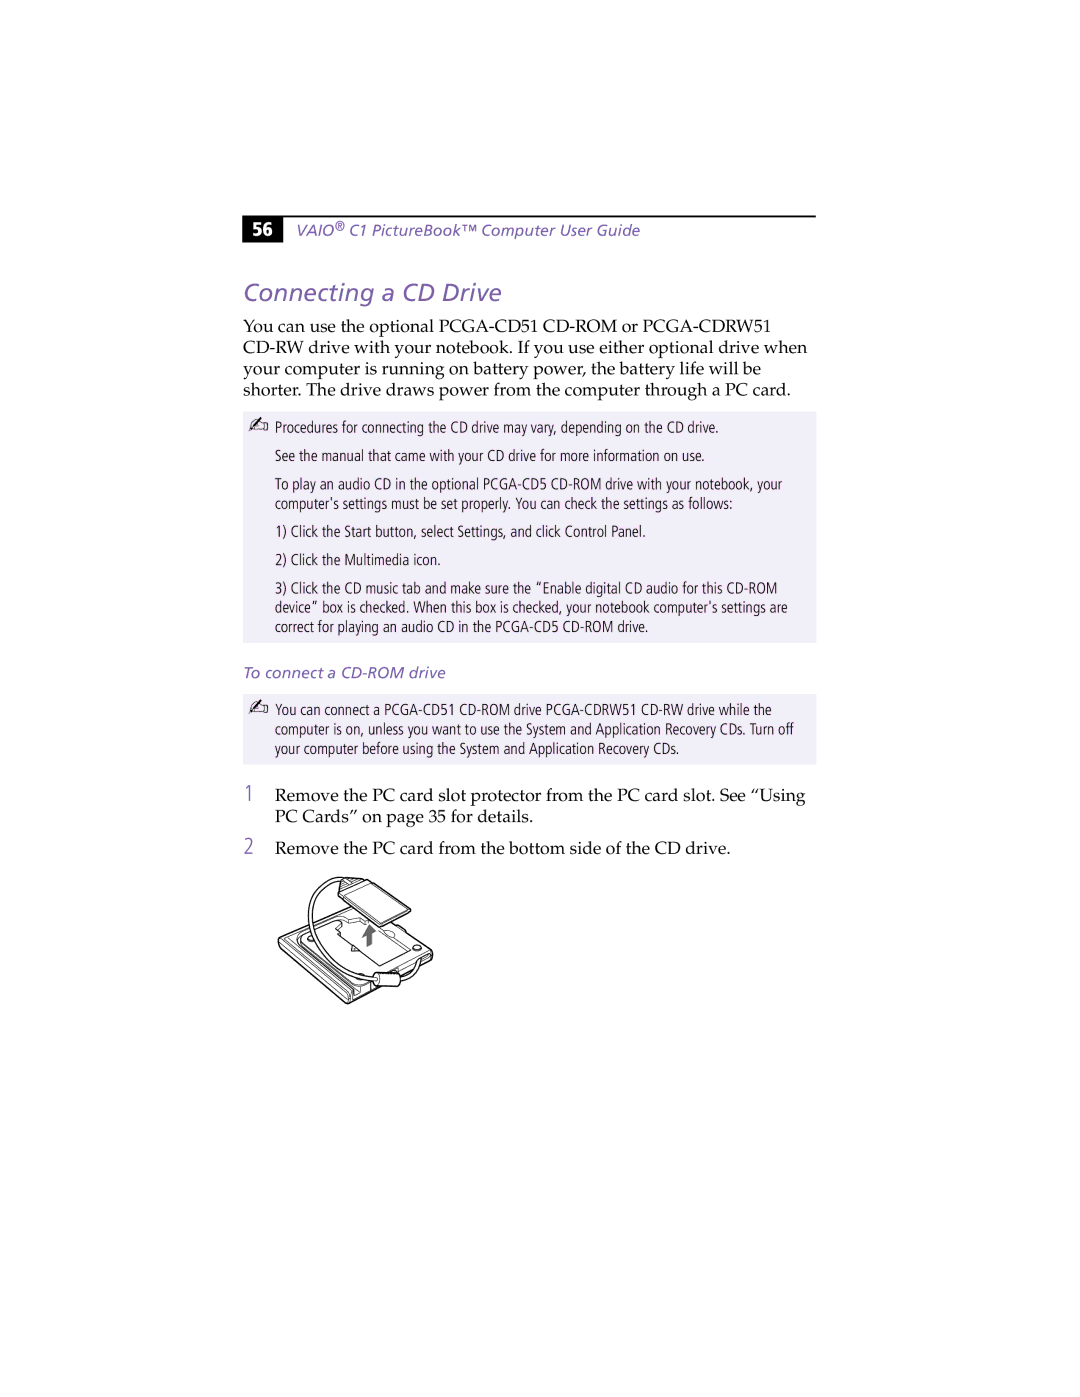
Contents Vaio C1 PictureBook Computer User Guide Page Safety Information Regulatory Information Telephone Consumer Protection Act United States Disposal of Lithium ION Battery Avis DE L’INDUSTRIE Canada Page Contents Connecting Peripheral Devices Index Xii Features WelcomeManuals Unpacking Your Vaio C1 PictureBook ComputerVaio C1 PictureBook Computer User Guide Other Recovery CDsSoftware CDs Unpacking Your Vaio C1 PictureBook ComputerPage Locating the Controls and Connectors FrontLeft Right Locating the Controls and ConnectorsBottom Connecting a Power Source Using the AC AdapterConnecting a Power Source Using Battery PowerTo insert the battery pack Battery Indicator Light Status Meaning Connecting a Power Source To insert the optional high-capacity battery pack PCGA-BP54 Displaying the PowerPanel Toolbar Conserving Battery PowerOpening the PowerPanel Conserving Battery PowerStarting Your Vaio C1 PictureBook Computer Shutting Down Your Vaio C1 PictureBook Computer Using the Windows Start ButtonShutting Down Your Vaio C1 PictureBook Computer Registering Your Computer Using the Keyboard Using the KeyboardKey Description Vaio C1 PictureBook Computer User Guide Key Description Combinations and Functions with the Windows 98 Key Combination FunctionIndicator Function IndicatorsLight Off Combinations and Functions with the Fn Key Combinations/ FeatureFunctions Using the Pointing Device Action DescriptionPointing device cover supplied Vaio Action Setup Jog Dial ControlVaio Action Setup Launcher mode Guide modeUsing the Jog Dial Control Software that does not support the Jog Dial Control Vaio Action Setup Guide modeSoftware that supports the Jog Dial Control Link Interface Internal TimerAutoAlert E-mail Notification System Vaio C1 PictureBook Computer User Guide Dialog boxUsing the built-in Motion EYE camera Using the built-in Motion EYE cameraCapturing a still image Vaio C1 PictureBook Computer User Guide Features Description To set the image quality and mode of Motion EYE cameraTo create a panoramic image Click Mode tab and click the item you want to set To connect the floppy disk drive Using the Floppy Disk DriveUsing the Floppy Disk Drive To insert a disketteTo remove the floppy disk drive To carry the floppy disk driveUsing PC Cards Using PC CardsTo insert a PC card Pull the release button, then push it down toward the slot Using PC Cards To remove a PC card Using Smart Connect Link cable not suppliedTo use infrared communication with a digital still camera Using Infrared Communication DevicesUsing Infrared Communication Devices To use infrared communication with another computerInches 1m Normal Mode Using Power Saving ModesSystem Suspend Mode System Hibernation Mode To activate System Hibernation modeConnecting Peripheral Devices Connecting a Phone Line Connecting a Phone Line Plug the other end into the wall jackTo connect a printer Connecting a PrinterTo use a printer Connecting an External Display Connecting an External DisplayTo connect a computer display RGB signal cable Connecting an External Display To connect a TV Selecting a Display Setting Equipment displayed Selecting a DisplayCRT Display Setting Function Television Display When connected to the Display Adapter Connecting an External USB Mouse Connecting an External USB MouseTo connect an external mouse Connecting a CD Drive To connect a CD-ROM driveConnecting a CD Drive To insert a CD-ROMGently slide the tray back into place Connecting an i.LINK device Connecting an i.LINK deviceTo connect a digital video camera recorder Connecting External Speakers To connect external speakersConnecting an External Microphone Connecting an External MicrophoneTo connect an external microphone Getting Help Page Troubleshooting My computer won’t startTroubleshooting My LCD does not display anythingMy computer locks up Pointer moves across the screen on its ownMy mouse doesn’t work My software program locks up or crashesMy microphone doesn’t work Troubleshooting Cannot play a CD-ROMWhen I press Fn+F3, nothing happens My floppy disk drive cannot write to a disketteMy modem does not work My modem connection is slowGame images or video images are not clear My computer does not shut downMy PC card is not working Image in the viewfinder of Smart Capture is grainyAbout the Motion EYE Camera Smart Write and Smart Label do not startImage in the view finder of Smart Capture is rough Troubleshooting Motion EYE camera does not show any images Power ManagementMessage Failed to record to DV deck appears Using the System and Application Recovery CDs Using the System Recovery CDsIf your computer does not start from the Recovery CD Using the Application Recovery CDs To use the Application Recovery CDsUsing the System and Application Recovery CDs Hard Drive PartitionSpecifications MpegSpecifications ServiceVaio C1 PictureBook Computer User Guide Index LCD Index Key Key combinations 19 Start button 15 taskbar 15
Related manuals
Manual 1 pages 25.49 Kb

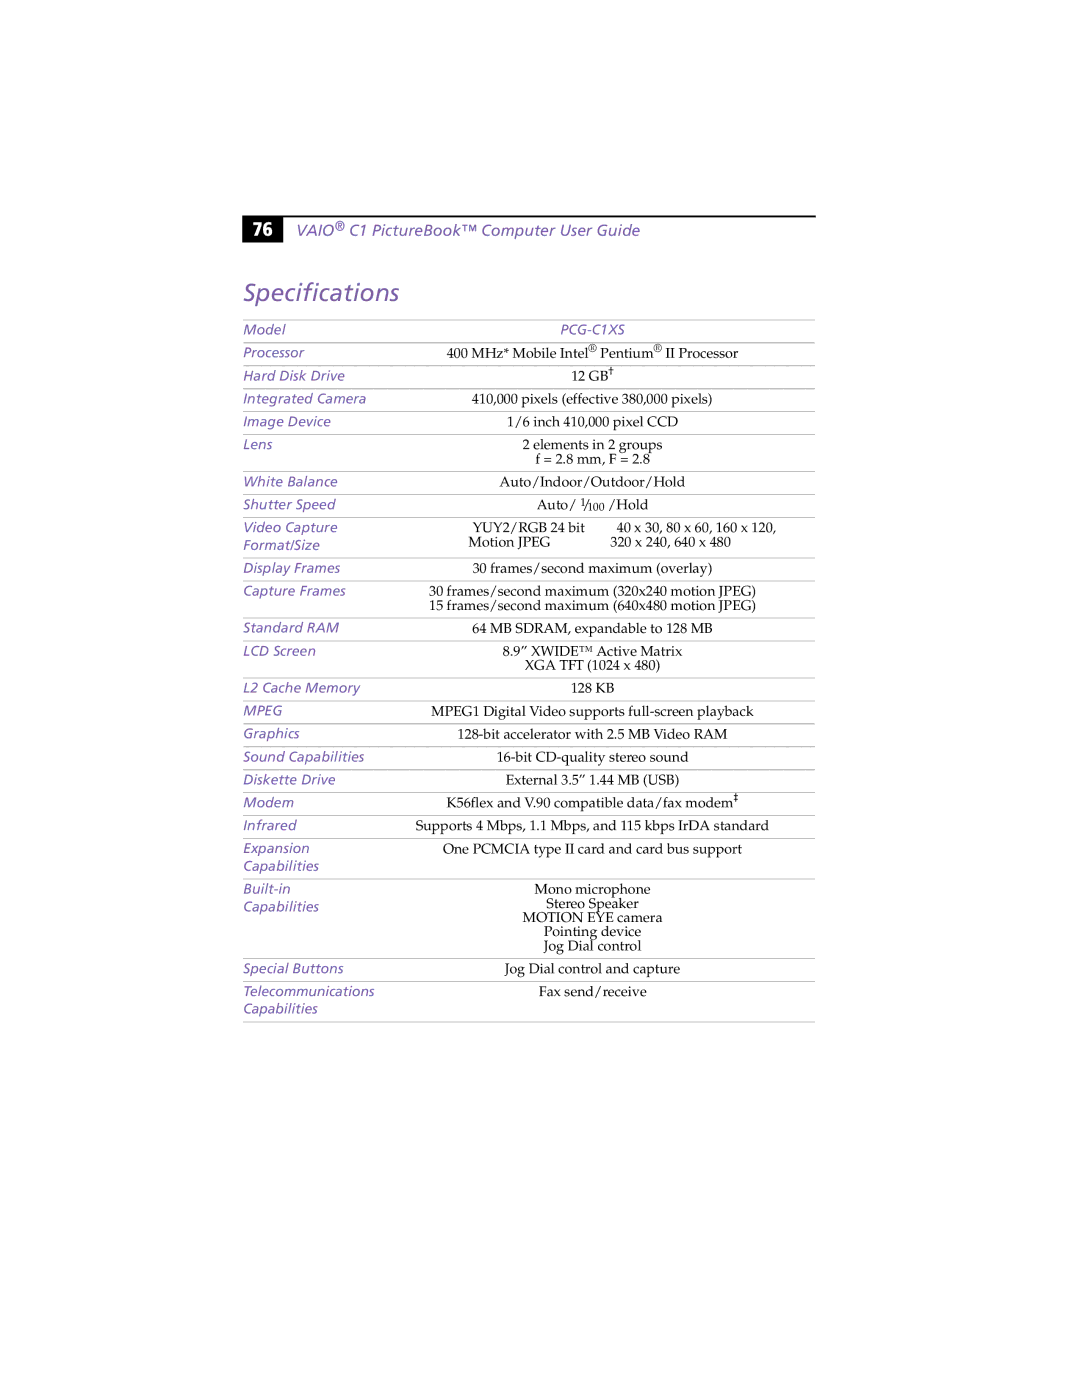
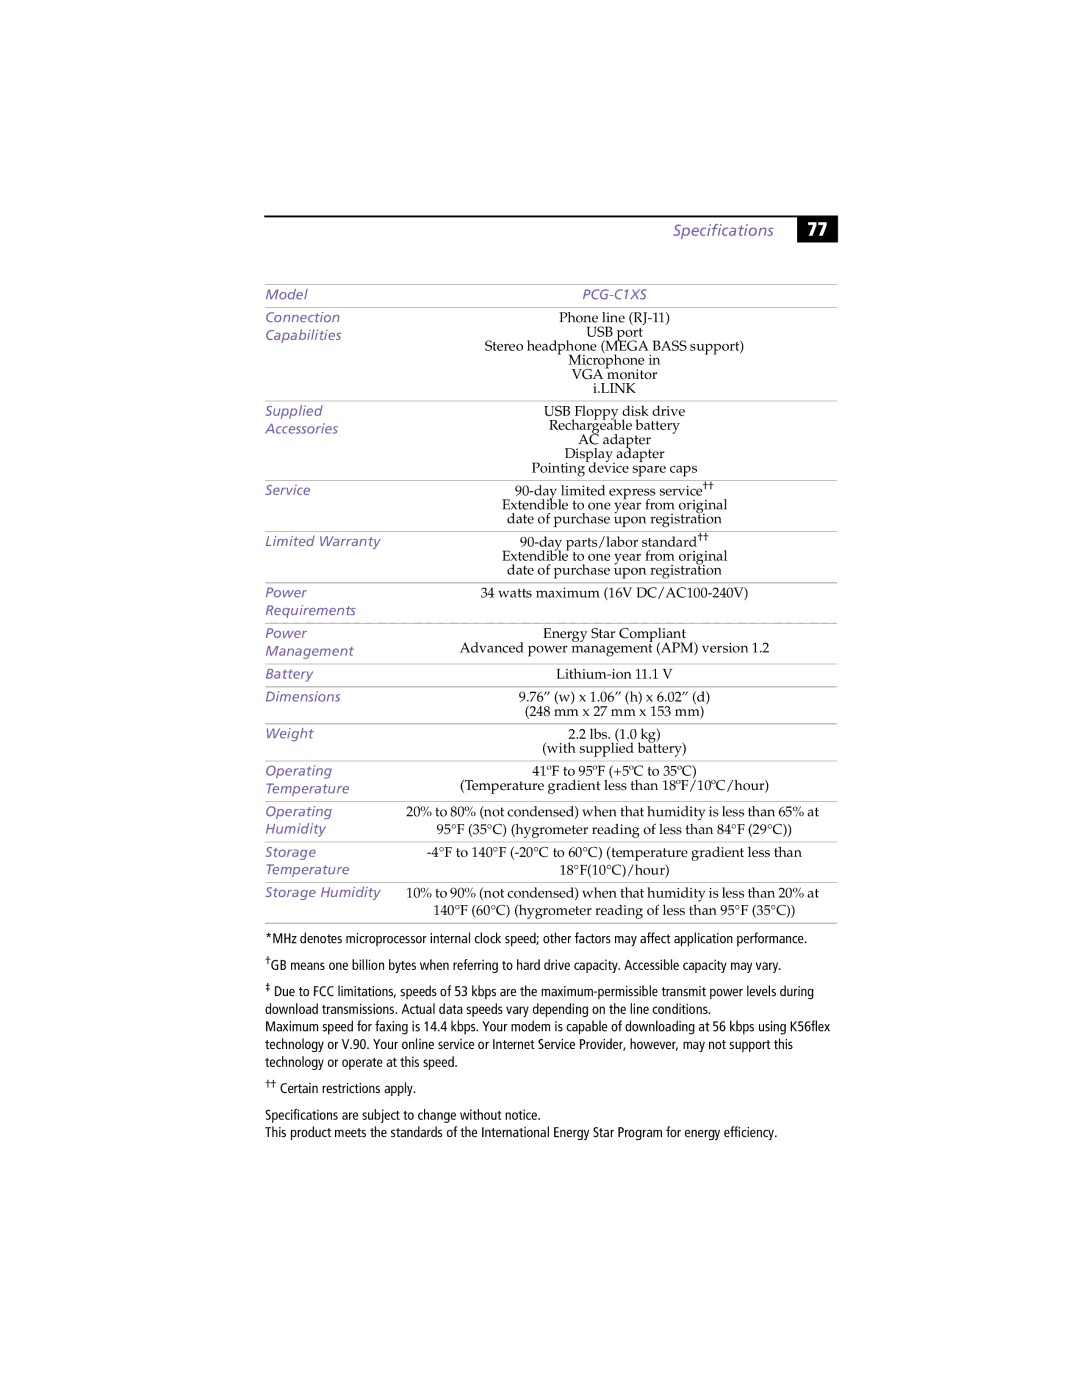
PCG-C1XS specifications

The Sony PCG-C1XS, part of the VAIO series, emerged as a notable product in the early 2000s, particularly for its innovative design and compact form factor. As a subnotebook, the PCG-C1XS was aimed at users who required portability without sacrificing performance.

One of the standout features of the PCG-C1XS was its lightweight and slim design. Weighing just over 2.5 pounds, this laptop was perfect for professionals constantly on the move. The sleek dimensions made it easy to carry while fitting snugly in a backpack or briefcase.

The display of the PCG-C1XS was another highlight, featuring a vibrant 10.4-inch TFT screen with a resolution of 1024x768 pixels. This screen provided bright, clear visuals, making it suitable for both productivity tasks and multimedia consumption. Despite its small size, the screen's quality ensured an enjoyable viewing experience.

In terms of performance, the PCG-C1XS was equipped with an Intel Pentium III processor, delivering competitive processing power for its time. With options for RAM up to 512MB, users were able to handle everyday tasks efficiently, whether it be word processing, web browsing, or even light gaming. The integrated Intel graphics chipset complemented the system's capabilities, providing sufficient graphics performance for standard applications.

Storage was handled by a 20GB hard drive, which was relatively modest but adequate for the primary use cases of portable computing during that era. Additionally, the laptop featured a CD-ROM drive, enabling users to access software and media without the need for external devices.

Connectivity options on the PCG-C1XS included USB ports, a modem for dial-up internet access, and a parallel port, reflecting the diverse requirements of users at the time. The inclusion of an integrated audio controller ensured decent sound quality for multimedia applications.

The design philosophy of the VAIO series was prominent in the PCG-C1XS, with a stylish aesthetic complemented by ergonomic keyboard design and touchpad functionality. Sony's commitment to build quality was evident, as the laptop featured a durable casing that could withstand regular travel stress.

In summary, the Sony PCG-C1XS was a trailblazing device in the realm of portable computing. With its blend of lightweight design, functional performance, and stylish aesthetics, it catered to users who valued convenience without compromising on usability. Its significant contributions to the subnotebook category reaffirm Sony's innovation in personal computing during the early 2000s.