Samsung 510MP manual Connecting to other devices, Connecting AV Devices

Page 14

Connecting to other devices

AV input devices like DVDs, VCRs or Camcorders as well as your computer may be connected to the monitor. For detailed information on connecting AV input devices, refer to User Controls under Adjusting Your Monitor.

1. Connecting AV Devices

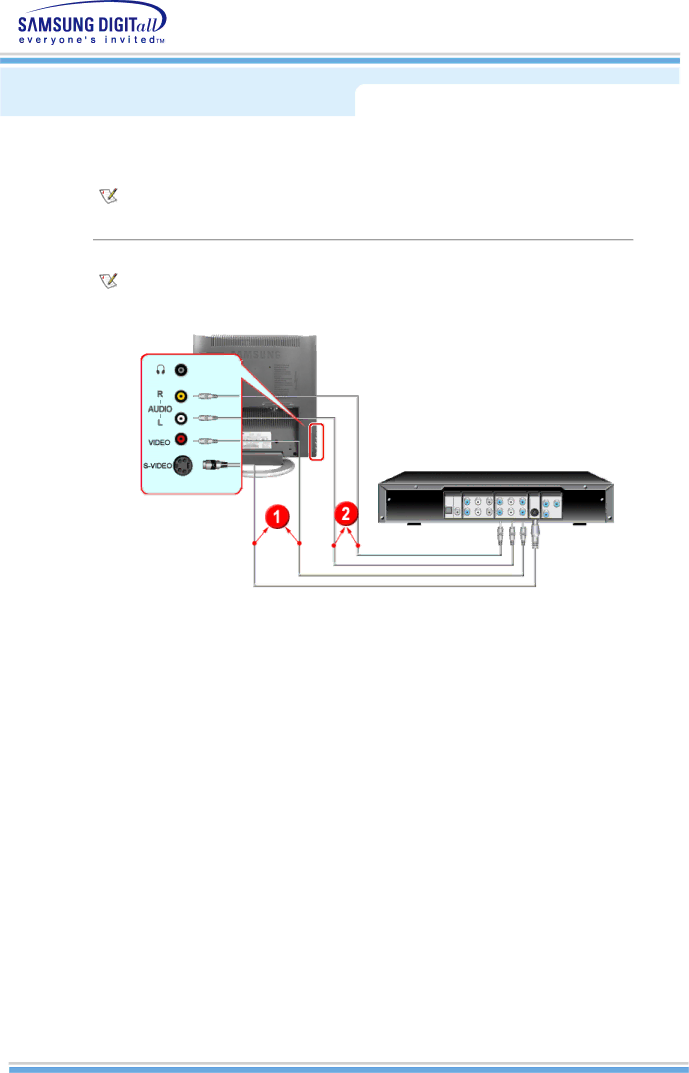
The monitor has AV connection terminals to connect AV input devices like DVDs, VCRs or Camcorders. You may enjoy AV signals as long as the monitor is turned on.

1.AV input devices like DVDs, VCRs or Camcorders are connected to the S-Video (V1) or Video (V2) terminal of the monitor using the S-VHS or RCA cable.

S-VHS or RCA cable is optional.

2.Connect the Audio (L) and Audio (R) terminals of a DVD, VCR or Camcorders to the monitor's L and R audio input terminals using audio cables.

3.Select Video or S-Video that is connected to a DVD, VCR or Camcorders using the Source button on the monitor's front.

4.Then, start the DVD, VCR or Camcorders with a DVD disc or tape inserted.

Image 14
Contents SyncMaster 510MP / 710MP Index Notational Use only a properly grounded plug and receptacle PowerDo not use a damaged or loose plug Place the monitor on a flat and stable surface InstallationDo not drop the monitor when moving it Set down the monitor carefullyCleaning Do not spray water or detergent directly on the monitorOhther Do not cover the vents on the monitor cabinetNever insert anything metallic into the monitor openings Be careful when adjusting the stand angleDo not use or store inflammable substances near the monitor Unpacking Front Source buttonRear Power portSignal port PC soundStereo connection terminal AV Connection TerminalReplacing Batteries Remote ControlButton Names Connecting to a Computer Connecting to a ComputerConnecting to other devices Connecting AV DevicesConnecting TV Connecting to a MacintoshConnecting Headphones Click Windows ME Driver Installing the Monitor DriverWindows ME Windows XP/2000 Click Windows XP/2000 DriverMicrosoft Windows XP Operating System Installing the Monitor Driver Installing the Monitor Driver Microsoft Windows Millennium Operating System How to install Click Start , Setting , Control PanelMicrosoft Windows 2000 Operating System Microsoft Windows NT 4.0 Operating System Linux Operating SystemInstalling a Vesa base Reclining MonitorFolding Base Installing a Vesa base CH button User ControlsMonitor Buttons VOL buttonRemote Control Buttons Exits from or closes the menu screen OSD Lock/Unlock Auto AdjustmentPC Screen MagicBright TV Screen Channel, Volume Volume ChannelOn-Screen Display PC ScreenTV Screen Video Screen OSD Control MagicBrightVideo mode not supported Check before calling for serviceSelf-Test Feature Check Display Adapter Driver Maintenance and CleaningSymptoms and Recommended Actions Problems related to Screen Problems and SolutionsProblems related to Installation Problems SolutionsProblems Problems related to AudioProblems related to Remote Control Items to checkQuestion AnswerGeneral Specifications Dot Acceptable Environmental considerationsPlug and Play Capability SyncMaster 710MP General Specifications 110 Vac PowerSaverState Normal Operation Power saving mode Power Switch off Countries Display ModeSync Polarity Preset Timing Modes Service Center United KingdomChile Sonda S.A Terms User Information RegulatoryFCC Information User Instructions IC Compliance NoticePCT Notice MPR II ComplianceEuropean Notice Europe only Why do we have environmentally-labelled monitors? What does labelling involve?Cadmium Environmental RequirementsLead MercuryWhy do we have environmentally labelled computers? TCO DevelopmentEnvironmental requirements Flame retardants Emissions ErgonomicsEnergy EcologyTCO03 Recycling Information TCO03 applied model only ElkretsenNatural Color How to install the Natural Color softwareHow to delete the Natural Color software program Natural Color Software ProgramSyncMaster 710MP For Better DisplaySyncMaster 510MP SyncMaster 701MPAuthority