|
| Maintenance | 23 |
|
|
|
|
|
|
|
| ||
|
|
|
|
|
|
|
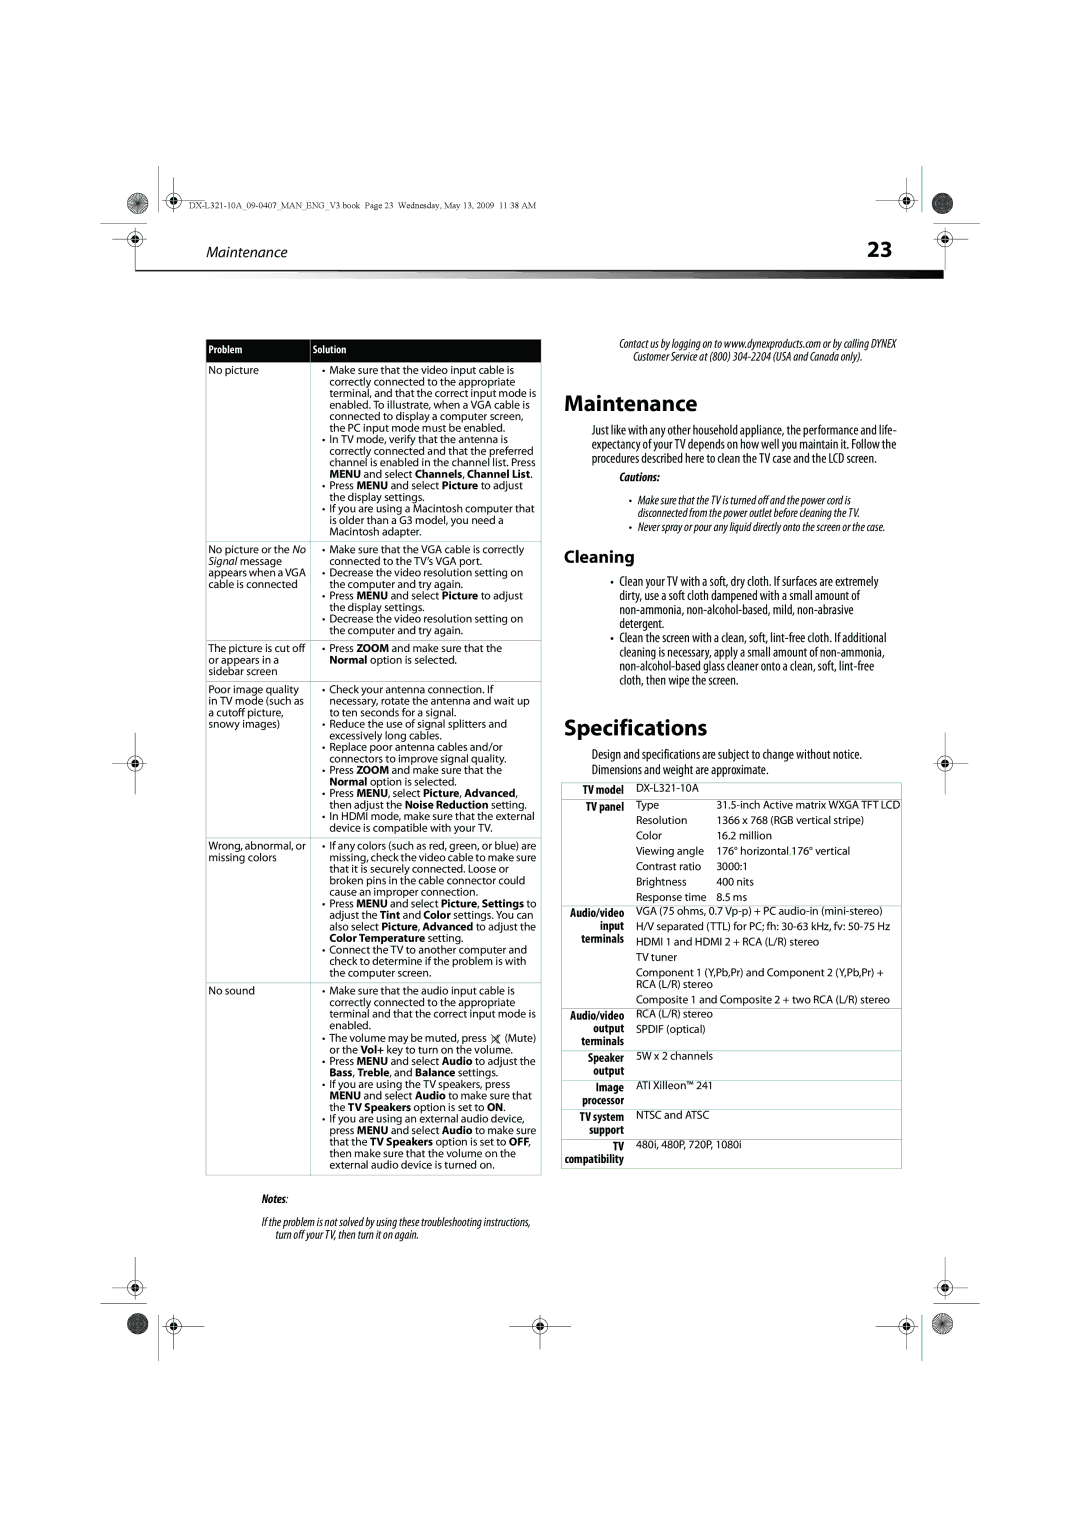
Problem | Solution |
|
|
No picture | • Make sure that the video input cable is |
| correctly connected to the appropriate |
| terminal, and that the correct input mode is |
| enabled. To illustrate, when a VGA cable is |
| connected to display a computer screen, |
| the PC input mode must be enabled. |
| • In TV mode, verify that the antenna is |
| correctly connected and that the preferred |
| channel is enabled in the channel list. Press |
| MENU and select Channels, Channel List. |
| • Press MENU and select Picture to adjust |
| the display settings. |
| • If you are using a Macintosh computer that |
| is older than a G3 model, you need a |
| Macintosh adapter. |
|
|
No picture or the No | • Make sure that the VGA cable is correctly |
Signal message | connected to the TV’s VGA port. |
appears when a VGA | • Decrease the video resolution setting on |
cable is connected | the computer and try again. |
| • Press MENU and select Picture to adjust |
| the display settings. |
| • Decrease the video resolution setting on |
| the computer and try again. |
|
|
The picture is cut off | • Press ZOOM and make sure that the |
or appears in a | Normal option is selected. |
sidebar screen |
|
|
|
Poor image quality | • Check your antenna connection. If |
in TV mode (such as | necessary, rotate the antenna and wait up |
a cutoff picture, | to ten seconds for a signal. |
snowy images) | • Reduce the use of signal splitters and |
| excessively long cables. |
| • Replace poor antenna cables and/or |
| connectors to improve signal quality. |
| • Press ZOOM and make sure that the |
| Normal option is selected. |
| • Press MENU, select Picture, Advanced, |
| then adjust the Noise Reduction setting. |
| • In HDMI mode, make sure that the external |
| device is compatible with your TV. |
|
|
Wrong, abnormal, or | • If any colors (such as red, green, or blue) are |
missing colors | missing, check the video cable to make sure |
| that it is securely connected. Loose or |
| broken pins in the cable connector could |
| cause an improper connection. |
| • Press MENU and select Picture, Settings to |
| adjust the Tint and Color settings. You can |
| also select Picture, Advanced to adjust the |
| Color Temperature setting. |
| • Connect the TV to another computer and |
| check to determine if the problem is with |
| the computer screen. |
|
|
No sound | • Make sure that the audio input cable is |
| correctly connected to the appropriate |
| terminal and that the correct input mode is |
| enabled. |
| • The volume may be muted, press (Mute) |
| or the Vol+ key to turn on the volume. |
| • Press MENU and select Audio to adjust the |
| Bass, Treble, and Balance settings. |
| • If you are using the TV speakers, press |
| MENU and select Audio to make sure that |
| the TV Speakers option is set to ON. |
| • If you are using an external audio device, |
| press MENU and select Audio to make sure |
| that the TV Speakers option is set to OFF, |
| then make sure that the volume on the |
| external audio device is turned on. |
|
|
Contact us by logging on to www.dynexproducts.com or by calling DYNEX Customer Service at (800)
Maintenance
Just like with any other household appliance, the performance and life- expectancy of your TV depends on how well you maintain it. Follow the procedures described here to clean the TV case and the LCD screen.
Cautions:
•Make sure that the TV is turned off and the power cord is disconnected from the power outlet before cleaning the TV.
•Never spray or pour any liquid directly onto the screen or the case.
Cleaning
•Clean your TV with a soft, dry cloth. If surfaces are extremely dirty, use a soft cloth dampened with a small amount of
•Clean the screen with a clean, soft,
Specifications
Design and specifications are subject to change without notice. Dimensions and weight are approximate.
TV model |
| |
TV panel | Type | |
| Resolution | 1366 x 768 (RGB vertical stripe) |
| Color | 16.2 million |
| Viewing angle | 176° horizontal,176° vertical |
| Contrast ratio | 3000:1 |
| Brightness | 400 nits |
| Response time | 8.5 ms |
|
| |
Audio/video | VGA (75 ohms, 0.7 | |
input | H/V separated (TTL) for PC; fh: | |
terminals | HDMI 1 and HDMI 2 + RCA (L/R) stereo | |
| TV tuner |
|
| Component 1 (Y,Pb,Pr) and Component 2 (Y,Pb,Pr) + | |
| RCA (L/R) stereo |
|
| Composite 1 and Composite 2 + two RCA (L/R) stereo | |
|
|
|
Audio/video | RCA (L/R) stereo |
|
output | SPDIF (optical) |
|
terminals |
|
|
Speaker | 5W x 2 channels |
|
output |
|
|
Image | ATI Xilleon™ 241 |
|
processor |
|
|
|
|
|
TV system | NTSC and ATSC |
|
support |
|
|
TV | 480i, 480P, 720P, 1080i | |
compatibility
Notes:
If the problem is not solved by using these troubleshooting instructions, turn off your TV, then turn it on again.
