Speco Technologies 4HD manual Operation, Addition of sites

Page 80

10-6. Operation

10-6-1. Addition, Delete, and modify of DVR sites

10-6-1-1. Addition of sites
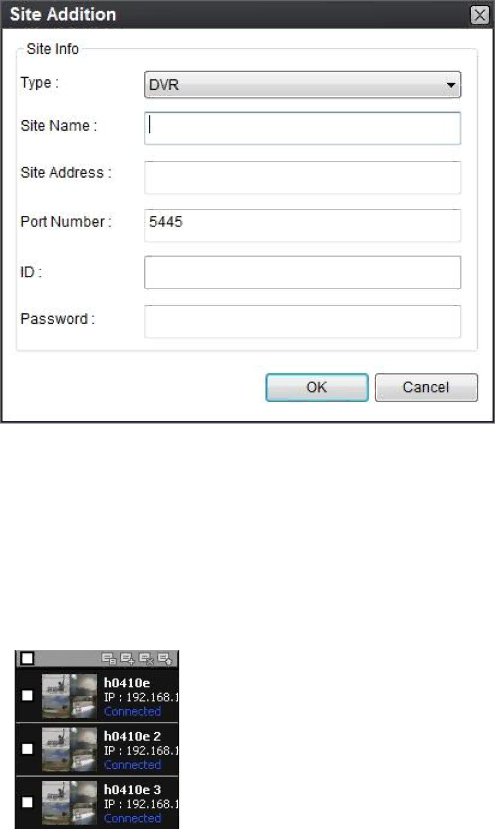
1. Click SITE ADDITION button. And then the following window displays.

oType : Choose the product type

oSite Name: Input a name that properly describes a site.

oIP Address: Input IP address (Public IP address of a router that DVR is connected.) or Domain name that is registered at www.ddnscenter.com

oPort No.: Input port number of DVR.

oPassword: Input network password of DVR.

oChannels: Select the channels number of DVR.

2.Click OK button. And then the registered site is added on the directory window.

80

Image 80
Contents Channel HDcctv Digital Video Recorder Model DVR4HDSafety Precautions These Precautions Must Be Followed For Safety Reasons Product Components Basic Function of the Mouse Page Specification SpecificationSpecifications are subject to change without notice Table of Contents 10-2-1 Name and Function Front PanelSelect Connection VideoVGA RSVSetting Up the DVR Setup Main Screen1. Setup Menu Tree Page Setup Display Mode Setup Recording ModePage 2. Schedule Recording Setup Screen Recording SchedulesSetup Device Mode Alarm OUTAlarm-Out PTZ SetupMotion Zone Setup 3. PTZ Control Setup ScreenSetup Storage Mode 4. Motion Zone Selection ScreenA.R.T 1. Menu Items in Storage Setup Screen DescriptionDisk Info Setup System Mode YYYY/MM/DD MM-DD-YYYY DD-MM-YYYYConnection Period 1~24 SavingSend Mail Setup Security Mode Password CheckSetup, PlaybackPB, PTZ, Record OFFR/OFF, and Network User Password ADMIN, NETWORK, USER1, USER2, USER3Web Sever Port number Setup Network ModePort number Default Network Access beyond Router Web Viewer Network Access Beyond RouterPorts Network Types StaticDhcp DdnsSetup Config Mode 1. Config SetupFollow settings such as Language, DVR ID, Security User LoadSaving Setup Setup -QUICK Setup Mode1. Status Indicator Icons in Live Screen Live, Search, and PlaybackLive Viewing Screen Icon DescriptionSearch Screen ArchTime-Line Search 2. Time-Line SearchEvent Search 3. Event Search ScreenGo To First Time Go To Last TimeGo To Specific Time Log SearchPLAY/PAUSE Play mode1. Button Functions in Play Mode PTZ Control 2. Description of RS-485 Port AutoscanPTZ Back Up Still Image Backup onto USB Flash DriveVideo Backup onto USB Flash Drive Playback of Backup Video Transferring Still Images or Video from the Archive List1. HD Player Upgrading Firmware PC Requirements Network Access Using the Single-Site Network ViewerInstalling the Network Software Live Monitoring Mode and Functions Display Mode SetupDate & Time CONNECT/DISCONNECTImage Capture of Live Screen Remote Search Mode and Functions Bi-Directional AudioDisconnect LiveButton Display Mode MarkMark OUT CalendarBackup of Video in the Remote DVR PC System Configuration Setting GeneralSetting Site Setting EventSetting Record Network Access Using the Multi-Sites Network Viewer Live Window Button DescriptionSite Management Connect Search and Playback Window Main control panel Event List Setup Miscellaneous Page Page Page Remote Setup General Settings Channel-Specific SettingsVideo Image Adjustment Channel DesignationCommon to All Channels Page Camera Channel Designation Page Page Setting the System Clock SetPage Setting the Send E-Mail Page Page Network Type Ntsc PAL Operation Addition of sitesDelete of Sites Modify of SitesConnect Disconnect Page Page Playback of Recorded Video on Local PC Playback of Recorded Video on Remote DVR Page BACKUP. And then the window appears as below Page Network Access Using the 3G App Viewer