Pelco DX9200HDDI installation manual Unallocated Space Shortcut Menu

Page 49

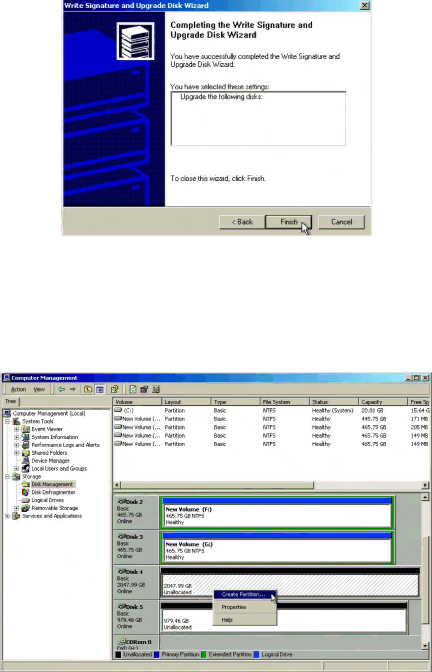
k.Click Next. The Completing the Write Signature and Upgrade Disk Wizard opens.

Figure 52. Completing the Write Signature and Upgrade Disk Wizard

l.Click Finish. The new disks are displayed in the Computer Management window.

m.Verify that the new disks are labeled Basic.

3.To create a partition, do the following:

a.Right-click in the Unallocated Space block. A shortcut menu opens.

Figure 53. Unallocated Space Shortcut Menu

C2635M (1/07)

49

Image 49
Contents DX8100-ISCI Scsi Page Contents List of Illustrations C2635M 1/07 List of Tables Introduction Parts ListTools Needed Other DX8100 Optional AccessoriesGetting Ready Installing the DX8100-ISCI Scsi CardOpening the DX8100 Chassis Preparing the DX8100 for Scsi Card InstallationCPU Understanding the DX8100 Component LayoutMoving the Main Capture Card to Slot Moving Main Capture Card Installing the DX8100 Scsi CardReassembling the Unit Installing the Hard Drives Setting Up the DX9200HDDICtrl Configuring the DX9200HDDIConfiguring a Single RAID Level 5 Array Specifying the Number of Hard Drives in the Array Single RAID Level 5 Array Initialization Status Description Configuring a Single RAID Level 5 Array with HOT Spare C2635M 1/07 Configuring TWO RAID Level 5 Arrays C2635M 1/07 C2635M 1/07 C2635M 1/07 Configuring TWO RAID Level 5 Arrays with HOT Spare C2635M 1/07 C2635M 1/07 C2635M 1/07 Deleting ONE Array Deleting ArraysC2635M 1/07 Deleting TWO Arrays C2635M 1/07 DX8100 Connecting the DX8100 to the DX9200HDDIConfiguration Instructions for Storage Arrays UP to 2.0 TB Configuring the DX8100 to Access the DX9200HDDIMy Computer Quick Menu Computer Management window opens Select Disk to Write Signature Dialog Box C2635M 1/07 Create Partition Wizard Specify Partition Size Dialog Box Click Next. The Assign Drive Letter or Path dialog box opens Click Finish. The new drive appears in the device list Opening Drive Options Menu Initializing Drive Allocation My Computer Quick Menu Configuration Instructions for Storage Arrays Above 2.0 TBWrite Signature and Upgrade Disk Wizard Select Disks to Upgrade Wizard Dialog Box Unallocated Space Shortcut Menu Specify Partition Size Dialog Box Click Next. The Assign Drive Letter or Path dialog box opens Click Finish. The new drive appears in the device list C2635M 1/07 Initializing Drive Allocation Product Warranty and Return Information ISO9001
Related manuals
Manual 20 pages 10.68 Kb