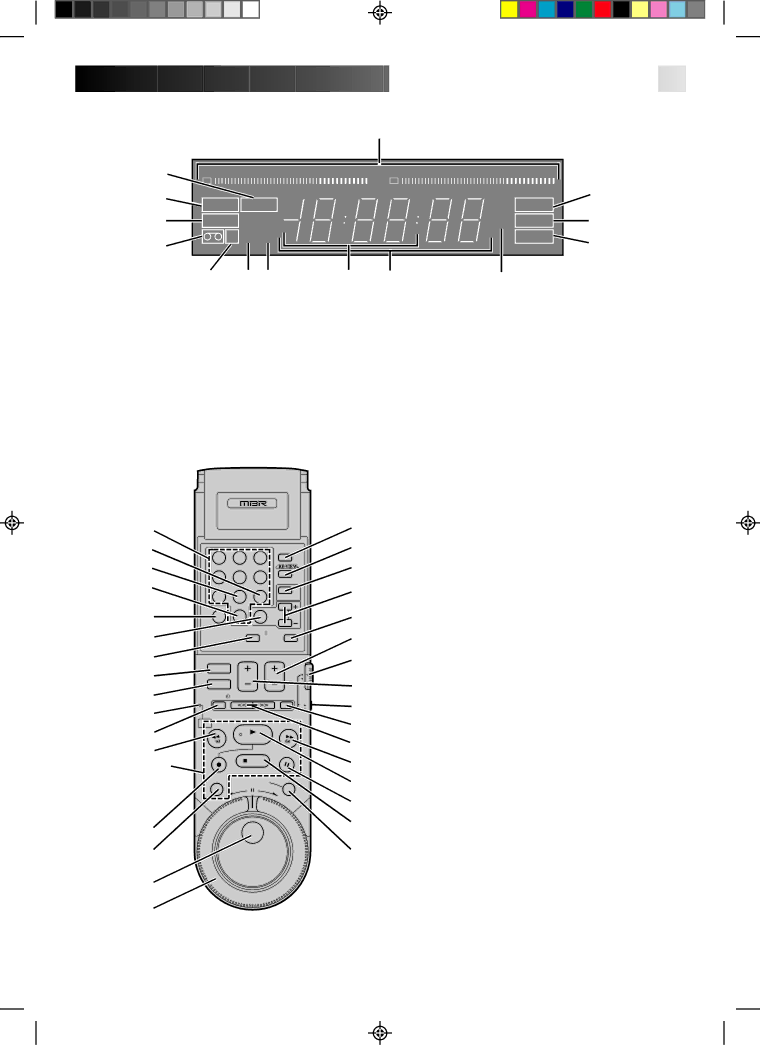
JVC HR-S7300U manual Remote Control Provided

Page 65

FRONT DISPLAY PANEL

65

1

2

dB –20 15

10 8 6

4

2 0

2

4

6

+8

dB –20 15 10 8 6

4 2 0 2

4 6 +8


L


R


$

3

I T R

TIMER


ST

R E C

4

VIDEO SP AM


SAP

PLAY

#

5

M EP PM


H


M

S

PAUSE

@


6

7 8


9


0

!


1 Audio Level Meter (pg. 37)


9 Clock Display (pg. 8)


2 Timer Mode Indicator (pg. 41)


0 Channel Display [“AU” for AUX mode] (pg. 24)

3 Instant Timer Recording Indicator (pg. 39)


Counter Display (pg. 23)


4 Video Mode Indicator (pg. 35)


! Multi-Channel TV Sound Indicators (pg. 36)

5 “Cassette Loaded” Mark


@ Pause Mode Indicator (pg. 24)


6 Counter Memory Mark (pg. 32)


# Play Mode Indicator (pg. 23)


7 Tape Speed Indicators (pg. 24)


$ Recording Mode Indicator (pg. 24)

8 AM/PM Indicators (pg. 8)


REMOTE CONTROL (Provided)


ILLUMINATED


1

MULTI BRAND REMOTE


2


SP/EP

1

2

3


3

4

5

6


4


DAILY(M-F)

WEEKLY


7

8

9

MENU

5


AUX


0

SELECT SET


6

ENTER /


IN/OUT

CANCEL

OSD


START


C.MEMORY / ADO

C.RESET / SKIP

7

POWER


8


VIDEO

VOL.


CH


VCRMBR

9

TV/


TIMER

SEARCH

SKIP SEARCH

0

BACK


CABLE TV

!

LIGHT


PLAY


@


STOP


* Pressing theBACK


LIGHTbutton


JOG/SHUTTLE


illuminates these


buttons for about


6 seconds.


#

$

%

^


1 DIGIT Buttons (pg. 10)


2 WEEKLY Timer Recording Button (pg. 40)


3 DAILY Timer Recording Button (pg. 40)


4 “AUX” Mode Select Button (pg. 46)

&

5 ENTER Button (pg. 24)

On-Screen Display [OSD] Button (pg. 30)

*

6 SELECT Button (pg. 9)

(

IN/OUT Button (pg. 53)

7 Counter [C.] MEMORY Button (pg. 32)

)

ADD Button (pg. 15)

START Button (pg. 53)

8POWER ON/OFF Button (pg. 9) q 9 TV/VIDEO Button (pg. 35)

0BACK LIGHT Button* w ! TIMER Button (pg. 41)

e

@ Rewind [REW] Button (pg. 23)


# Record [REC] Button (pg. 24)

r

$ DISPLAY Button (pg. 32)

t

% JOG Dial (pg. 25)

^ SHUTTLE Ring (pg. 23)

y

& Recording Speed [SP/EP] Button (pg. 24)

* Instant REVIEW Button (pg. 32)

u

( MENU Button (pg. 9)

) SET +/– Buttons (pg. 9)

i

q CANCEL Button (pg. 44)

o

Counter [C.] RESET (pg. 32)

Channel SKIP Button (pg. 15)

p

w Channel [CH] +/– Buttons (pg. 24)


e MBR/VCR Switch (pg. 55)

Q r Volume [VOL] +/– Buttons (pg. 55)

tTV/CABLE Switch (pg. 55)

W y SKIP SEARCH Button (pg. 27)

uSEARCH Buttons (pg. 25)

iFast-Forward [FF] Button (pg. 23) o PLAY Button (pg. 23)

p PAUSE Button (pg. 24) Q STOP Button (pg. 23)

W JOG/SHUTTLE Button (pg. 25)

**If the remote control doesn't work properly, remove its batteries, wait a short time and then try again.

Image 65
Contents HR-S7300U English Do not place the VCR Dear CustomerImportant Product Safety Instructions Should be moved with care. Quick Product and cart combinationContents Connections Antenna or Cable AC Power Cord Not suppliedAdvanced Auto Clock Set ClockNitial Sett Ings Access Custom SET Access ON-SCREEN MenuTurn on the VCR ScreenInitial Settings Access Select ScreensSelect Host Channel Select Time ZoneSelect D.S.T. Mode Select ModeMake Corrections AutoAccess Language Access ON-SCREENLanguage Select ScreenTuner Press Menu as many times as necessary Return to Normal ScreenAccess AFC Screen Access Tuner SET ScreenMake Selection Add Or Delete a ChannelSituate Controller Cable Box ControlAttach Controller Connect Cable BOX to VCRAccess Cable BOX SET Access Main MenuAccess Cable BOX Output ScreenSelect Cable BOX Output Channel Access Brand SET ScreenReturn to Cable BOX SET Screen Turn on Cable BOXYou can now set up the VCR Plus+ feature pg Access Main Menu Screen VCR Plus+ SetupInput Guide Channel Number Access Guide Channel SET ScreenCheck Input Data Input Receiving Channel NumberReturn to Tuner SET Screen Playback SimpleSimple Recording Activate FRAME-BY Frame Playback Pause During PlaybackPlayback and Recording FEA Tures Still Picture/Frame-By- Frame PlaybackActivate HIGH-SPEED Search Layback and Recording FeaturesVariable-Speed Search/ Reverse Motion Playback High-Speed SearchAdjust Manual Tracking Engage Manual Tracking ModeStop Repeat RE-ENGAGE Automatic TrackingContrast Mode Trast ModeLizer Mode Engage Dynamic CONSelect The Soundtrack Superimpose Start Search Access Distant CodeIndex Search Manual Index Mark/EraseActivate Counter Memory Reset Counter to ZeroATE Instant Review Make Connection Press REW, then press Timer within 2 secondsNext-Function Memory AV Compu Link PlaybackPress SET+/- to place the arrow next to Function ExampleSET, then press Select Press SET+/- to placeRecording Engage TV ModeSelect Channel for Viewing Display Elapsed Time on ScreenAccess 2ND Audio Access Function SETReturn to Normal Stereo And SAP Second Audio ProgramING Level Adjust Audio RecordHi-Fi Audio Recording Level Control SET +Display Tape Remaining Display Counter InformationTime Exit the DisplayEngage ITR Mode Instant Timer Recording ITRTimer Recording SET Recording DurationVCR Plus+ Timer Programming CHECK/CORRECT Input Data Engage Timer ModePress TIMER. The VCR turns off automatically Imer Recording On-Screen Timer ProgrammingExample Press just once to access the Auto Timer screenAccess Program SET Disengage TimerCancel a Program RE-ENGAGE TimerAuto Timer Access Auto TimerYour choice on or OFF by pressing SET +Edit From a Camcorder Return to Function SET Screen Access Tape DUB Mode ScreenStart Player Start RecorderLoad Cassettes Edit To Or From AnotherEngage Tape Dubbing Player Your VCRAssemble Editing Reset the Counter SET Input ModeLocate END Point Locate Start PointEND Insert Editing Engage Insert EditingPrepare for Editing Random As- semble EditingStart R.A. Edit Locate EDIT-IN PointLocate EDIT-OUT Point Engage Audio Dubbing Audio DubbingStart Dubbing END Audio DubbingSpecial Features SET Remote Control ModeTurn on the TV SET TV Brand CodeOperate Cable BOX Cable Box Multi-Brand Remote ControlTurn on the Cable BOX SET Remote Control Unplug Vcrs PowerPlug in Power Cord Turn VCR Power onCassette gets stuck partway MBR/VCR and/or TV/CABLERecording Timer againProcedure pg Re-perform the VCR Plus+ setupOubleshooting Doesn’t work properlyPlayback Questions and Answer S 20C to 60C -4F to140F Year programmable timer 16-13/16 x 3-3/4 x 13-7/16 Maximum recording timeVCR Plus+ Timer Programming MBR Multi-Brand Remote Code SettingIndex List Of TermsFront View Remote Control Provided For Servicing HOW to Locate Your JVC Service CenterLimited Warranty WarrantyHR-S7300U