BenQ VA261 quick start Using the TV, Power on and standby, Switching inputs, Adjusting volume

Page 18

Using the TV

Power on and standby

Turning the TV on

After plugging the TV's power cable into a wall outlet and turning on the main power switch, the TV will enter standby mode. The power indicator will light up red.

Press Power on the TV, or

on the remote control. The TV will turn on and the power

indicator will change to green.

Putting the TV to standby

Press Power on the TV, or

on the remote control again, and the TV will return to standby

mode. The power indicator will turn red.

Turning the TV off

Should you wish to remove power from the TV, you should first turn off the main power switch on the rear of the set adjacent to the power cable socket.

Switching inputs

1.Turn on all connected equipment or devices before selecting an input.

2.Press INPUT on the TV, or INPUT on the remote control to display the current selected input. Press the button repeatedly until your desired input is displayed.

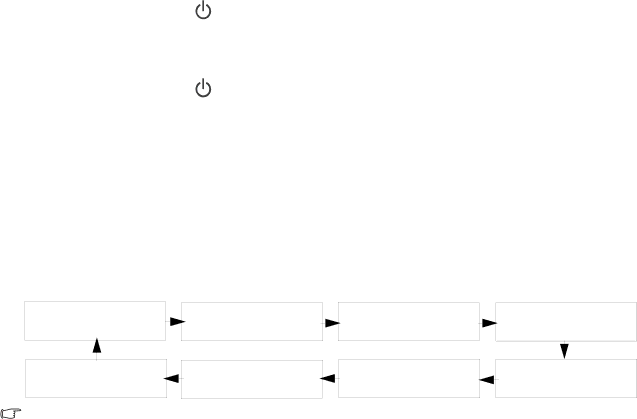
The sequence is as follows:

TV

Channel Number

HDMI

(or DVI)

AV1

(or AV1 S-Video)

VGA

AV2

(or AV2 S-Video)

COMPONENT 2

AV3

(or AV3 YPbPr)

COMPONENT 1

AV1 S-Video and AV2 S-Video will appear only when an S-Video signal is connected to the AV1 or AV2 S-Video input.

AV3 YPbPr will appear only when a Component video signal is connected to the AV3 input.

DVI will appear only when a DVI digital video signal is connected to the HDMI input.

Be aware that HDMI input must be HDCP-compliant to be displayed.

The HDMI (or DVI) input option is unavailable on the VA261 model.

When you select AV1 (AV1 S-Video), AV2 (AV2 S-Video) or AV3 (AV3 YPbPr) as the input source and the image does not display, check that the signal cables are correctly connected (see "Connecting audio and video inputs" on page 12) and if the default input signal types for these inputs are correctly selected (see "Setup menu" on page 26).

Adjusting volume

Press VOL+ on the TV, or VOLUME + on the remote control to increase the sound level. The OSD volume indicator will increase in length as volume rises.

Press VOL- on the TV, or VOLUME - on the remote control to decrease the sound level. The OSD volume indicator will decrease in length as volume falls.

Mute setting

Press MUTE on the remote control to turn off the sound (without adjusting the volume).

Press MUTE again, or press VOLUME + or - to restore the sound level.

TV sound mode selection

Press TV SOUND on the remote control to select 'Sound 1', 'Sound 2', 'Stereo' or 'Mono' systems. (The items available will depend on the TV and video sound system being received.)

18Using the TV

Downloaded From TV-Manual.com Manuals

Image 18
Contents Check package contents Important Please read this firstSelect and prepare the installation location Connect the TV antenna cableConnect the power cable Power indicator on the front lower center will light up redActivate the remote control Remote control usage tipsView the TV channels Test the remote controlSee Performing Auto installation on Press Channel or ChannelSee Using the sleep timer on Using common TV operationsCare and cleaning information What’s next?Getting to know the TV Connecting Video source inputsConnecting Graphic source inputs Important Please read this nextFront view Name DescriptionControl panel Rear view See Connecting the Hdmi input onConnecting the VGA input on No./Icon Name Description12 and Connecting the Component Connecting the composite Video input onSee Connecting the Component video Connecting the S-Video input onConnecting audio and video inputs Using the cable holderConnecting the composite Video input Video Connecting the S-Video inputConnecting the Component video input Cable not providedConnecting the VGA input Connecting the Hdmi inputSee Setup menu on Connecting the DVI input Getting to know the remote control See Selecting a channel directly on Switching inputs Using the TVPower on and standby Adjusting volumeAdjusting aspect ratio Adjusting the backlightChanging channels Using the sleep timer Selecting a picture modeUsing the freeze function Using the Teletext functionOperations whilst in PBP mode Using the PIP and PBP functionsOperations whilst in PIP mode Display informationOn-Screen Display OSD menu OSD menu structurePress Menu on the remote control, or Menu on the TV to Navigating the OSD menuFunction Operation Range OffSound effect to the audio Selection Saving changes in the picture menu See Swapping channels in the sequential channel list on Setup menuSee Performing Manual installation on AutoPerforming Manual installation Tuning the TV to your regionPerforming Auto installation Installation aboveOrdering the sequential channel list Naming a channelSkipping a channel in the sequential channel list Adding a channel in the sequential channel list Swapping channels in the sequential channel listYou wish to move, and then press OK Setting up the OSD language EnglishSee Child lock on Enabling child lock Changing child lock passwordChild lock Disabling child lockReference Functions and featuresSpecifications Model VA261 VA321 VA371 VA421Supported VGA/DVI input signal timing Supported Component/HDMI input signal timingDimensional drawings VA261Unit mm VA321 VA371 VA421 Troubleshooting Symptoms Possible CausesSee Warnings on Disclaimer Copyright