Toshiba 40RV52U Dear Customer, Safety Precautions, Issue, Toshiba Cares, Tune Into Safety

Page 2

Dear Customer,

Thank you for purchasing this Toshiba LCD TV. This manual will help you use the many exciting features of your new LCD TV. Before operating your LCD TV, please read this manual completely, and keep it nearby for future reference.

Safety Precautions

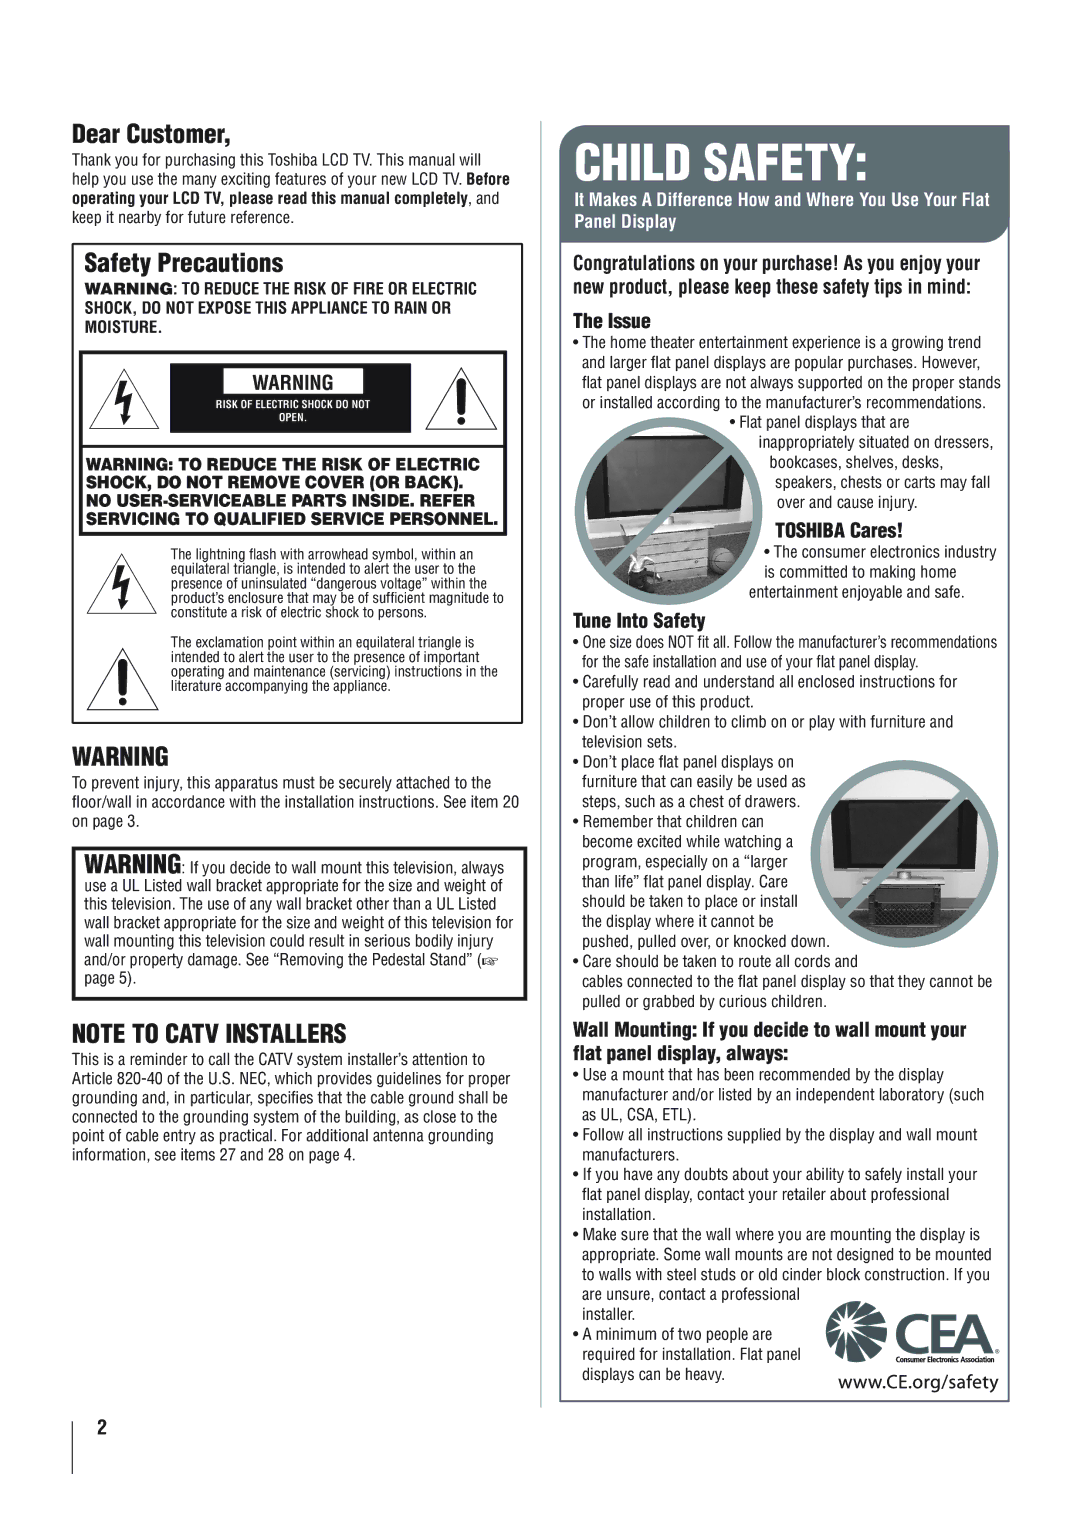
WARNING: TO REDUCE THE RISK OF FIRE OR ELECTRIC SHOCK, DO NOT EXPOSE THIS APPLIANCE TO RAIN OR MOISTURE.

WARNING

RISK OF ELECTRIC SHOCK DO NOT

OPEN.

WARNING: TO REDUCE THE RISK OF ELECTRIC SHOCK, DO NOT REMOVE COVER (OR BACK). NO USER-SERVICEABLE PARTS INSIDE. REFER SERVICING TO QUALIFIED SERVICE PERSONNEL.

The lightning flash with arrowhead symbol, within an equilateral triangle, is intended to alert the user to the presence of uninsulated “dangerous voltage” within the product’s enclosure that may be of sufficient magnitude to constitute a risk of electric shock to persons.

The exclamation point within an equilateral triangle is intended to alert the user to the presence of important operating and maintenance (servicing) instructions in the literature accompanying the appliance.

WARNING

To prevent injury, this apparatus must be securely attached to the floor/wall in accordance with the installation instructions. See item 20 on page 3.

WARNING: If you decide to wall mount this television, always use a UL Listed wall bracket appropriate for the size and weight of this television. The use of any wall bracket other than a UL Listed wall bracket appropriate for the size and weight of this television for wall mounting this television could result in serious bodily injury and/or property damage. See “Removing the Pedestal Stand” ( page 5).

NOTE TO CATV INSTALLERS

This is a reminder to call the CATV system installer’s attention to Article 820-40 of the U.S. NEC, which provides guidelines for proper grounding and, in particular, specifies that the cable ground shall be connected to the grounding system of the building, as close to the point of cable entry as practical. For additional antenna grounding information, see items 27 and 28 on page 4.

CHILD SAFETY:

It Makes A Difference How and Where You Use Your Flat Panel Display

Congratulations on your purchase! As you enjoy your new product, please keep these safety tips in mind:

The Issue

The home theater entertainment experience is a growing trend and larger flat panel displays are popular purchases. However, flat panel displays are not always supported on the proper stands or installed according to the manufacturer’s recommendations.

Flat panel displays that are inappropriately situated on dressers,

bookcases, shelves, desks, speakers, chests or carts may fall over and cause injury.

TOSHIBA Cares!

The consumer electronics industry is committed to making home

entertainment enjoyable and safe.

Tune Into Safety

One size does NOT fit all. Follow the manufacturer’s recommendations for the safe installation and use of your flat panel display.

Carefully read and understand all enclosed instructions for proper use of this product.

Don’t allow children to climb on or play with furniture and television sets.

Don’t place flat panel displays on furniture that can easily be used as steps, such as a chest of drawers.

Remember that children can become excited while watching a program, especially on a “larger than life” flat panel display. Care should be taken to place or install the display where it cannot be pushed, pulled over, or knocked down.

Care should be taken to route all cords and

cables connected to the flat panel display so that they cannot be pulled or grabbed by curious children.

Wall Mounting: If you decide to wall mount your flat panel display, always:

Use a mount that has been recommended by the display manufacturer and/or listed by an independent laboratory (such as UL, CSA, ETL).

Follow all instructions supplied by the display and wall mount manufacturers.

If you have any doubts about your ability to safely install your flat panel display, contact your retailer about professional installation.

Make sure that the wall where you are mounting the display is appropriate. Some wall mounts are not designed to be mounted to walls with steel studs or old cinder block construction. If you are unsure, contact a professional

installer.

A minimum of two people are

required for installation. Flat panel displays can be heavy.

2
Image 2
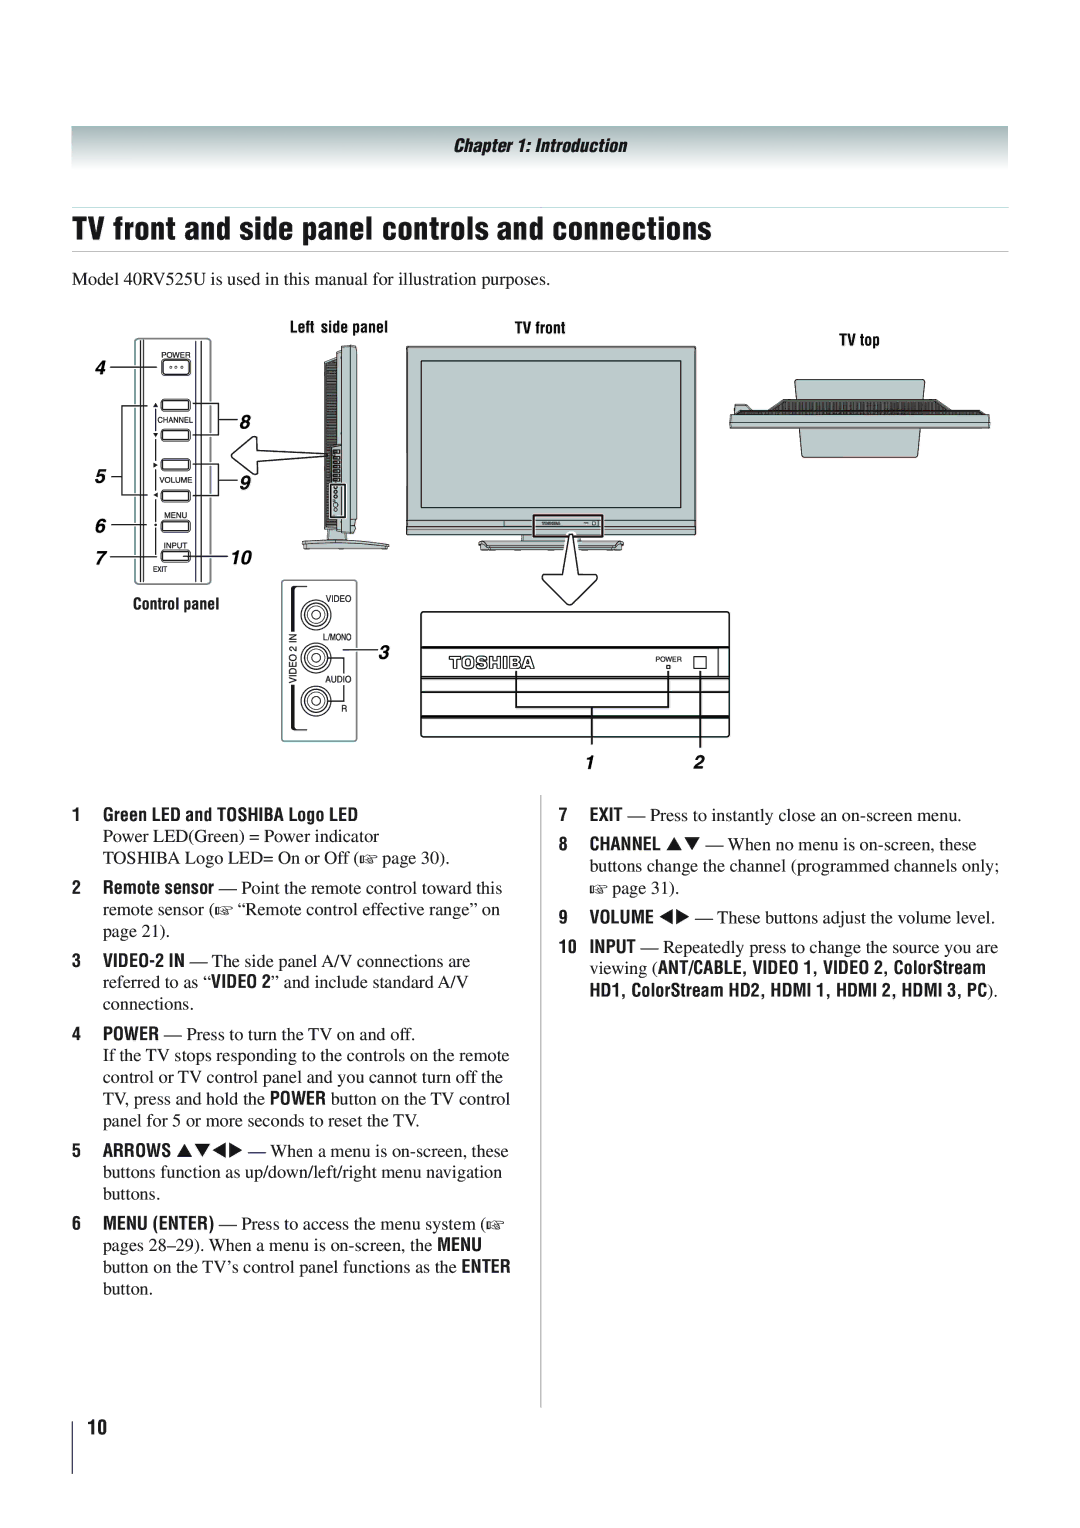
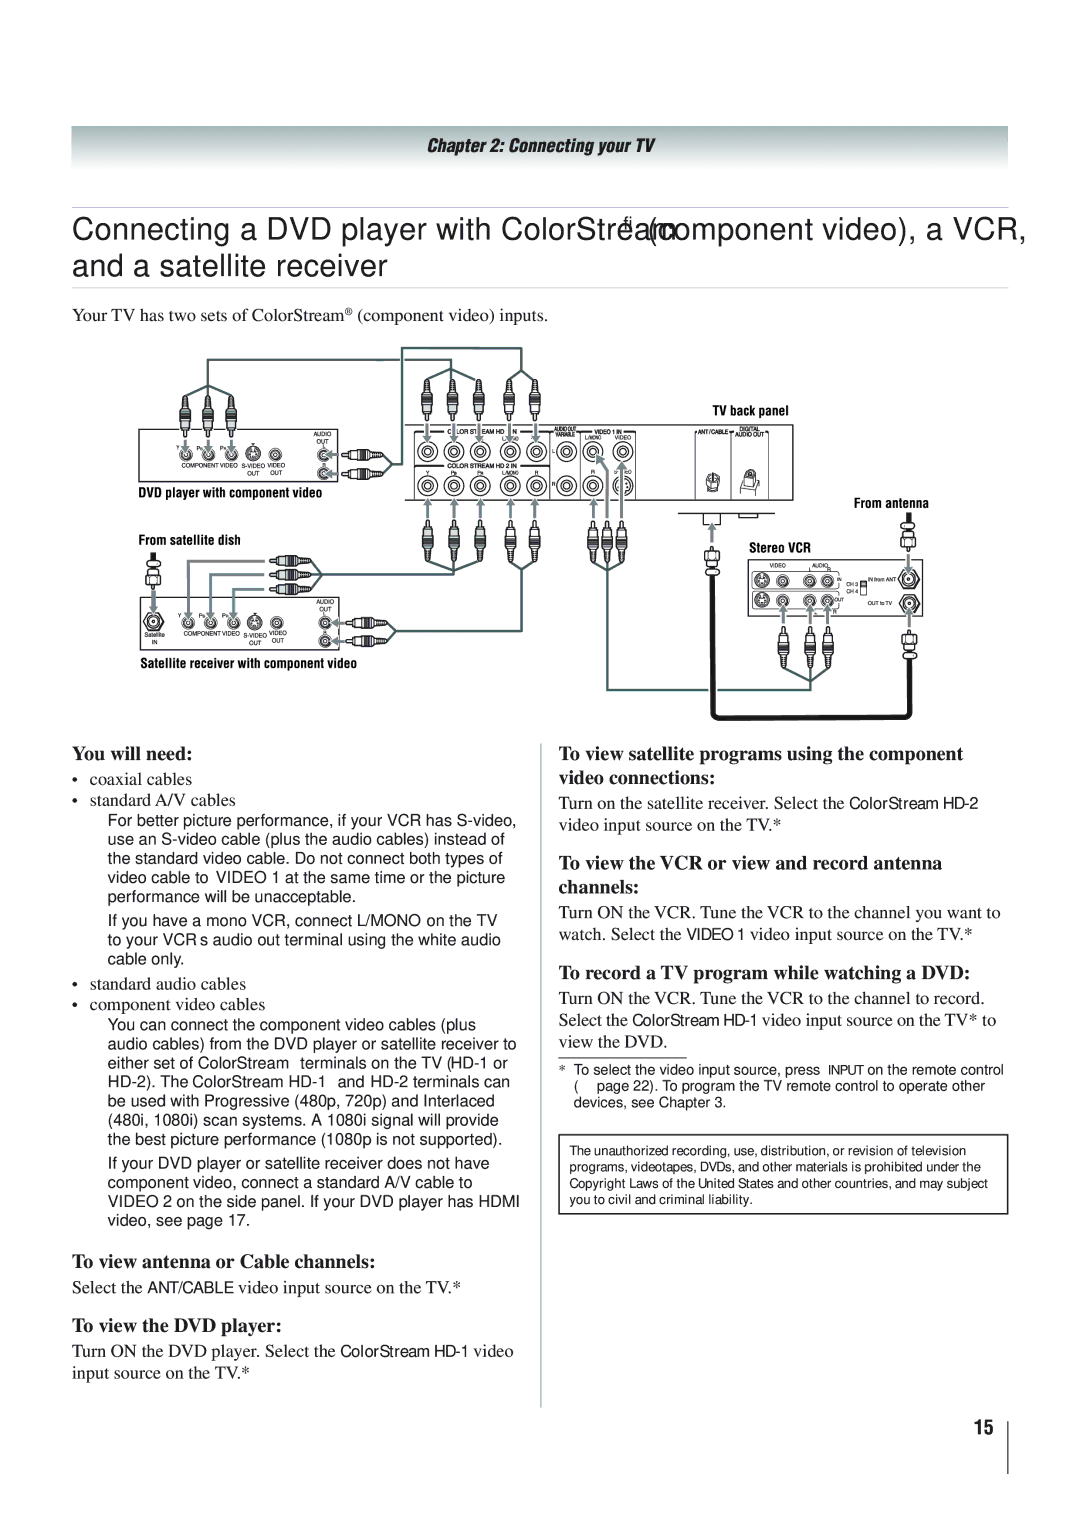
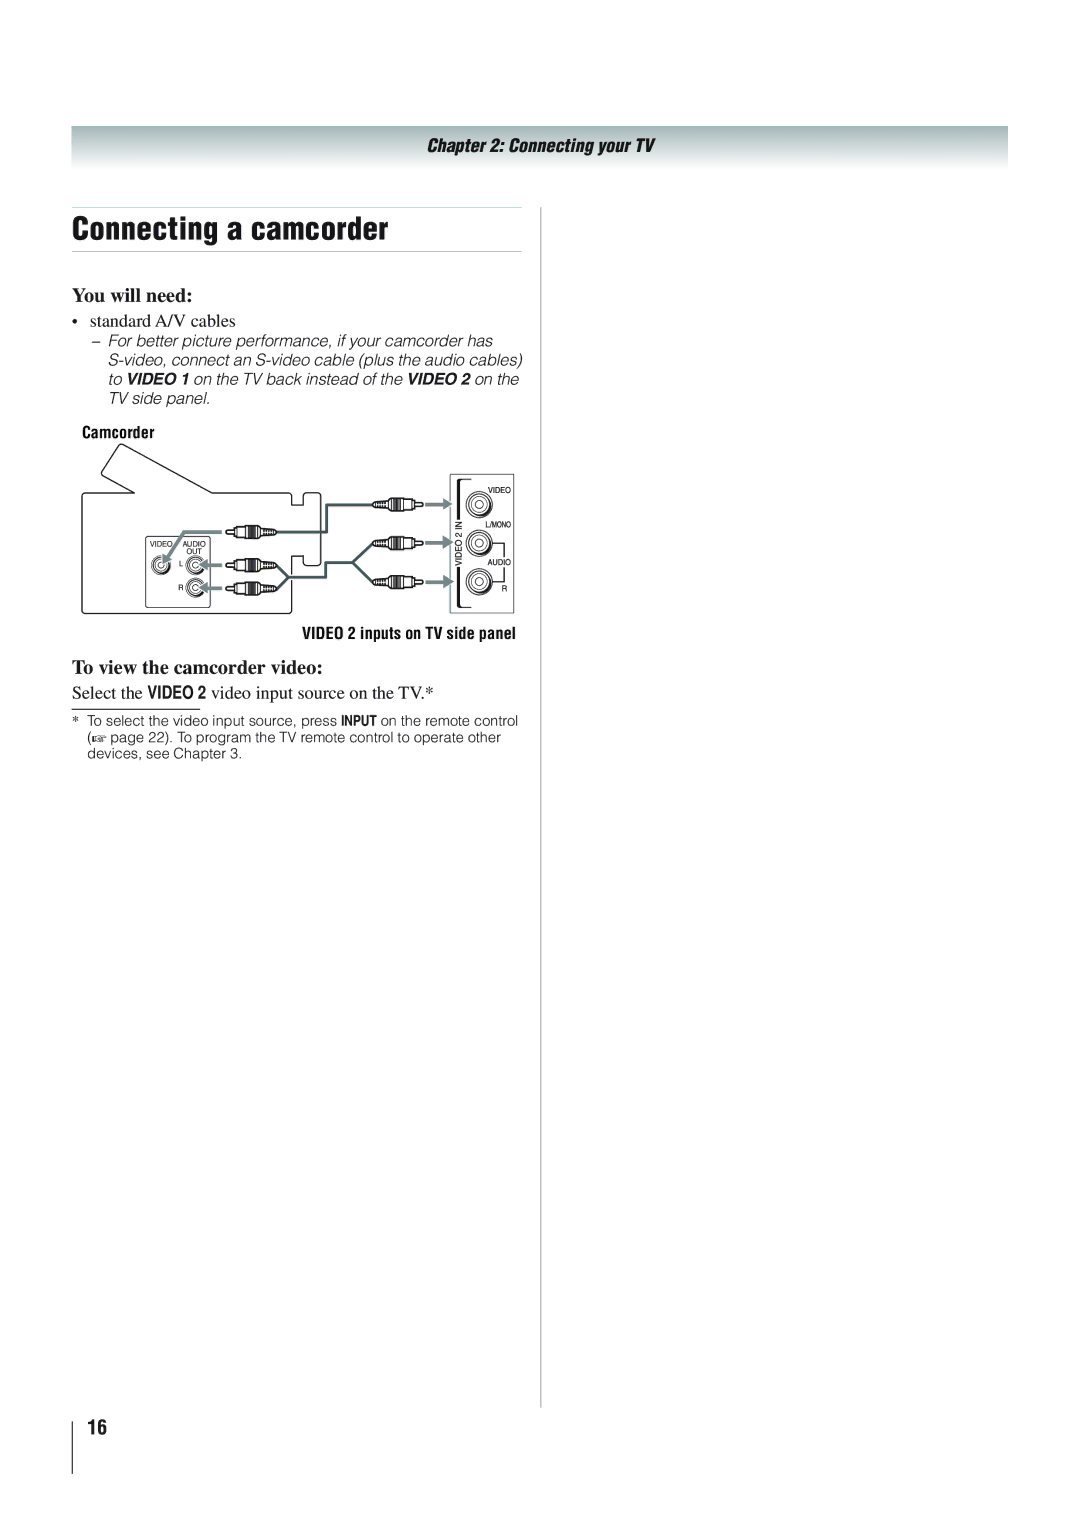
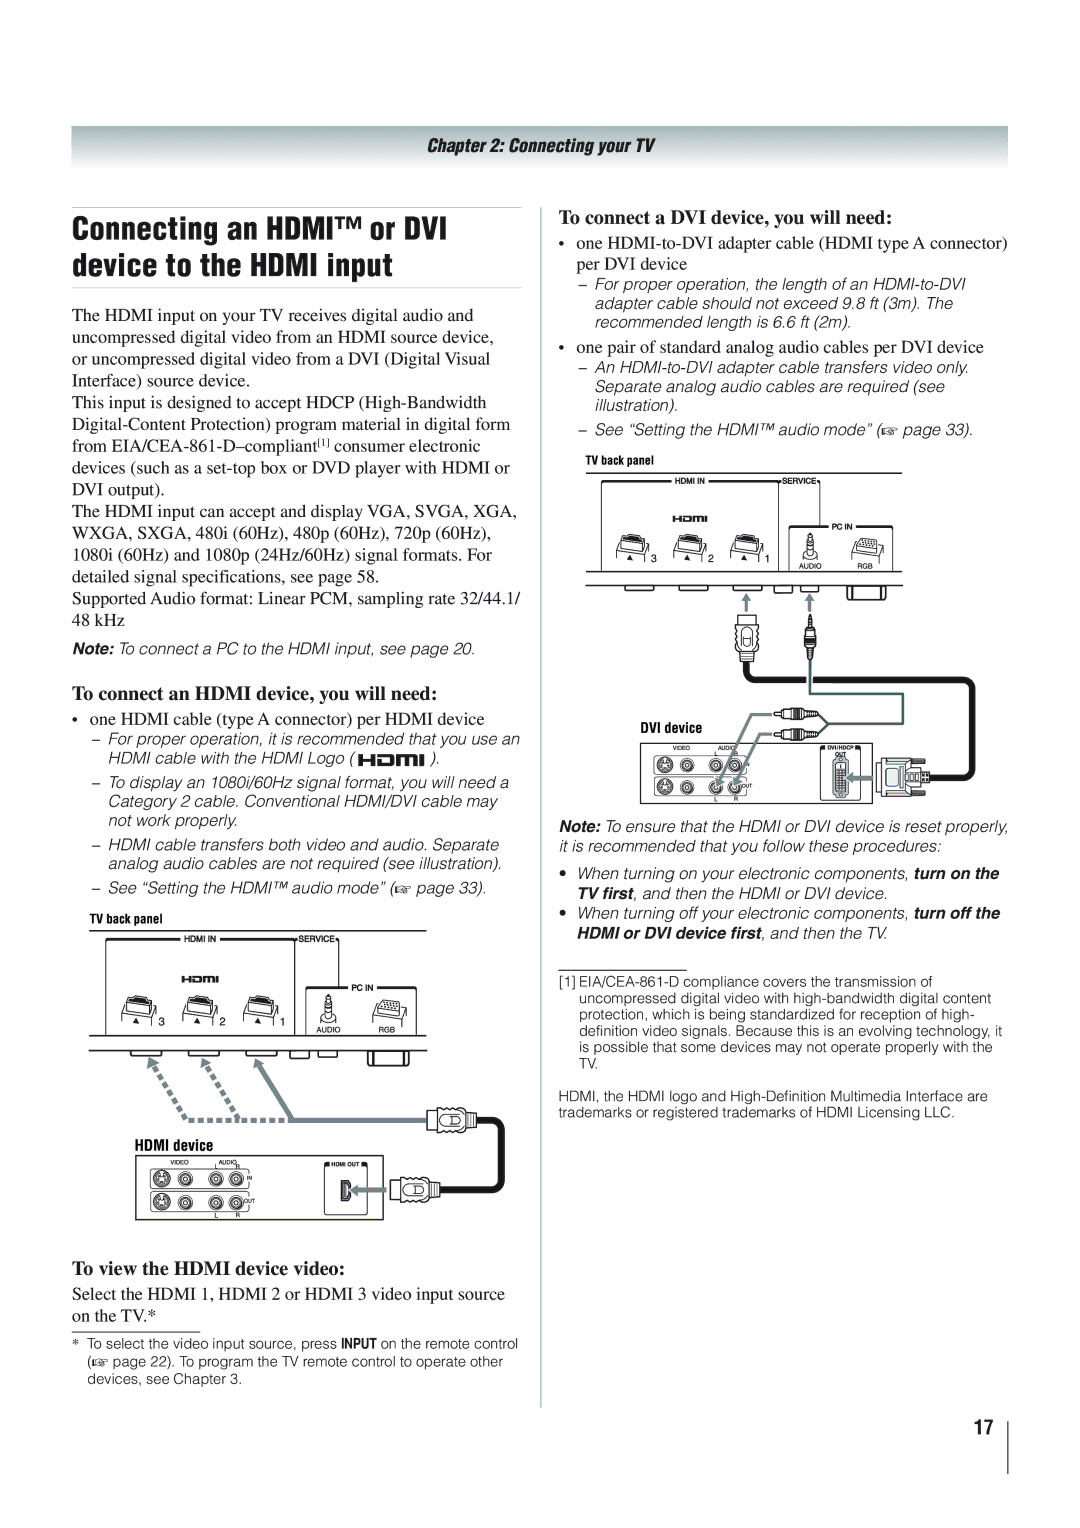
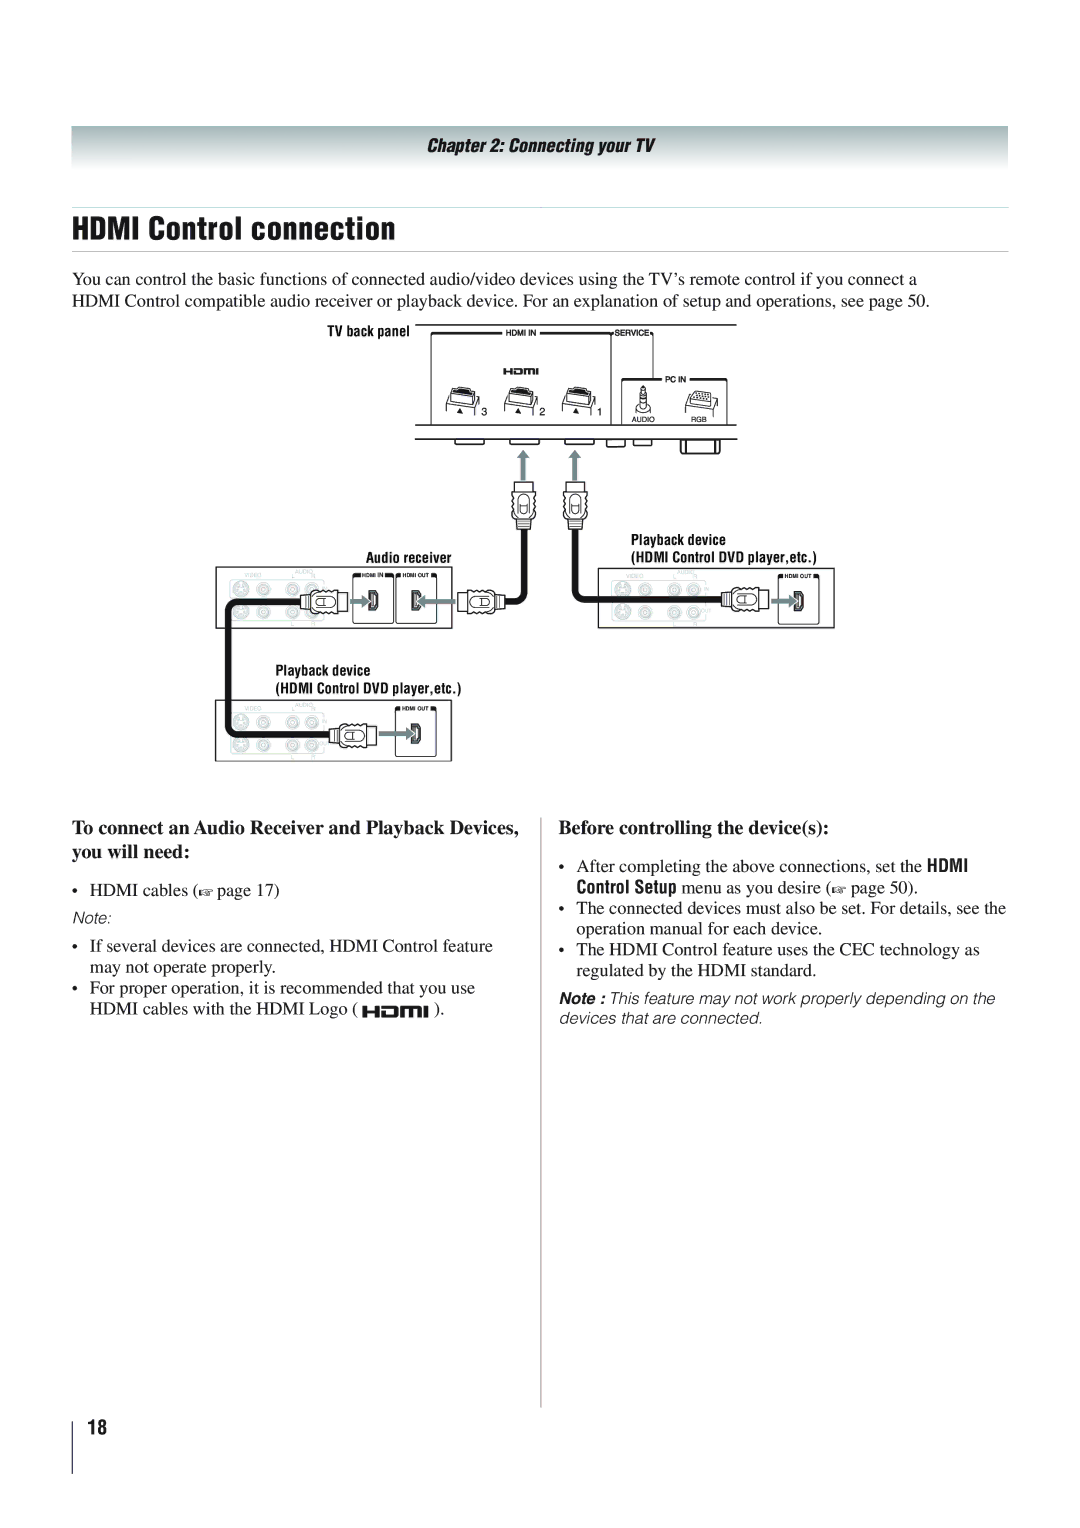
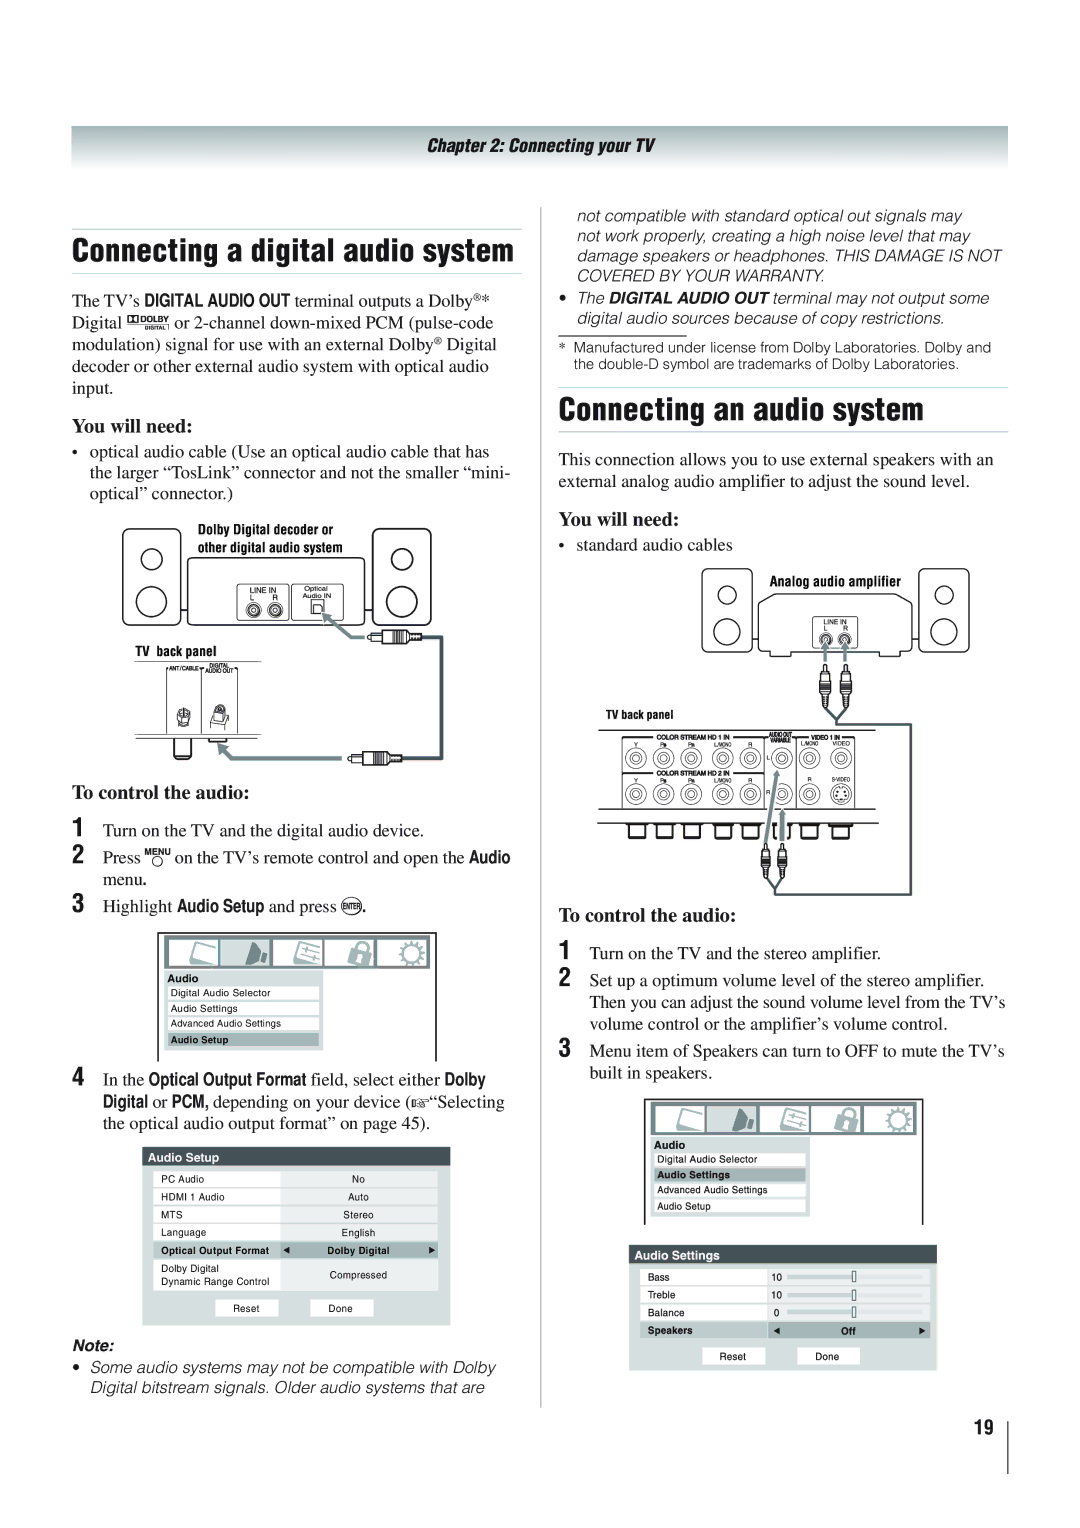
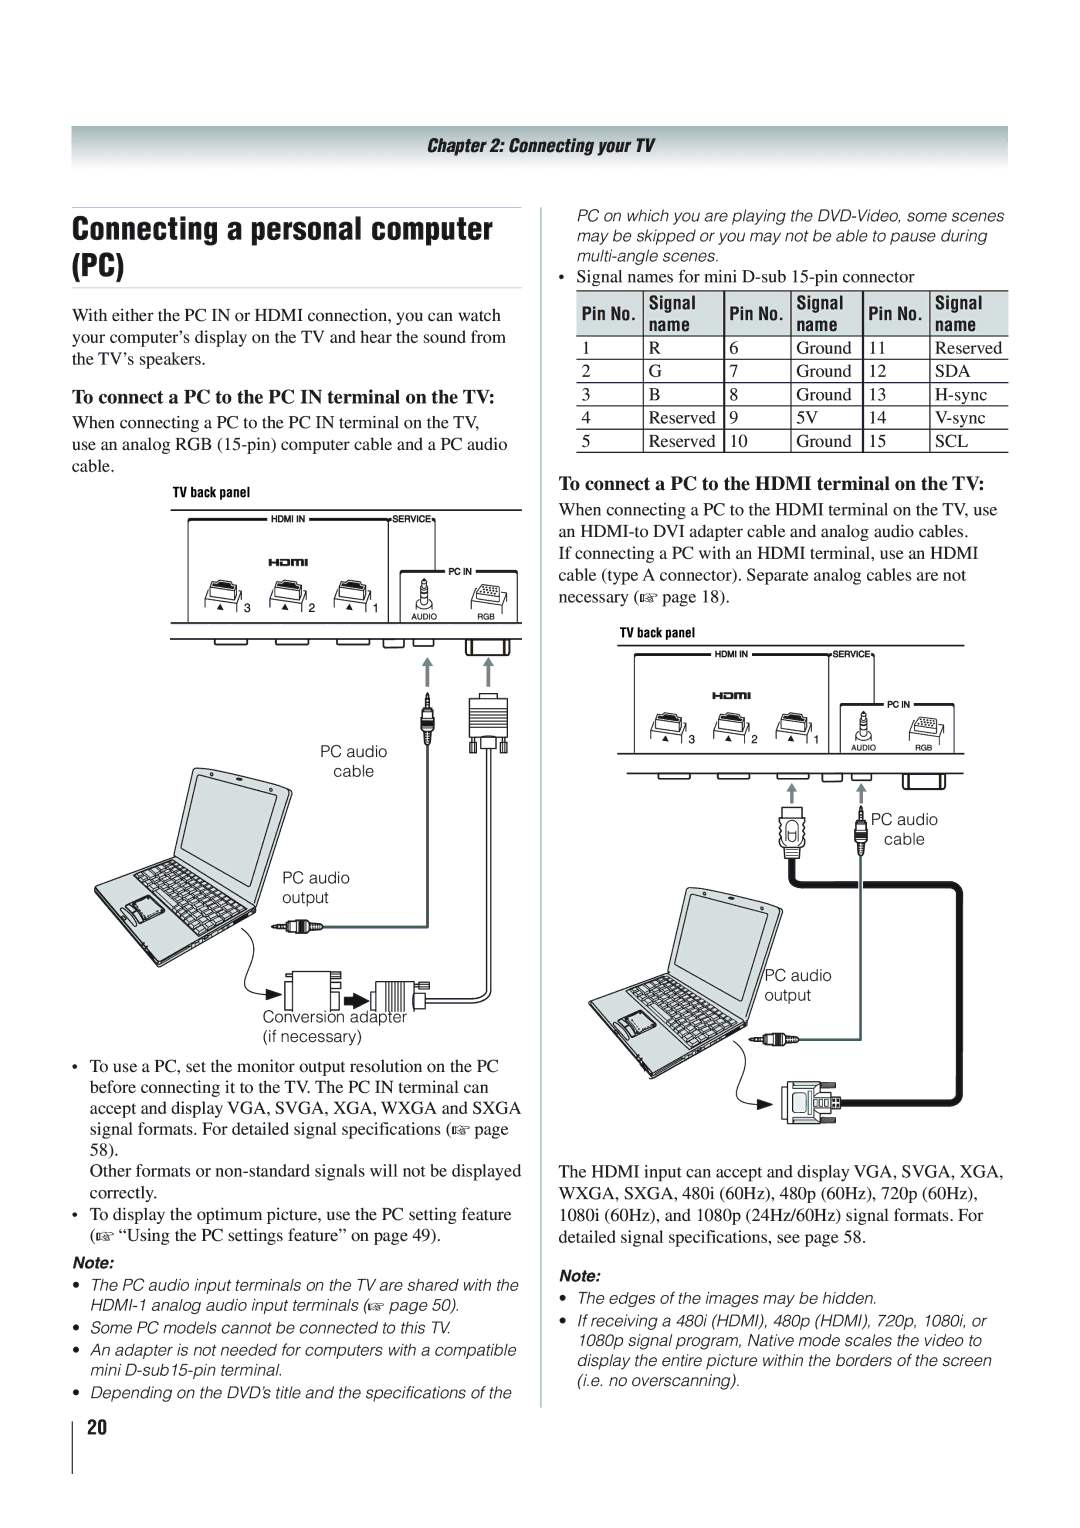
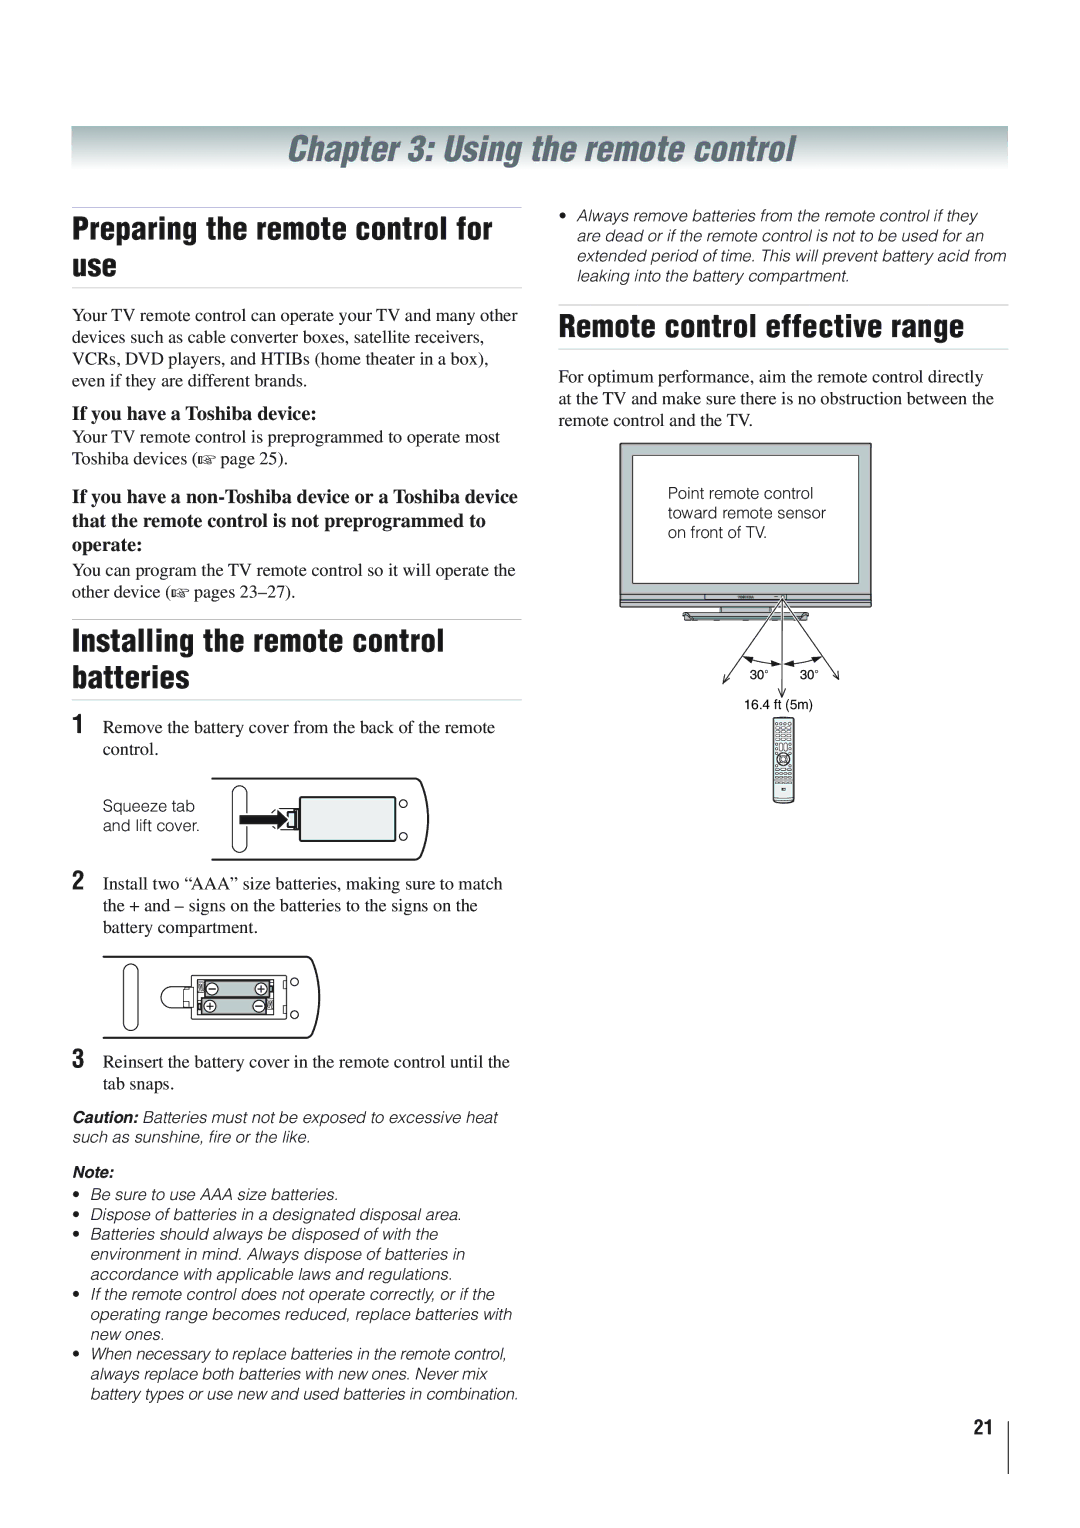
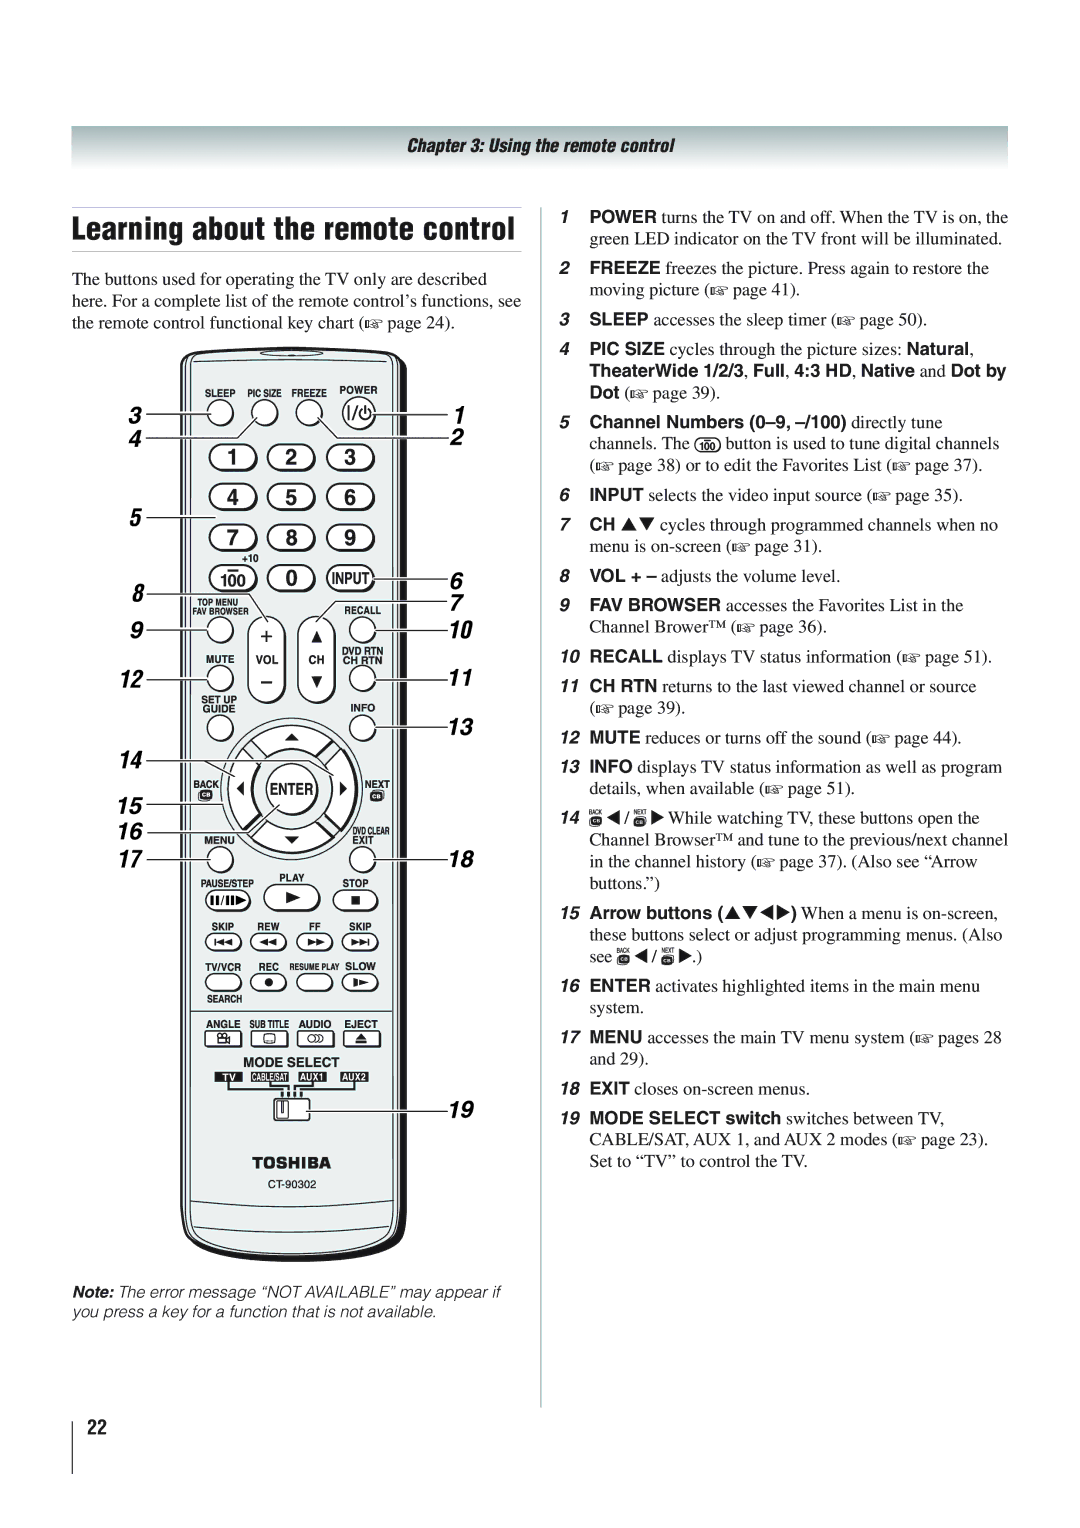
Contents 40RV52U 40RV525U 46RV525U Tune Into Safety Safety PrecautionsIssue Dear CustomerAdditional Safety Precautions Important Safety InstructionsInstallation, Care, and Service InstallationService CareTo Display your LCD TV on the included Pedestal Stand To Display your LCD TV using a Wall BracketChoosing a location for your LCD TV Removing the Pedestal StandTrademark Information PartImportant notes about your LCD TV Contents Features of your new TV IntroductionIntroduction TV front and side panel controls and connections Green LED and Toshiba Logo LEDTV back panel connections Connecting your TV Overview of cable typesYou will need Connecting a VCR and antenna or Cable TV no Cable boxTo view the antenna or Cable signal To view the VCRCoaxial cables Video cable Connecting a VCR with S-video and a cable boxTo view basic and premium Cable channels Standard audio cablesTo view the VCR or view and record antenna channels To view antenna or Cable channelsTo view the DVD player To record a TV program while watching a DVDSelect the Video 2 video input source on the TV Connecting a camcorderTo view the camcorder video To view the Hdmi device video One Hdmi cable type a connector per Hdmi deviceTo connect an Hdmi device, you will need To connect a DVI device, you will needHdmi Control connection Before controlling the devicesConnecting an audio system To control the audioTo connect a PC to the PC in terminal on the TV Connecting a personal computer PCPin No Signal To connect a PC to the Hdmi terminal on the TVInstalling the remote control batteries Using the remote controlPreparing the remote control for use Remote control effective rangeTheaterWide 1/2/3, Full, 43 HD, Native and Dot by DotDVD player or HTIB, set the Mode Select switch to To use your TV remote control to operate aVCR, set the Mode Select switch to AUX AUXRemote Control functional key chart AUX 1 VCRProgramming the remote control to control your other devices TV/VCR Combo Cable converter boxSatellite receiver DVD/VCR ComboHtib Icon Option Menu layout and navigationMain menu layout Navigating the menu system Setup/Installation menu layoutInput Configuration Opens the Input Configuration menu Channel Program Start p Scans for new channels onSelecting the menu language Setting up your TVTo configure the ANT/CABLE input source Toshiba Logo LEDTo program channels automatically Programming channels automaticallyManually adding and deleting channels in the channel memory To add or delete channels in the channel memoryLabeling channels To create and assign a custom label Setting the Hdmi audio modeTo set the Hdmi audio mode To delete the custom labelReset Factory Defaults Viewing the digital signal meterSetting the time zone Viewing the system statusLabeling the video input sources Using the TV’s featuresSelecting the video input source to view To select the video input source to viewFavorites Browser Tuning channelsTuning channels using Channel Browser Elements of the ChannelBrowser Tuning to a specific channel programmed or unprogrammed Setting the Channel Tuning ModeTuning to the next programmed channel Adding and clearing channels and inputs in the History ListTo select the picture size using the remote control Switching between two channels using Channel ReturnSwitching between two channels using SurfLock To select the picture size using the menusTheaterWide For letter box programs NaturalTheaterWide For 43 format programs TheaterWide For letter box programs with subtitlesSelecting the cinema mode Using the Freeze featureAdjusting the picture quality Adjusting the pictureSelecting the picture mode To select the picture mode using the menu systemBase closed captions Using the closed caption modeDigital CC Settings CC SelectorMuting the sound Adjusting the audioUsing the digital audio selector Selecting stereo/SAP broadcastsTo adjust the audio quality Adjusting the audio qualityUsing the Dolby Digital Dynamic Range Control feature To select the optical audio output formatIf you cannot remember your PIN code Using the Locks menuEntering the PIN code Changing your PIN codeTo download the additional rating system if available Unlocking programs temporarily Using the input lock featureBlocking channels Using the control panel lock feature Using the PC settings featureUsing the GameTimer Using Hdmi Control Setting the PC AudioSetting the sleep timer To display TV status information using Recall Understanding the auto power off featureUnderstanding the last mode memory feature To display TV status information using InfoUsing the static gamma feature Using the TV’s advanced featuresUsing dynamic contrast Selecting the color temperatureUsing Mpeg noise reduction Using the Game Mode featureTo adjust the QSound settings Using the advanced audio settings featuresUsing the QSound sound feature Highlight Advanced Audio Settings and pressTroubleshooting General troubleshootingRating blocking V-Chip problems Channel tuning problemsClosed caption problems Hdmi problemsSpecifications AppendixAcceptable signal formats for PC in and Hdmi terminals Format Resolution Frequency Pixel Clock FrequencyLimited United States Warranty For LCD Televisions 26 and LargerLimited Canadian Warranty For Toshiba Brand Flat Panel TelevisionsDisclaimer and Limitation of Remedy Appendix Page Toshiba America Consumer PRODUCTS, L.L.C