Philips HDTV Connecting the Display, Connecting a DVD Player, Using Component Video Input

Page 15

User Manual BDH5011

7.CONNECTING THE DISPLAY

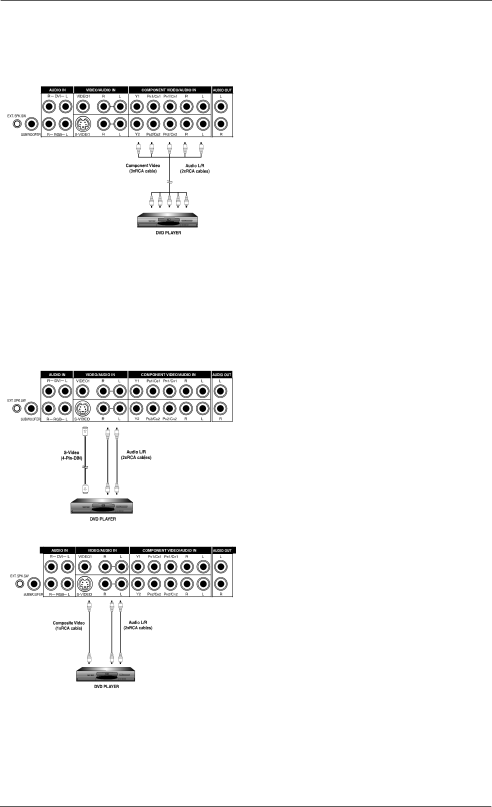
7.1 Connecting a DVD Player

Using Component Video Input

1. Connect the green-colored (labeled as Y) jack from the DVD to the green-colored Y1-jack of the display.

2. Connect the red-colored (labeled as PR or CR) jack from the DVD to the red-colored PR1/CR1 jack of the display.

3. Connect the blue-colored (labeled as PB or CB) jack from the DVD to the blue-colored PB1/CB1 jack of the display.

4. Connect the red (R) and white (L) audio jacks from the DVD to the R and L audio-in jacks located next to the PR1/CR1 connec- tor.

Note:

There are two sets of component inputs provided.You can use either set of component inputs to connect your DVD.

Using S-Video Input

1. Connect the S-Video (4-pin DIN) connector from the DVD to the S-VIDEOinput on the back of display.

2. Connect the red (R) and white (L) audio jacks from the DVD to the R and L audio-in jacks located next to the S-VIDEOconnec- tor.

Using Composite (AV) Video Input

1. Connect the yellow (video) connector from the DVD to the yellow VIDEO 1 input on the back of display.

2. Connect the red (R) and white (L) audio jacks from the DVD to the R and L audio-in jacks located next to the yellow VIDEO 1 connector.

15

Image 15
Contents Philips Business Solutions Table of Contents Risk of Electric Shock do not Open Important Safety InstructionsUnit has been dropped or the cabinet has been damaged FCC Statement FCC Compliance StatementCanadian Compliance Statement Cleaning and Maintenance Front Panel Cleaning InstructionsCabinet Cleaning Instructions Avoid Still Images Digital Zoom Modes Product FeaturesHdtv Signal Compatible Side-by-Side Picture POP280x1024 Sxga Support Discrete Power ON/OFFPackage Contents Optional Accessories Rear View Front ViewRemote Control 17 18. PIP Position Menu AdjustmentChannel Up/Down SwapUsing S-Video Input Connecting the DisplayConnecting a DVD Player Using Component Video InputUsing Composite Input Connecting a Hdtv Decoder Set-Top BoxConnecting a VCR Using RGB InputExternal Audio Connections Connecting External Amplified SpeakersConnecting to an External Amplifier Using the Subwoofer Out Connecting a SubwooferConnecting a PC Using RGB or DVI Video Input Pin Layout for RS-232 Terminal RS-232 Remote Control ConnectionsRS-232 Serial Terminal Overview Communications ParametersCmd Data Details Command ParametersBBE Using Discrete Power ON/OFF Buttons Using Your Display BasicsPowering on / OFF Using Front Panel or Remote ControlUsing Direct Input Selection Buttons Selecting Signal SourceUsing Mute Adjusting Sound VolumeUnderstanding Hdtv Using with HdtvSdtv Interlaced scan method1 Scan ModePicture-In-Picture PIP / Side-by-Side Picture POP Switch On PIP or POP ModeChanging the Sub-Picture Position in PIP Mode Advanced FunctionsSwitching Main and Sub-Pictures Swap Changing the Input Source for Sub-PictureChanging the Input Source for Main Picture Accessing PIP and POP Modes using OSD Picture-In-Picture PIP / Side-by-Side Picture POP / ContdPIP Window Position PIP Window Swap Screen Rate Aspect Ratio ControlPOP Window Swap Panorama Widescreen 169 Aspect Ratio Viewing ModesUnderstanding Widescreen Modes FullZoom For Widescreen ContentOn-Screen Display OSD Settings Sleep Timer Settings Sleep TimerSleep OFF Variable Sound AdjustmentsVariable and Fixed Audio Output Audio OutputTreble Switching OFF Built-In SpeakersInner speaker ON/OFF BassSignal Frequency Information Display Input H-FREQ KHZInput V-FREQ HZ When Using RGB & DVI Inputs HorFormat Refresh Brightness Picture AdjustmentFor AV/Component Video 480i signal ContrastSharpness Color TemperatureClock Phase TintFor Component Video 480p, 720p and 1080i signal Geometric Adjust For Component Video 480p, 720p and 1080i signal Contd For RGB / DVI Clock Phase Troubleshoot Common Conditions TroubleshootingSpecifications Audio Signal Pin Assignments For D-SUB Connector In/Loop OutPin Assignments For 24 Pin DVI Connector Digital Only DVI SignalRGB/DVI Weight PB/PR For Component 1 Mode Resolution RateDimensions Without/Stand With/Stand Package DimensionsEmission Requirement Power ManagementPreset Timing Chart Item Description Mode No 72.000 Rear View Wall Mount OptionOne Year Free Labor One Year Free Parts Limited WarrantyWhat is COVERED? What is EXCLUDED?Make Sure YOU Keep Before Requesting Service Where is Service AVAILABLE?To GET Warranty Service If YOU have QuestionsRemember