Connections & Setup
|
| STOP |
| R | RETAKE | F | |
LIGHT | AUTO ON | COUNTER | R/M |
| IPE |
|
|
| OFF |
|
| DIGIFECT | |||
|
| FADE/W |
| ||||
|
| P . | AE | ||||
|
|
|
|
|
|
| |
CHARGE | POWER | REFRESH | EJECT |
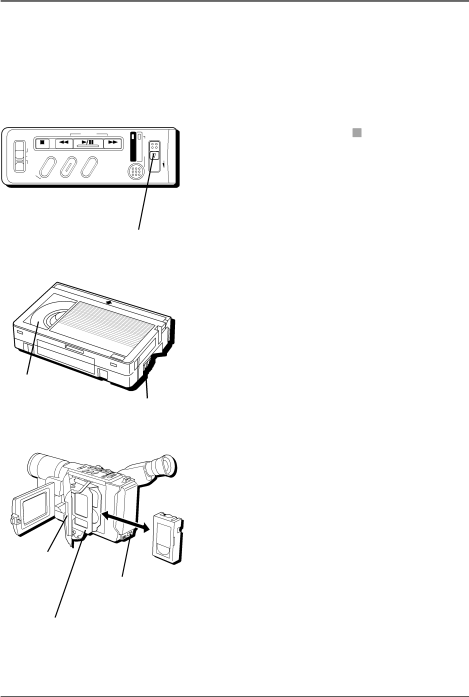
Insert a cassette tape
1.Make sure the camcorder is connected to a power supply.
2.Open the LCD monitor fully or adjust the viewfinder.
3.With the camcorder set to A (automatic record), slide the EJECT switch until the cassette tape holder opens. Don’t force the camcorder open.
4. Insert a tape with the tape wheel facing up and
| the tape window facing out. | |
EJECT switch | Notes: | |
|
| |
| • | Make sure the tape is not slack when |
|
| loading the cassette tape. If there is any |
|
| slack, turn the wheel on the cassette |
|
| tape in the direction of the arrow to |
|
| take up the slack. |
| • Make sure the Erase Protection tab is in | |
|
| the position that allows recording. If |
|
| not, slide the tab. Some tapes have |
|
| removable tabs. If the tab has been |
Tape window |
| removed, cover the hole with adhesive |
| tape. | |
|
| |
Tape wheel 5. Push on the area marked CLOSE until the | ||
| cassette tape holder locks into place. (PAUSE | |
| appears on the LCD or in the viewfinder.) | |
Area marked
CLOSE
BATTERY RELEASE switch
Notes:
•You can’t open the cassette tape holder unless a power supply is attached.
•The cassette tape holder can’t be opened while the camcorder is in the record mode.
Caution: Closing the LCD monitor while the cassette tape holder is still open may damage the LCD monitor.
Cassette tape holder
Chapter 1 | 13 |