Useful Features
Adjusting the Menu Settings | 5 Press the SET button (B) to select the | |
| desired setting. | |
Follow the procedure below to adjust the | • Each time you press the SET button, the | |
setting changes. | ||
desired menu settings. |
Useful Features
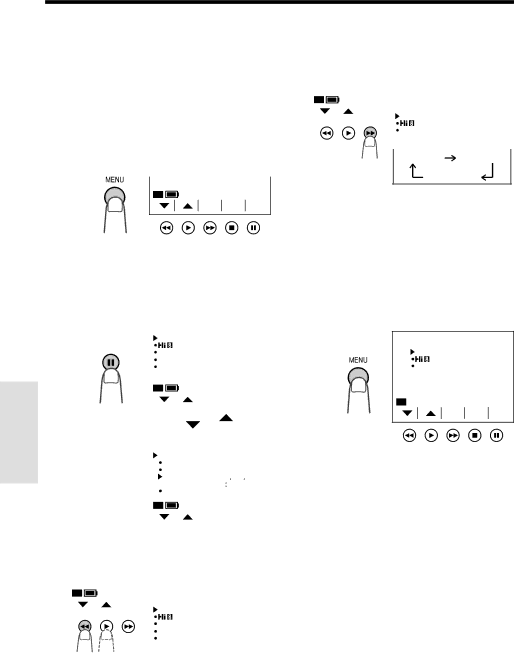
Camera mode
1 Hold down the Lock button and slide the Power switch to CAMERA.
2 Press the MENU button until![]() appears.
appears.
P I C -
S E T TURE PAGE
3 Press the PAGE button (![]()
![]() ) to display the desired menu screen.
) to display the desired menu screen.
•Each time you press the PAGE button, the screen changes between MENU 1 and MENU 2.
|
|
|
| P A G E |
|
|
|
|
|
| MENU | 1 |
|
|
|
| |||||
|
|
|
|
|
|
|
| F ADE | NORMAL |
|
|
| |||||||||
|
|
|
|
|
|
|
|
|
| REMOT E | AUTO |
|
|
| |||||||
|
|
|
|
|
|
|
|
|
|
|
|
| |||||||||
|
|
|
|
|
|
|
|
|
| ON |
|
|
| ||||||||
|
|
|
|
|
|
|
|
|
| DEMO MODE | O F F |
|
|
| |||||||
|
|
|
|
|
|
|
|
|
| L ANGUA G E |
|
|
|
|
|
|
| ||||
|
|
|
|
|
|
|
|
|
|
|
|
|
|
|
|
| P I C - |
|
|
| |
|
|
|
|
|
|
|
|
|
|
|
|
|
|
|
|
|
|
| |||
|
|
|
|
|
|
|
|
|
|
|
|
|
| S E T |
| TU RE |
|
| PAGE | ||
|
|
|
|
|
|
|
|
|
|
|
|
|
| ||||||||
|
|
|
|
|
|
|
|
|
|
|
|
|
|
|
|
|
|
|
|
|
|
|
|
|
|
|
|
|
|
|
|
|
|
|
|
|
|
|
|
|
|
|
|
|
|
|
|
|
|
|
|
|
|
|
|
|
|
|
|
|
|
|
|
|
|
|
|
|
|
|
|
|
|
|
|
|
|
|
|
|
|
|
|
|
|
|
|
|
|
|
|
|
|
|
|
|
|
|
| MENU | 2 |
|
|
|
| ||||
|
|
|
|
|
|
|
|
|
| DA T E / T I ME |
|
|
|
|
|
|
| ||||
|
|
|
|
|
|
|
|
|
| D I S P L A Y | O F F |
|
|
| |||||||
|
|
|
|
|
|
|
|
|
| S E L E C T | DA T E + T I ME | ||||||||||
|
|
|
|
|
|
|
|
|
| S E T T I NG | JUN 2 2 0 0 1 | ||||||||||
|
|
|
|
|
|
|
|
|
|
|
|
|
|
| 1 0 3 0 | AM | |||||
|
|
|
|
|
|
|
|
|
| 1 2 H / 2 4 H | 1 2 H |
|
|
| |||||||
|
|
|
|
|
|
|
|
|
|
|
|
|
|
|
|
| P I C - |
|
|
| |
|
|
|
|
|
|
|
|
|
|
|
|
|
|
|
|
|
|
|
| ||
4 Press the |
|
|
|
|
|
|
|
|
| S E T |
| TU RE |
|
| PAGE | ||||||
|
|
|
|
|
|
|
|
|
|
|
| ||||||||||
or | button (C or D) to | ||||||||||||||||||||
| select the desired menu item. |
|
|
| |||||||||||||||||
|
|
|
|
|
|
|
|
|
|
|
| Example |
|
|
| ||||||
|
|
|
|
|
|
|
|
|
|
|
|
|
|
|
|
|
| ||||
|
|
|
|
|
|
|
|
|
|
|
| MENU | 1 |
|
|
|
| ||||
|
|
|
|
| S E T |
|
| F ADE | NORMAL |
|
|
| |||||||||
|
|
|
|
|
|
|
|
| |||||||||||||
|
|
|
|
|
|
|
|
|
| REMOT E | AUTO |
|
|
| |||||||
|
|
|
|
|
|
|
|
|
| ON |
|
|
| ||||||||
|
|
|
|
|
|
|
|
|
| DEMO MODE | O F F |
|
|
| |||||||
|
|
|
|
|
|
|
|
|
| L ANGUA G E |
|
|
|
|
|
|
| ||||
|
|
|
|
|
|
|
|
|
|
|
|
|
|
|
|
|
|
|
|
|
|
Example
|
|
|
|
| MENU | 1 |
|
| |
|
| S E T |
| F ADE |
|
|
|
| |
|
|
|
| NORMAL |
|
| |||
|
|
|
|
|
|
| AUTO |
|
|
|
|
|
|
| REMOT E |
| ON |
| |
|
|
|
|
|
| ||||
|
|
|
|
|
|
|
|
| |
|
|
|
|
| NORMA L | HO L I D A Y |
| ||
B I R T HD A Y
6 Press the DISPLAY button to turn off the menu screen.
VCR mode
1 Hold down the Lock button and slide the Power switch to VCR.
2 Press the MENU button until![]() appears.
appears.
MENU |
|
ED I T | OF F |
REMOT E | AUTO |
ON |
3 3 ![]()
P I C -
S E T TURE
3 Perform steps 4 to 6 above.
Notes:
•Certain menu items are common in both Camera and VCR modes. If the REMOTE menu item, for example, is set to “OFF” in Camera mode, it will be automatically set to “OFF” in VCR mode.
•The menu screen automatically turns off if no settings are made within 5 minutes.
25