JVC GR-FXM15 specifications Power, Charging the Battery Pack, Using the Battery Pack

Page 6

6EN

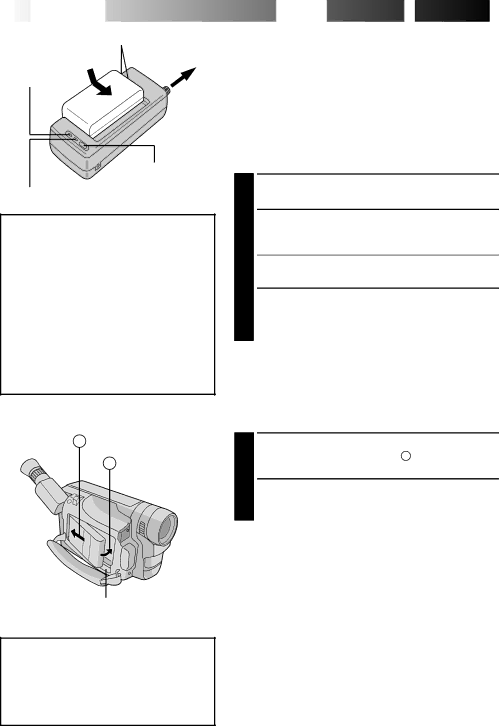
Marks

To AC outlet

CHARGE indicator

REFRESH switch

REFRESH indicator

REFRESH

The AC Power Adapter/Charger features a REFRESH function that allows you to fully discharge the battery pack before recharg- ing.

Perform the REFRESH function after no less than 5 chargings.

To discharge the battery . . .

.... attach the battery pack to the adapter as

shown in the above illustration. Then push REFRESH. The REFRESH indicator lights when discharging starts, and goes out when discharging is complete.

GETTINGSTARTED

Power

This camcorder’s 3-way power supply system lets you choose the most appropriate source of power.

NOTES:

No function is available without power supply.

Use only the specified power supply.

Do not use provided power supply units with other equipment.

CHARGING THE BATTERY PACK

1 SUPPLY POWER

Connect the charger’s AC power cord to a wall outlet.

2 ATTACH BATTERY PACK

Align the marks and slide the battery pack in the direction of the arrow until it locks in place.

•The CHARGE indicator begins blinking to indicate charging has started.

DETACH BATTERY PACK


3 When the CHARGE indicator stops blinking but stays

lit, charging is finished. Slide the battery pack

opposite the direction of the arrow.


Battery pack

Charging time


Discharging time


BN-V12U

approx. 1 hr. 10 min.


approx. 3 hrs. 30 min.

BN-V20U

approx. 1 hr. 50 min.


approx. 6 hrs. 40 min.


AHook on.

B Push in.

BATTERY RELEASE

ATTENTION:

Before detaching the power source, make sure that the camcorder’s power is turned off. Failure to do so can result in a camcorder malfunction.

USING THE BATTERY PACK

1 ATTACH BATTERY PACK

Hook its end to the camcorder ( ) and push the battery pack in until it locks in place ( ) .

DETACH BATTERY PACK


2 Slide BATTERY RELEASE and pull out the battery

pack.


Approximate recording time (unit: min.)


LCD

LCD

LCD

Battery pack

monitor on/

monitor off/

monitor on/


Viewfinder off

Viewfinder on

Viewfinder on

BN-V12U

60

65

50

BN-V20U

95

105

85


INFORMATION:

VU-V856KIT is a set composed of the BN-V856U battery pack and AA-V80EK AC Power Adapter/Charger.

The BN-V856U battery pack provides approx. 7 hours of recording time when the viewfinder is on and the LCD monitor is off. Also read thoroughly the VU-V856KIT’s instruction manuals.

It is impossible to charge the BN-V856U battery pack using the provided AC Power Adapter/Charger. Use the optional AA-V80EK AC Power Adapter/Charger.

Image 6
Contents GR-FXM15 Connection to the mains supply in the United Kingdom Dear CustomerIt is recommended that you 91/157/EEC and 93/86/EECEN3 Above ALLEN Major Features Slide Battery Release and pull out the battery pack Quick Operation Guide EN5Power Charging the Battery PackUsing the Battery Pack Using AC Power Using a CAR BatteryChoose which one means charged and which means discharged Clock Lithium Battery Insertion/Removal Getting StartedDate/Time Settings EN Getting Started Recording Mode SettingTape Length Setting ContOpen Cassette Holder Loading/Unloading a CassetteOpen LCD Monitor Close Cassette HolderGrip Adjustment Viewfinder AdjustmentTripod Mounting Adjust LengthShoulder Strap Attachment Attach StrapLoad a Cassette Power Switch PositionBasic Recording Start ShootingLCD Monitor/Viewfinder Indications Stop RecordingPress Display Button Recording Basic Recording Shooting While Watching The LCD MonitorBefore the following steps, perform pg Journalistic Shooting Interface ShootingBrightness Control EN Recording Basic Features Push the Power Zoom Lever towards TZoom Feature Quick Review To check the end of the last recordingTo re-record certain segments Feature 5Sec. Rec 5-sec. Recording Basic FeaturesFeature Picture Stabilizer Press P.STABILIZER. appearsFade/Wipe Recording Advanced Features EN21Tomodecancel FADE- or WIPE-STANDBY Start or END RecordingProgramme AE With Special Effects Advanced FeaturesSelect Mode Press P.AE to cycle through the modes as shown on the leftHigh shutter speed clearly captures fast-moving action Display ModeNega Posi mode Colours of a picture are reversedRecording Advanced Features Date/Time InsertPress the Select Dial to display the Menu Screen Access Title Menu Instant TitlesUsing Menu For Detailed Adjustment Make SettingEND Setting Menu Screen Available Using The Select Dial Menu Screen Available Using The Menu ButtonMenu Screen Explanations Allows you to set the current date and time pg Tally lamp comes on to signal the start of recordingDemo Mode is set to on and the Menu Screen is closed Recording pgAccess Exposure Menu Exposure ControlTo darken the image Auto Focus FocusingRecording Patterns that are regularly repeatedEND Adjustment of Focus Access Focus MenuAccess Manual Focus Manual FocusSET Function Parameters White Balance AdjustmentAccess White Balance Adjustment To Return To Automatic White BalancePress the Select Dial again to close the Menu Screen Enter SettingManual White Balance Operation To Change The Tint For RecordingStart Delayed Recording Self-TimerAccess INT. Time Menu SET Interval TimeAnimation Time-LapsePlay Back Playback Basic PlaybackRewind or Fast-Forward the tape Stop PlaybackAdjust Volume Playback FeaturesSpeaker Volume Control TrackingFeature Shuttle Search Playback FeaturesFeature Still Playback Feature Counter Memory FunctionUsing The Cassette Adapter EN39 Insert BatteryCassette Adapter Basic Connections When connecting the cables, open this coverBasic Connections And Tape Dubbing Connection For Tape DubbingTape Dubbing Remote control uses one lithium battery CR2025 Installing The BatteryPull OUT Battery Holder RM-V700U optional Functions ButtonsAnimation Feature Self-Timer, Animation and Time-LapseSelf-Timer Time-LapseOperate VCR Using the Remote Control UnitSET REMOTE/VCR Code You are now ready to try Random Assemble EditingVCR Other than Type or Make ConnectionsJVC VCR Equipped with Remote Pause Terminal Prepare CamcorderSelect Scenes Start Source PlaybackRegister END of Scene Begin Automatic Editing Automatic Editing to VCRPrepare Source Tape END Automatic EditingEN Using the Remote Control Unit Insert EditingAudio Dubbing Begin Audio DubbingEND Audio Dubbing Cleaning The Camcorder After UsePlayback picture No power is suppliedRecording does not start Playback picture is blurred orDuring recording, the indications do not appear An error number i.e. E03 appearsReview or Retake mode Tape will not ejectIndex Indications 54EN Tally Lamp Power Lamp Dioptre Adjustment Control Lens Cover Open/Close RingBattery Release Switch Battery Pack MountPg , 7 High Speed Shutter Mode ......................... pgRemote Control Darken The LCD MonitorTo avoid hazard For safety, do notAvoid using the unit During useTo protect the unit, do not Cleaning the video heads To prolong service lifeDo not leave the unit To prevent damage to the LCD monitor, do notConnectors Provided Accessories Optional AccessoriesGeneral GR-FXM15