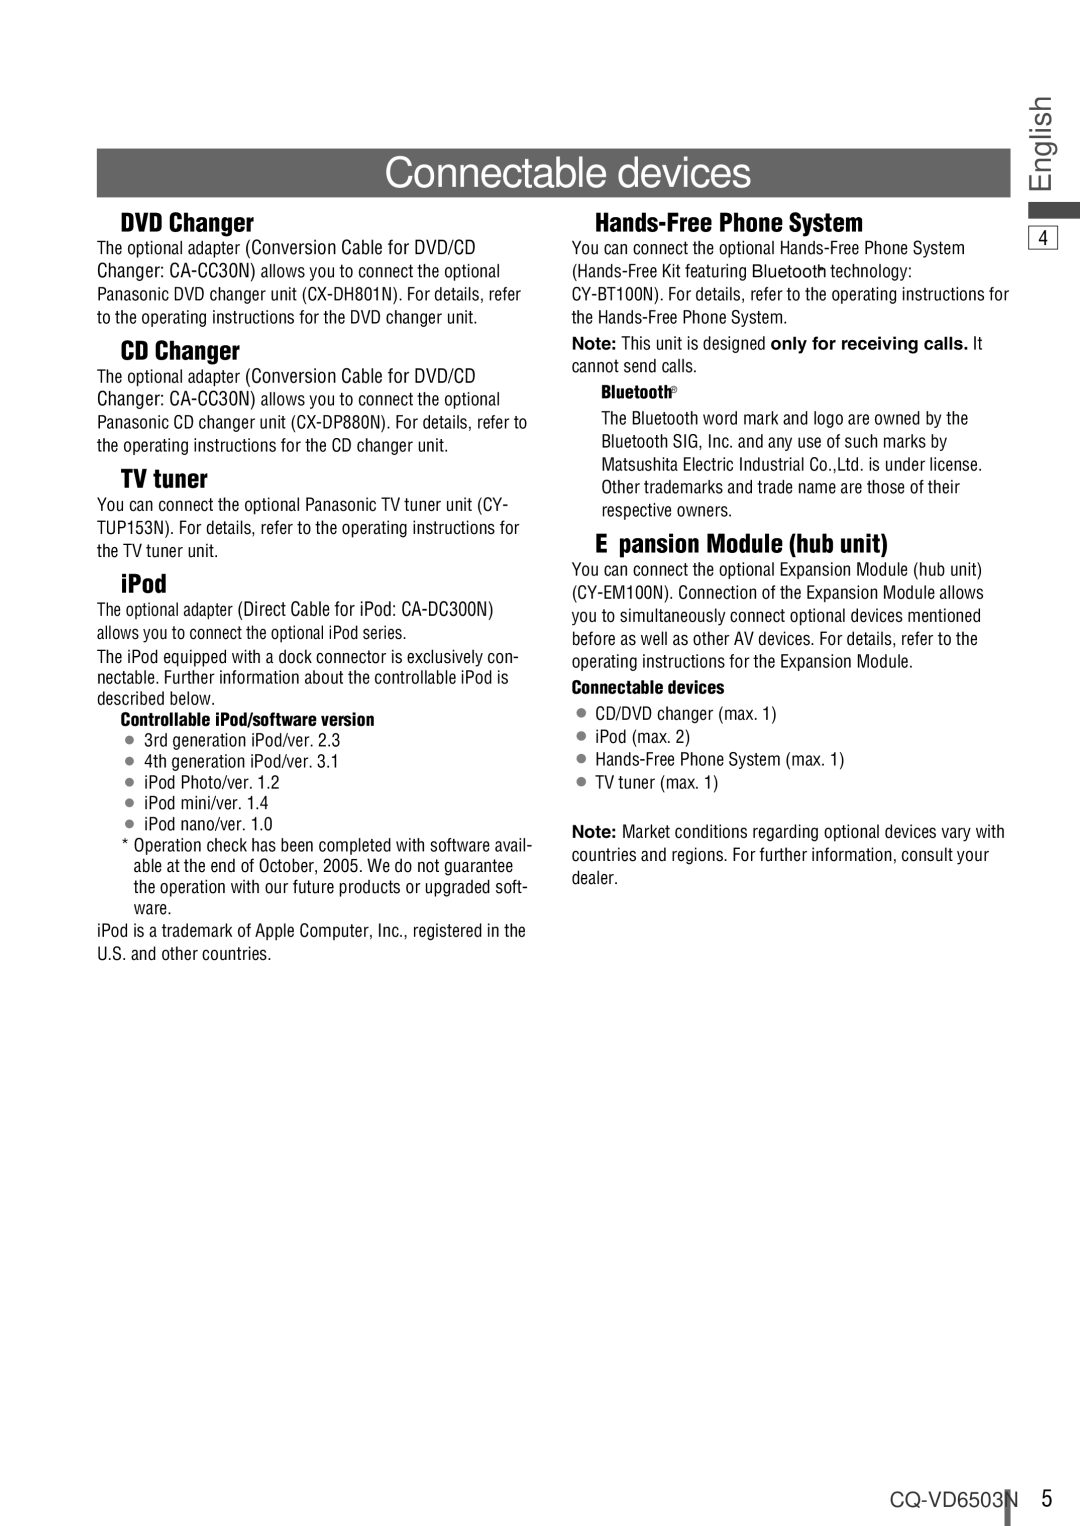
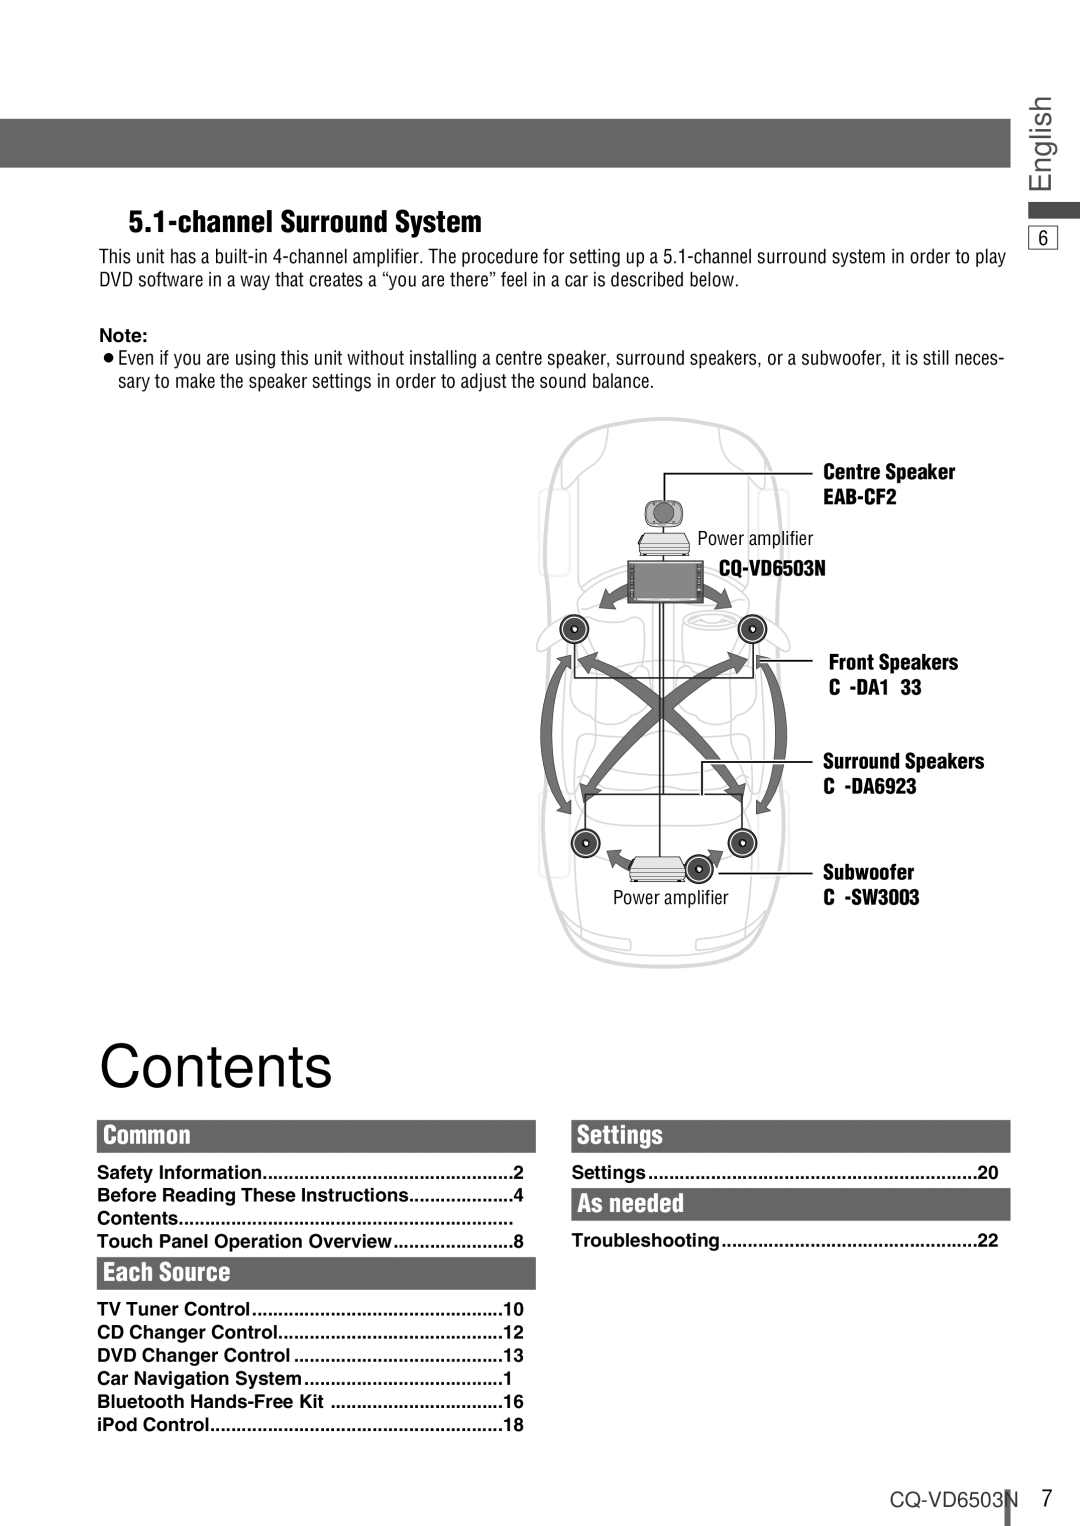
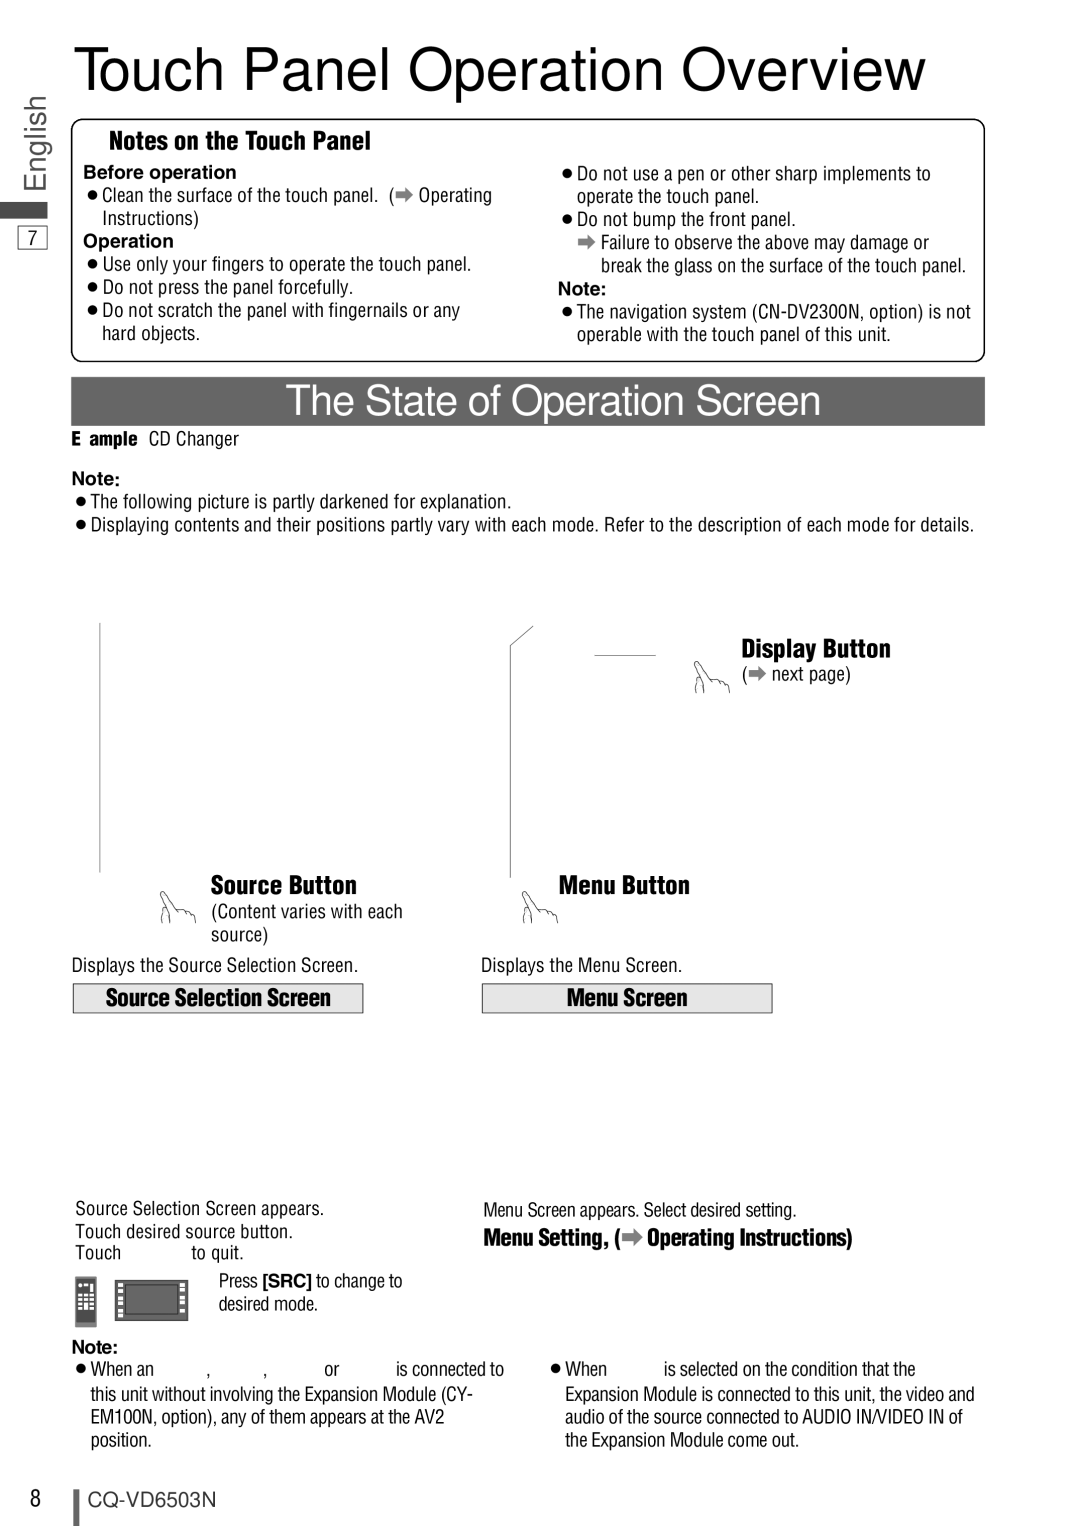
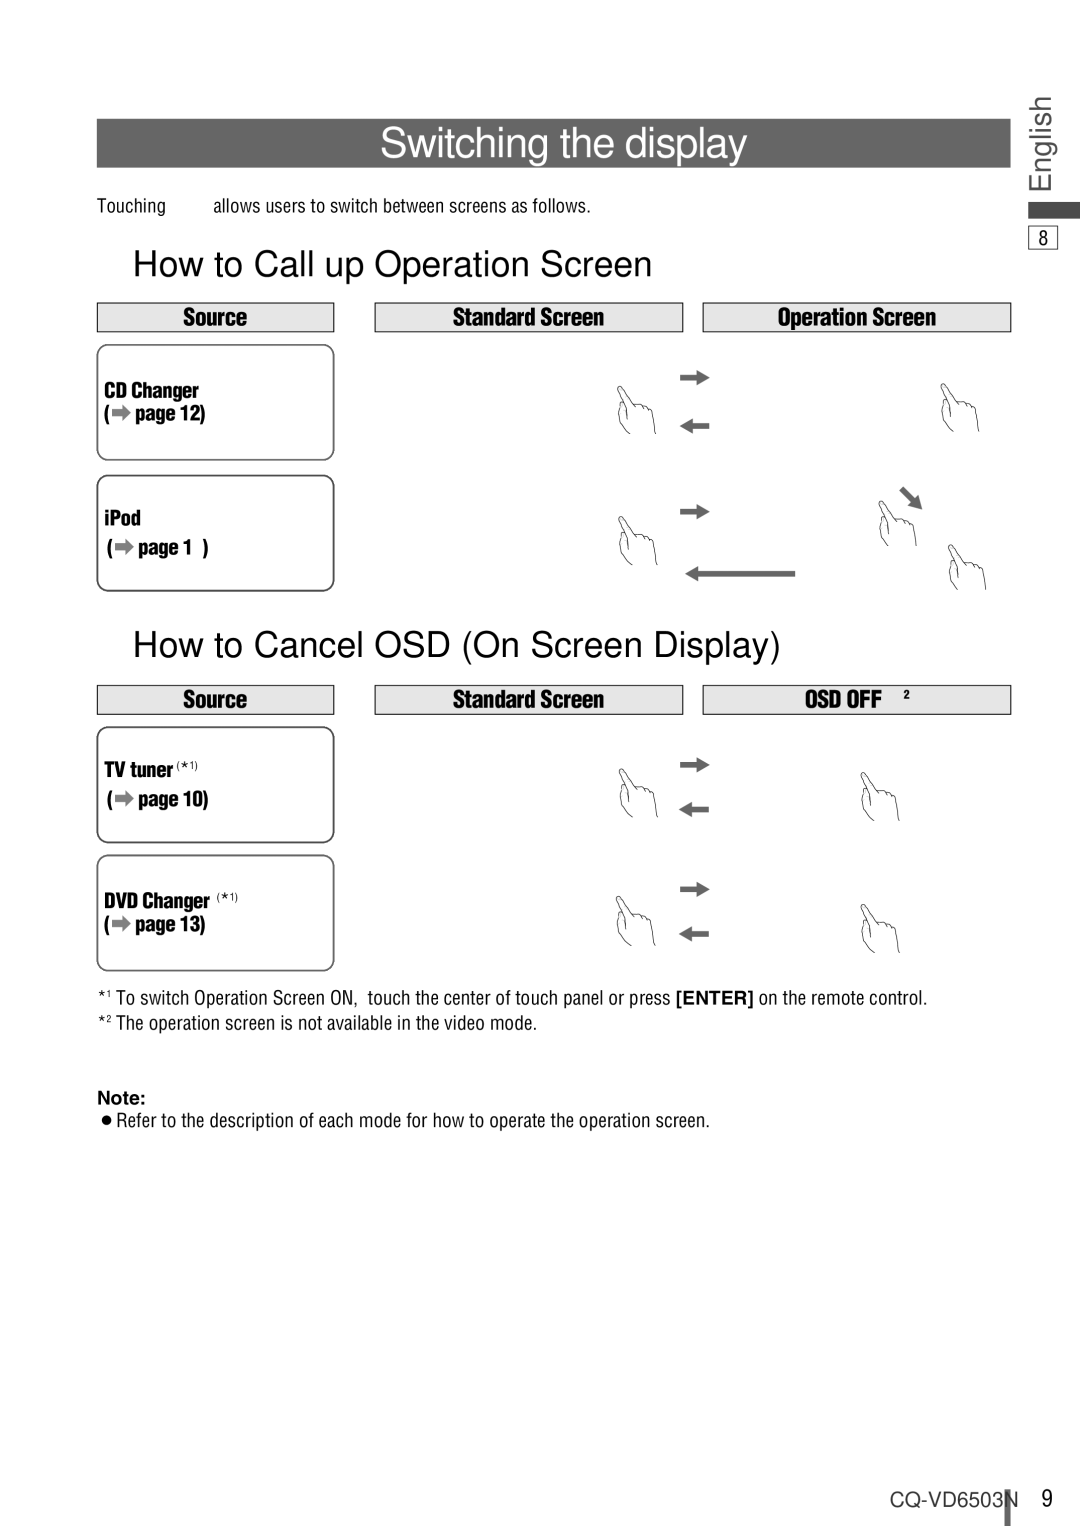
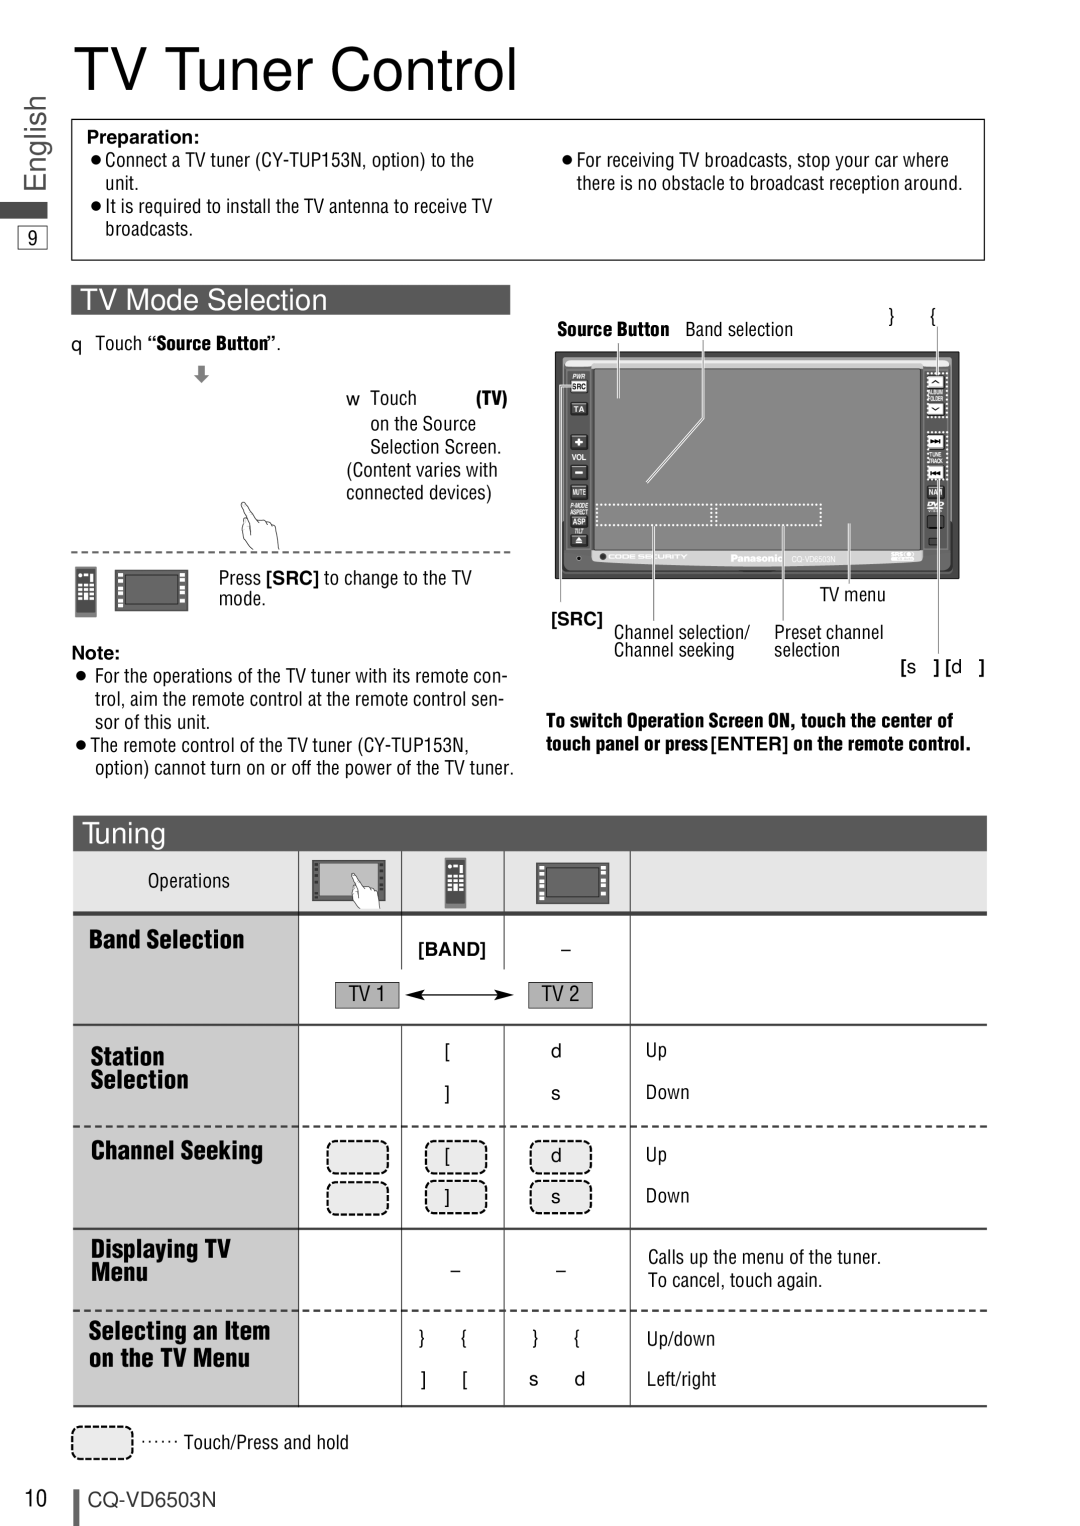
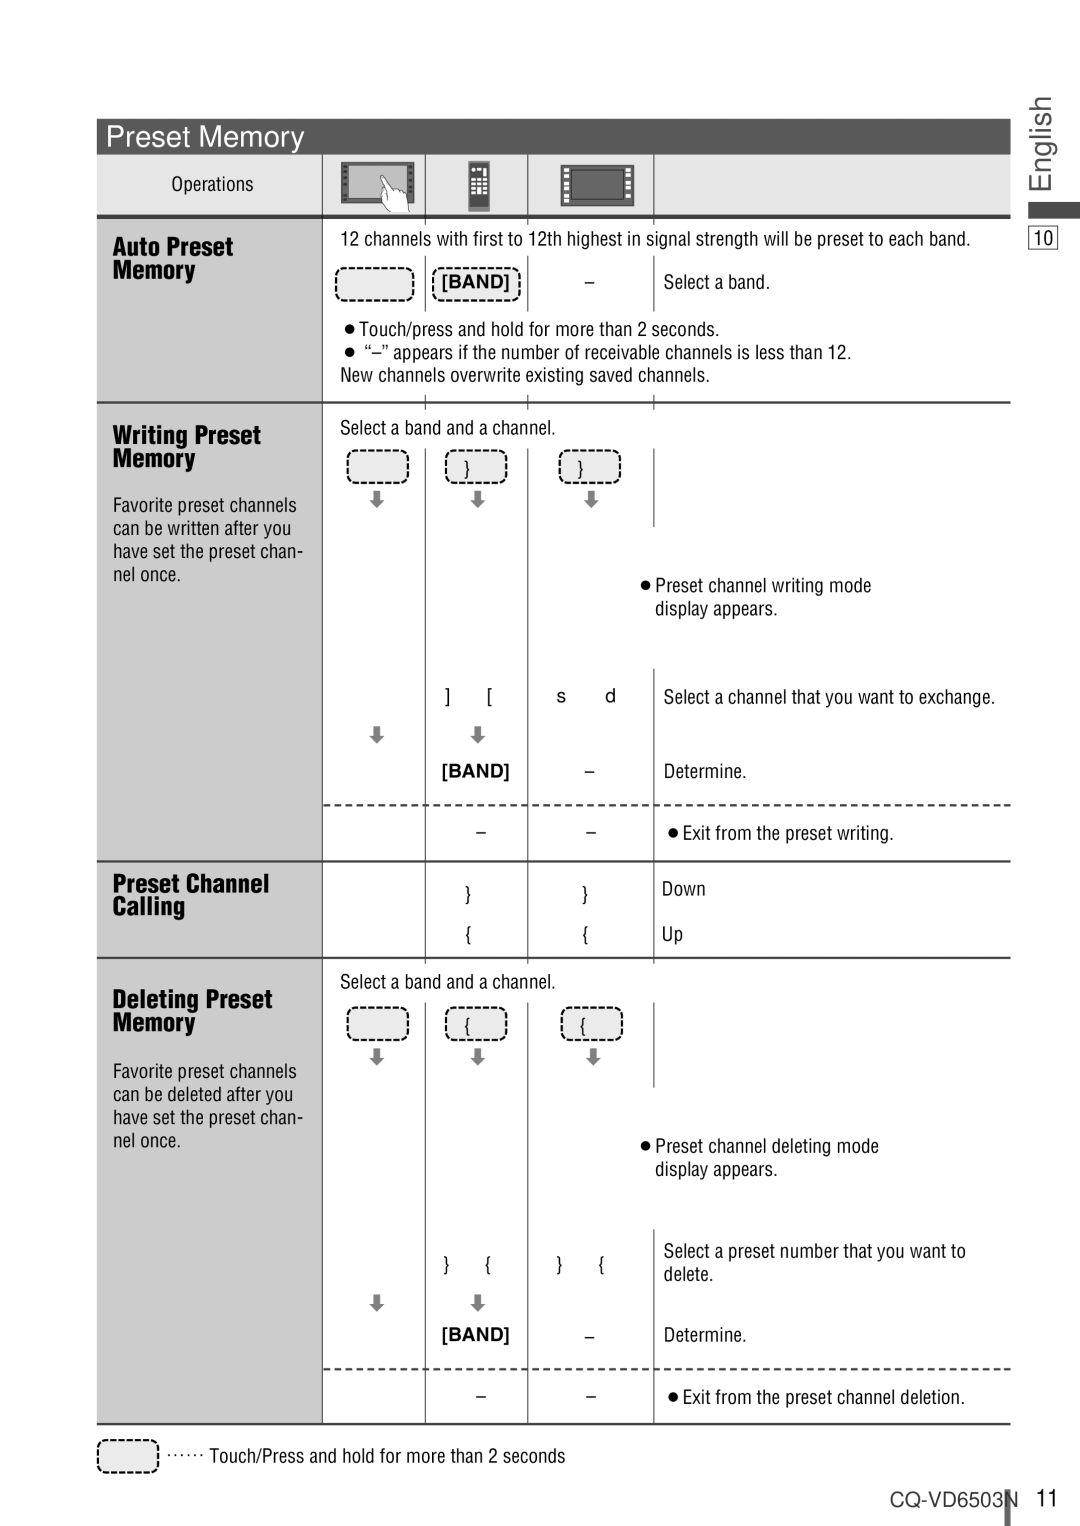
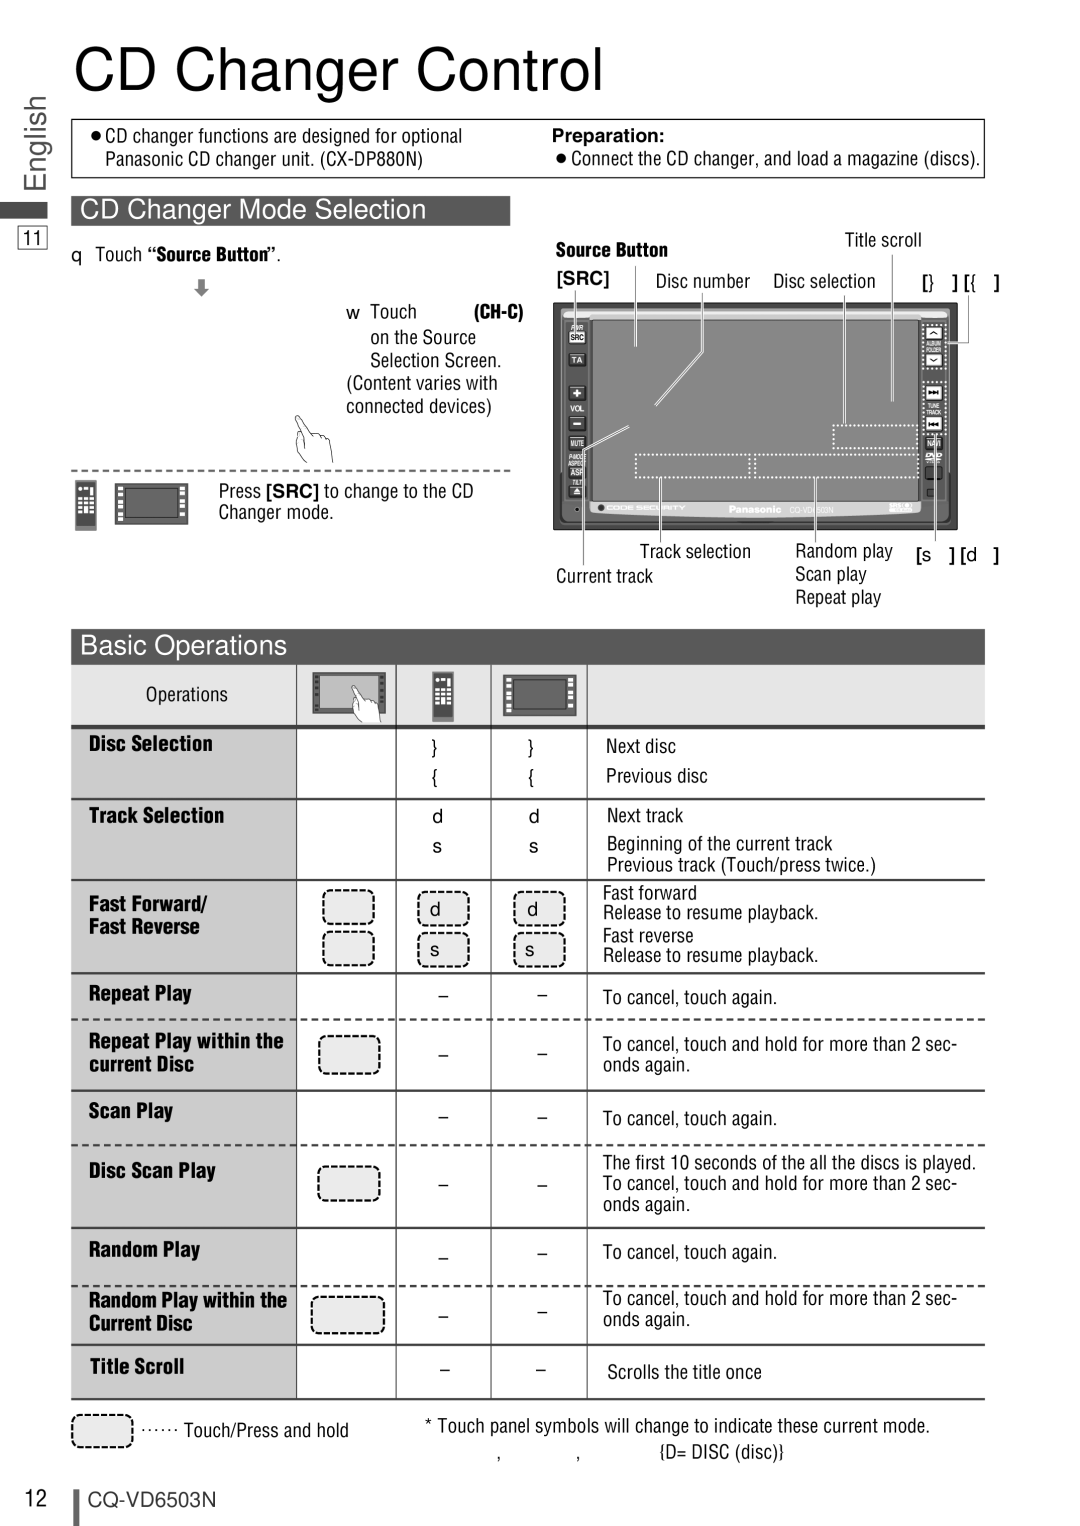
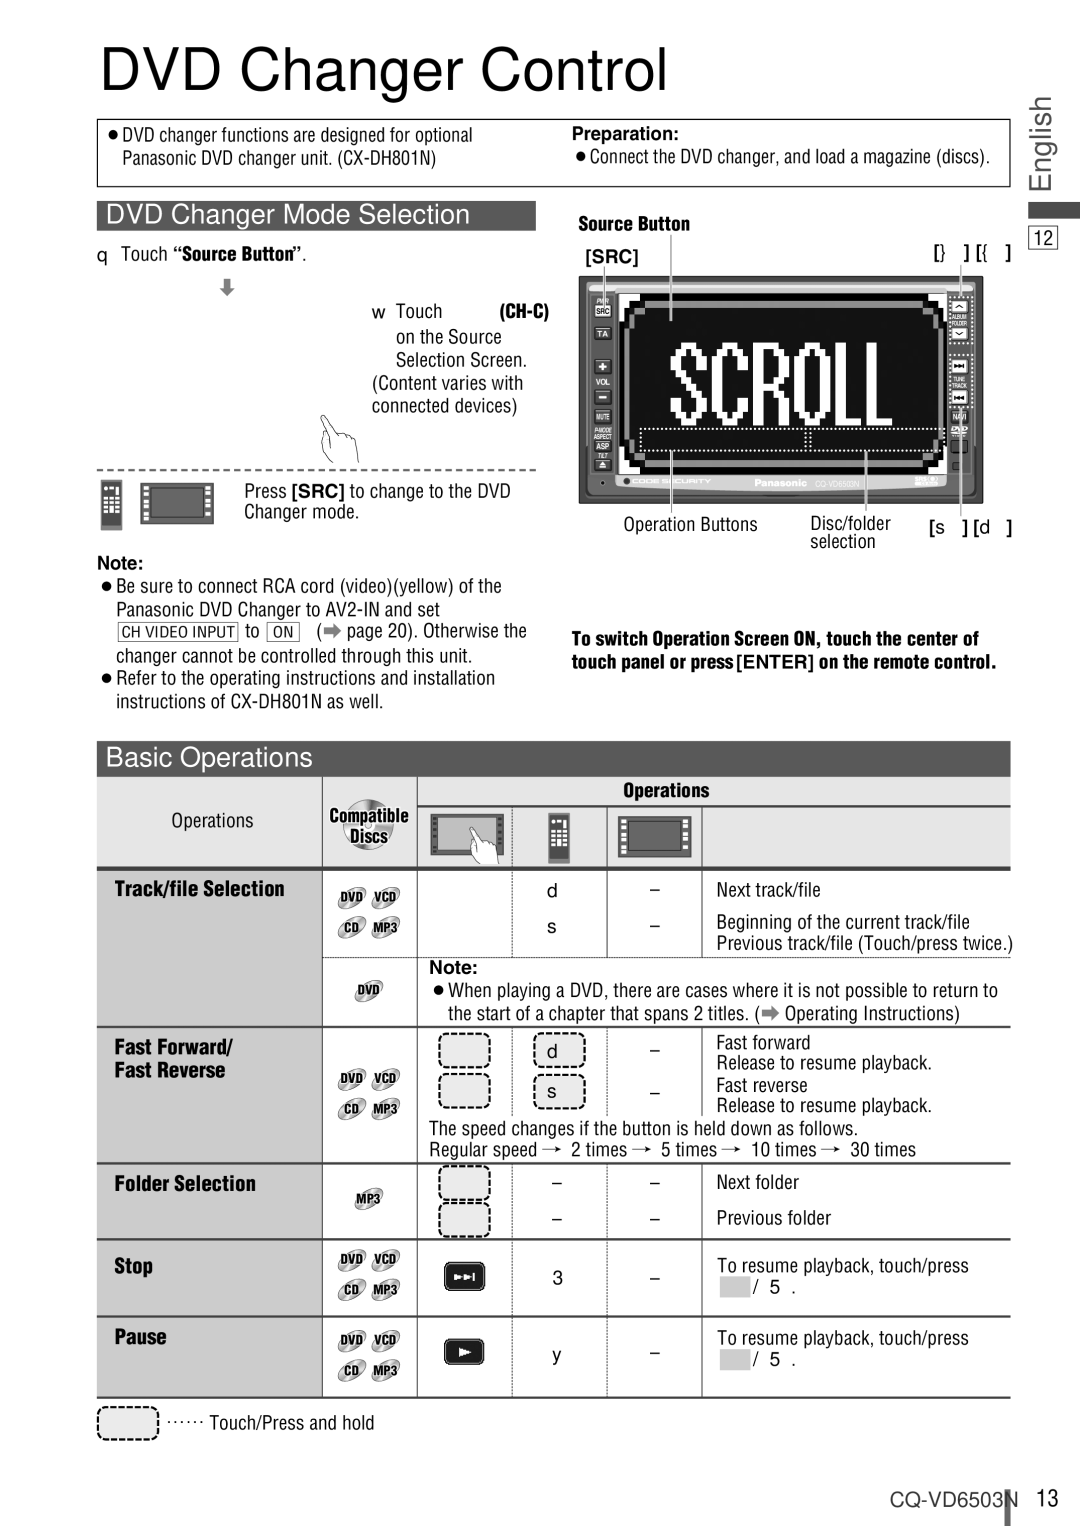
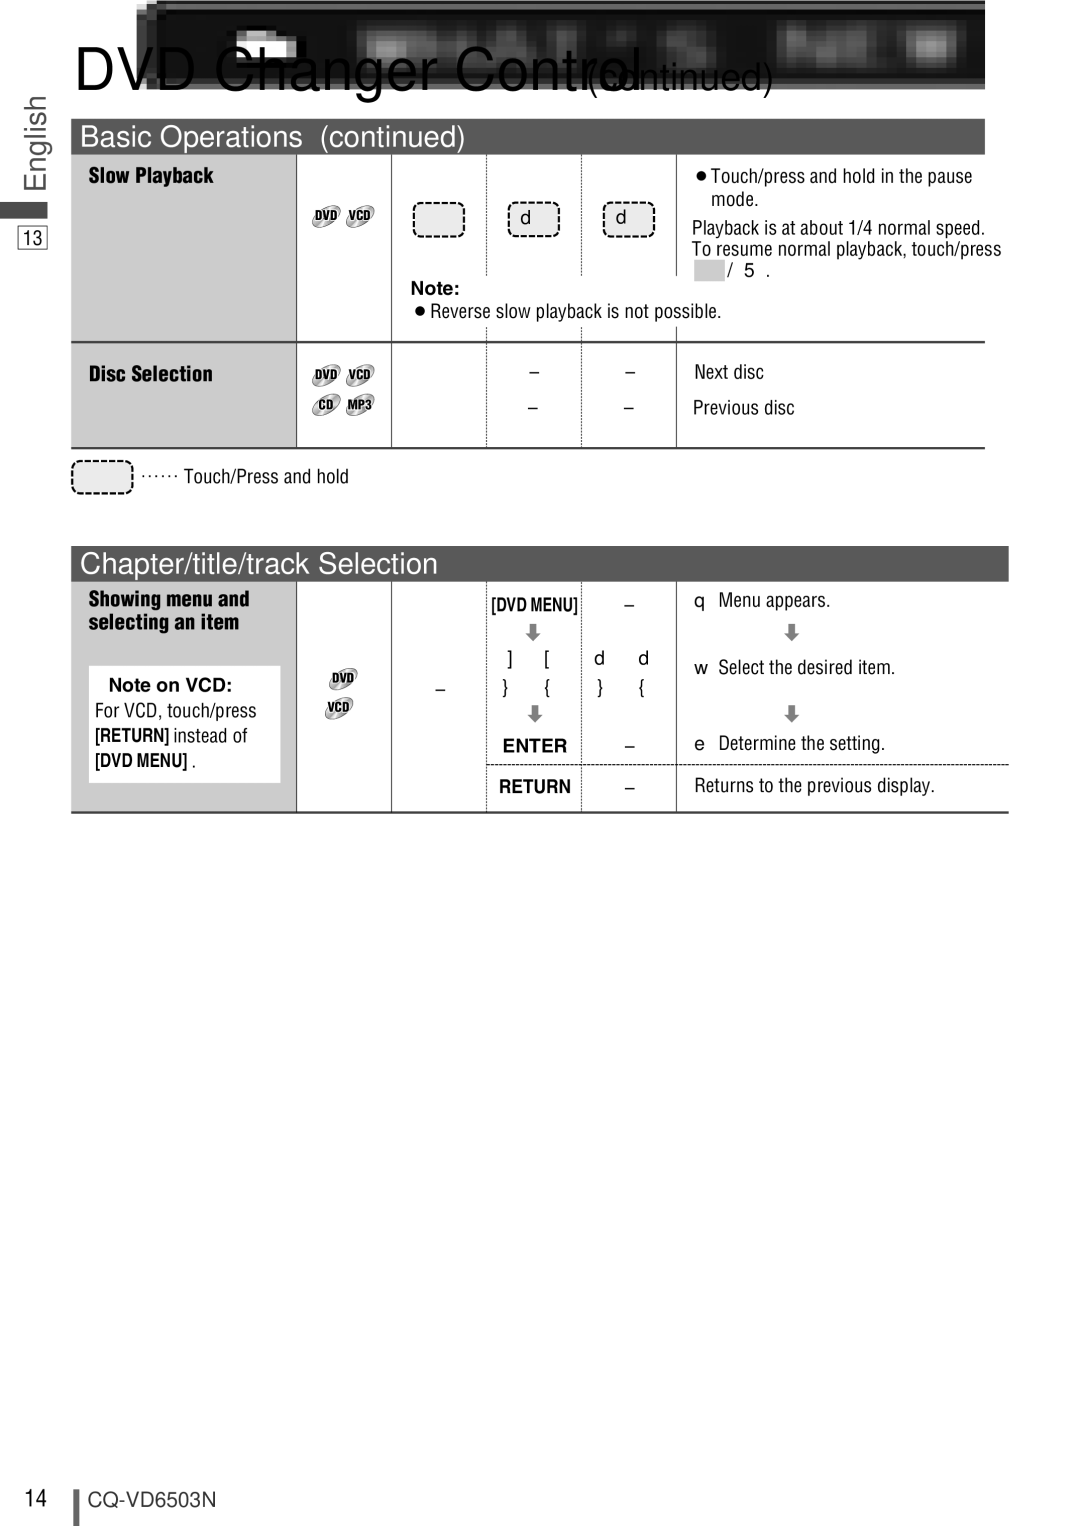
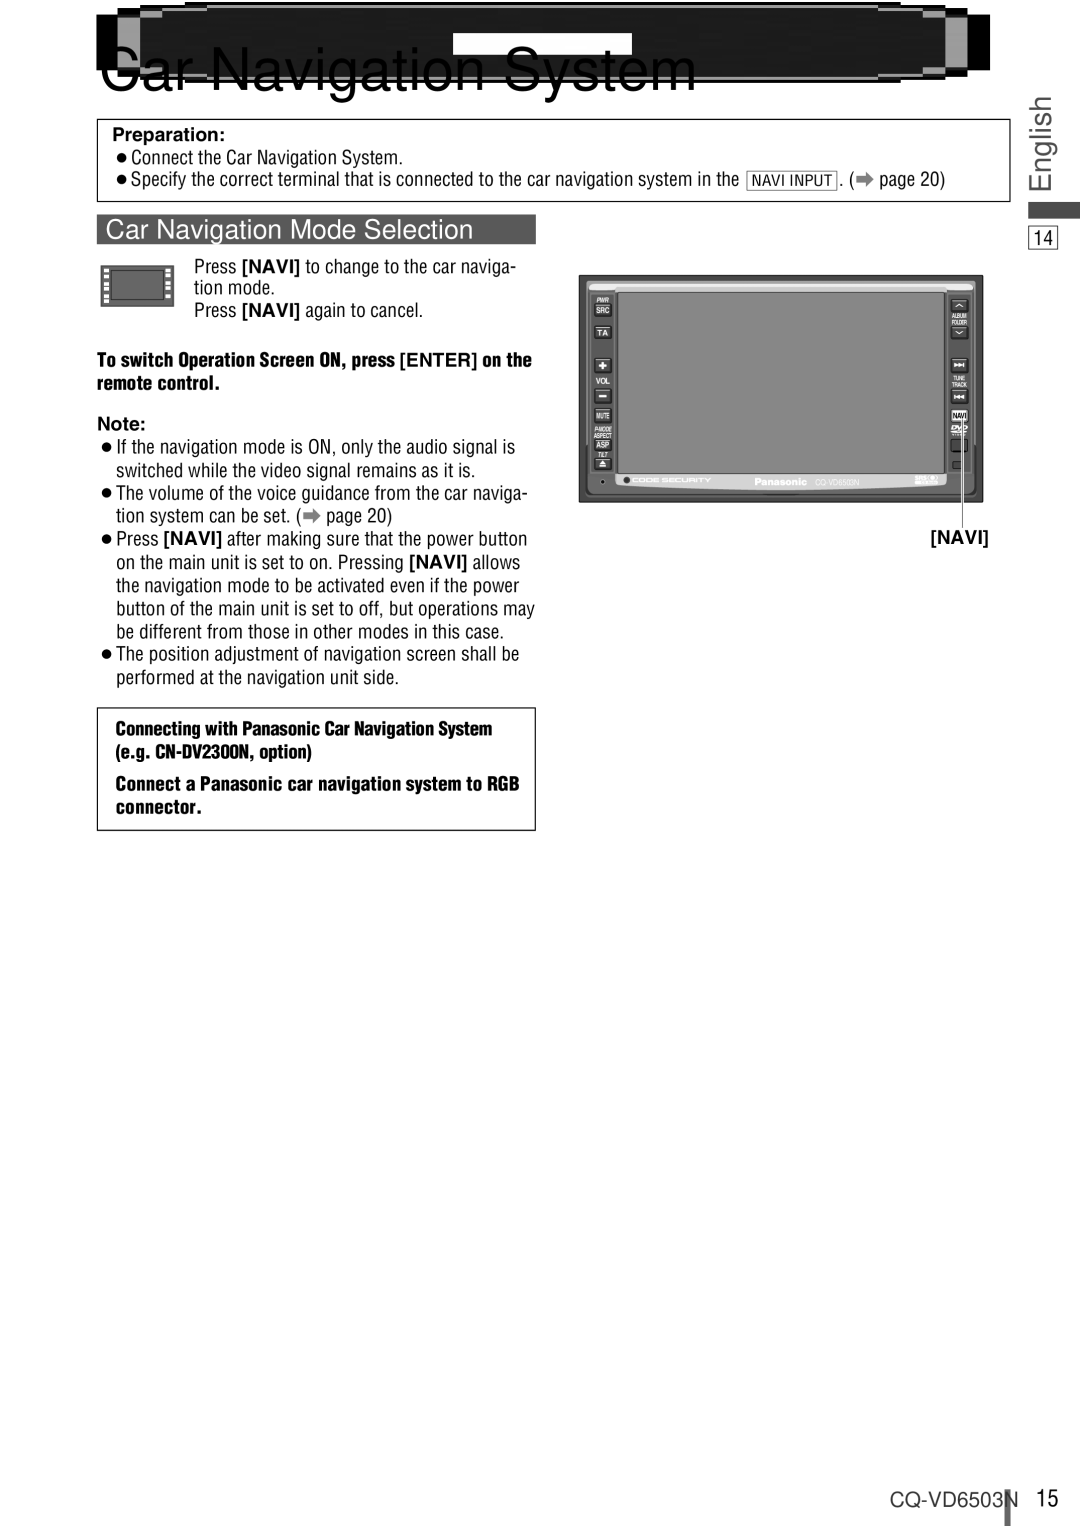
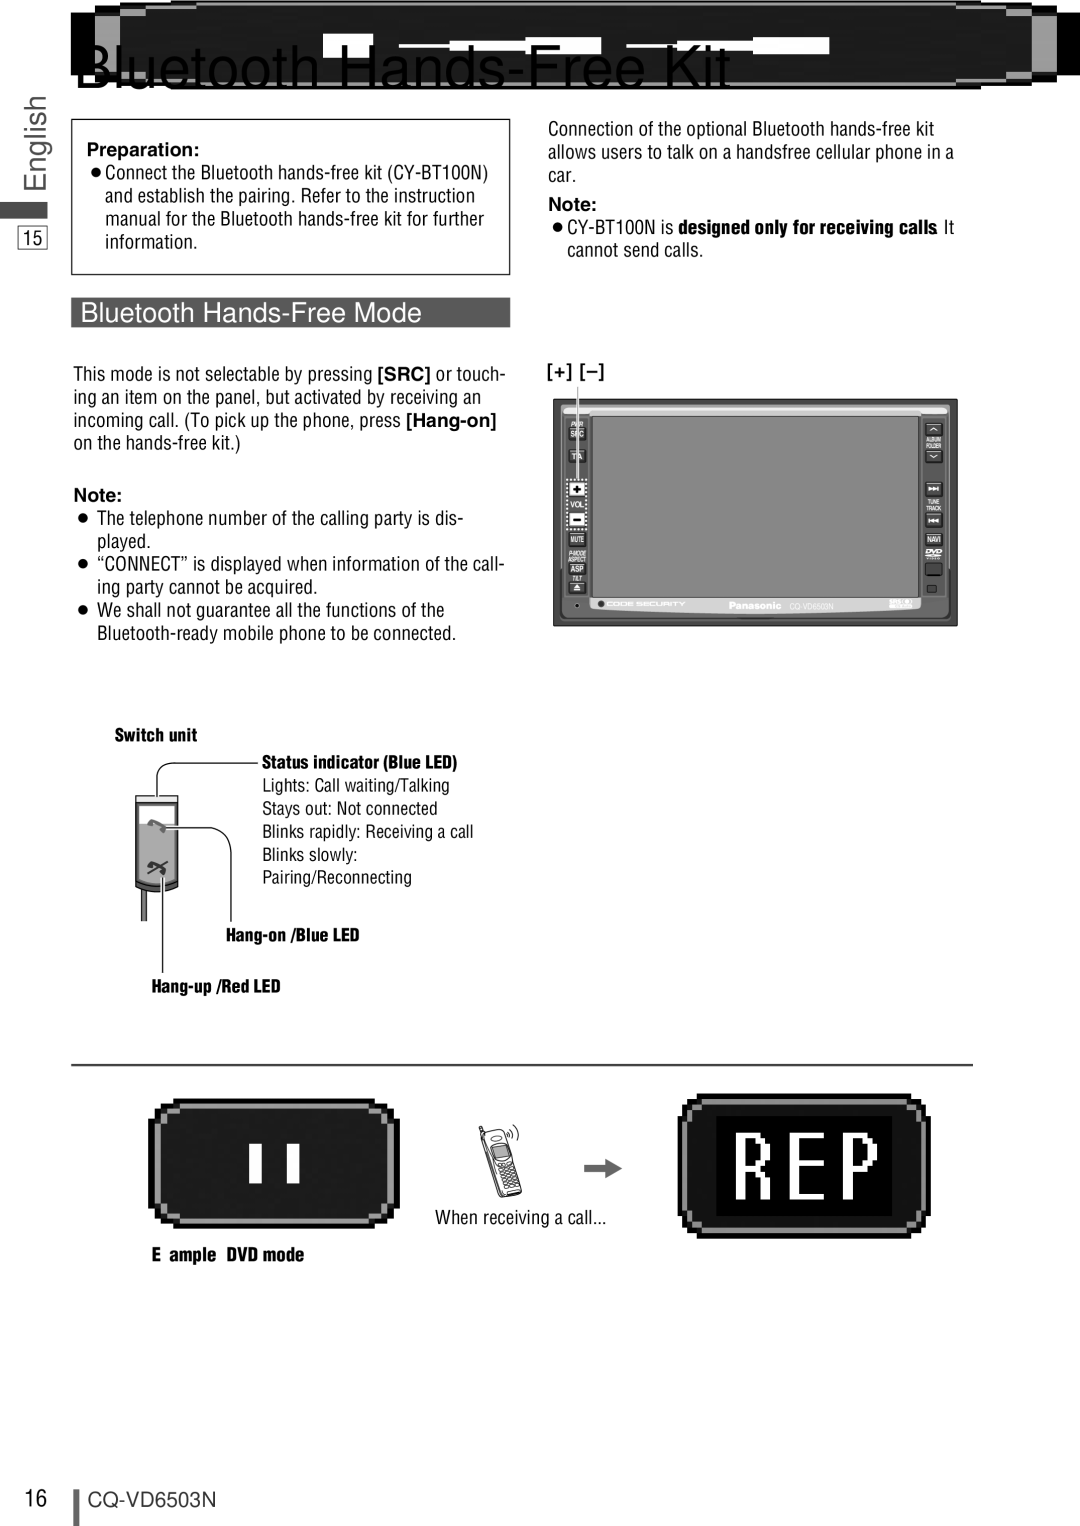
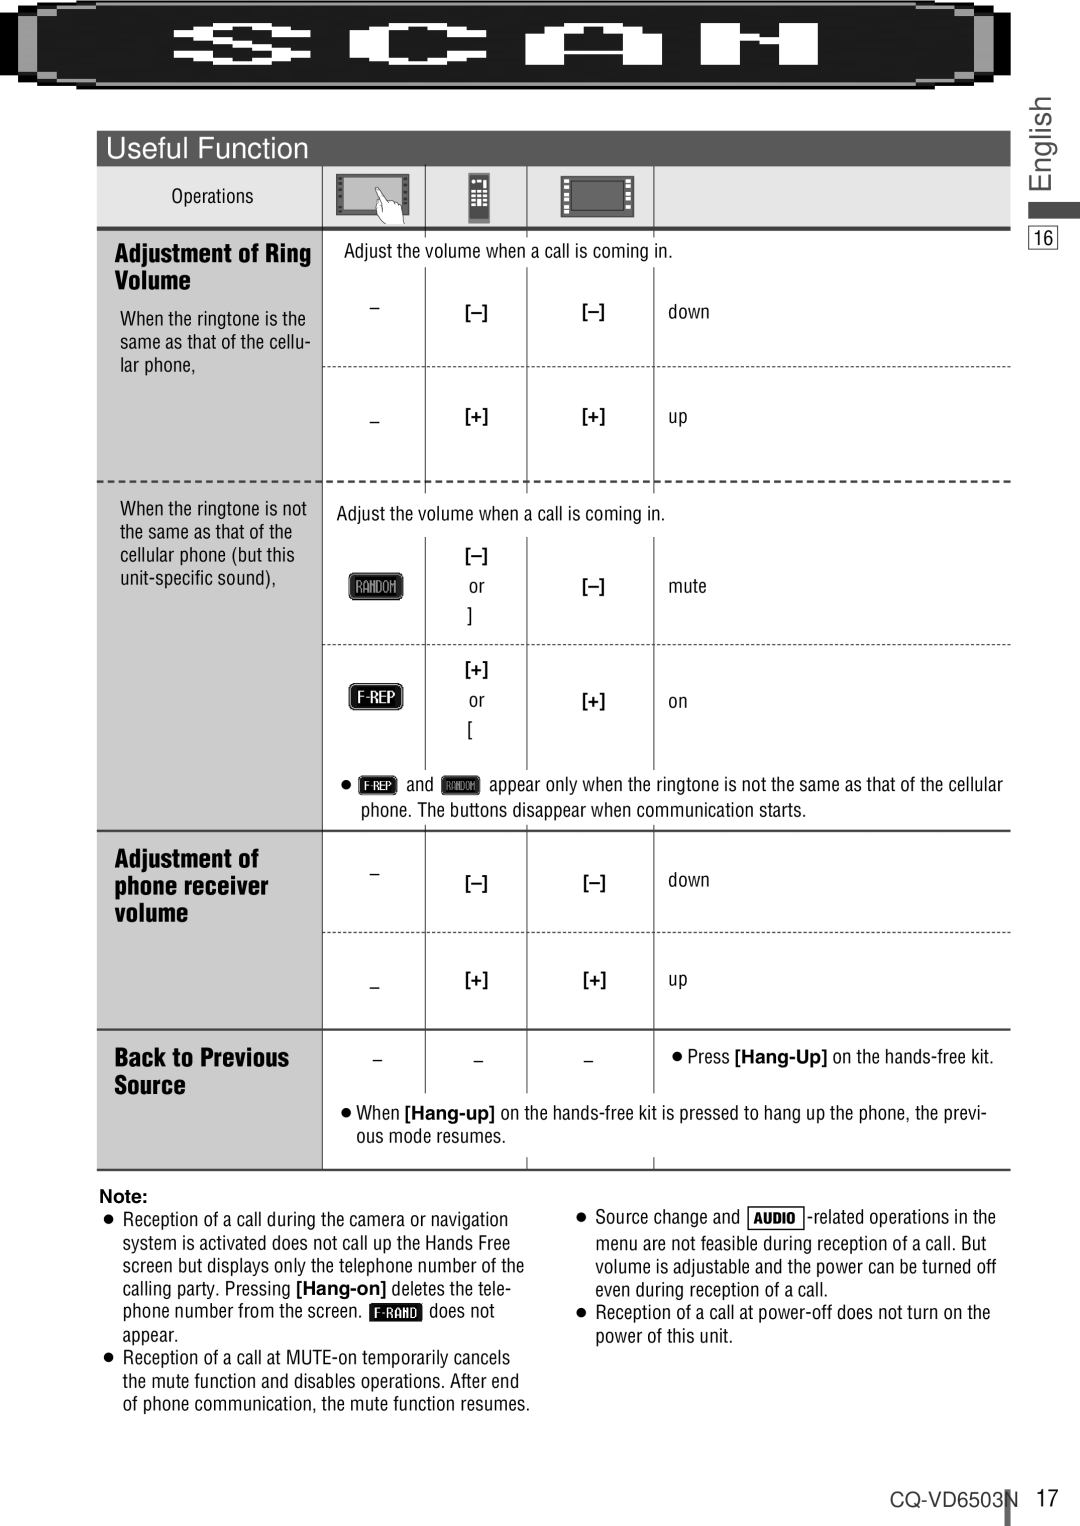
Panasonic CQ-VD6503N operating instructions Observe the following cautions when using this unit

Page 79

Caution

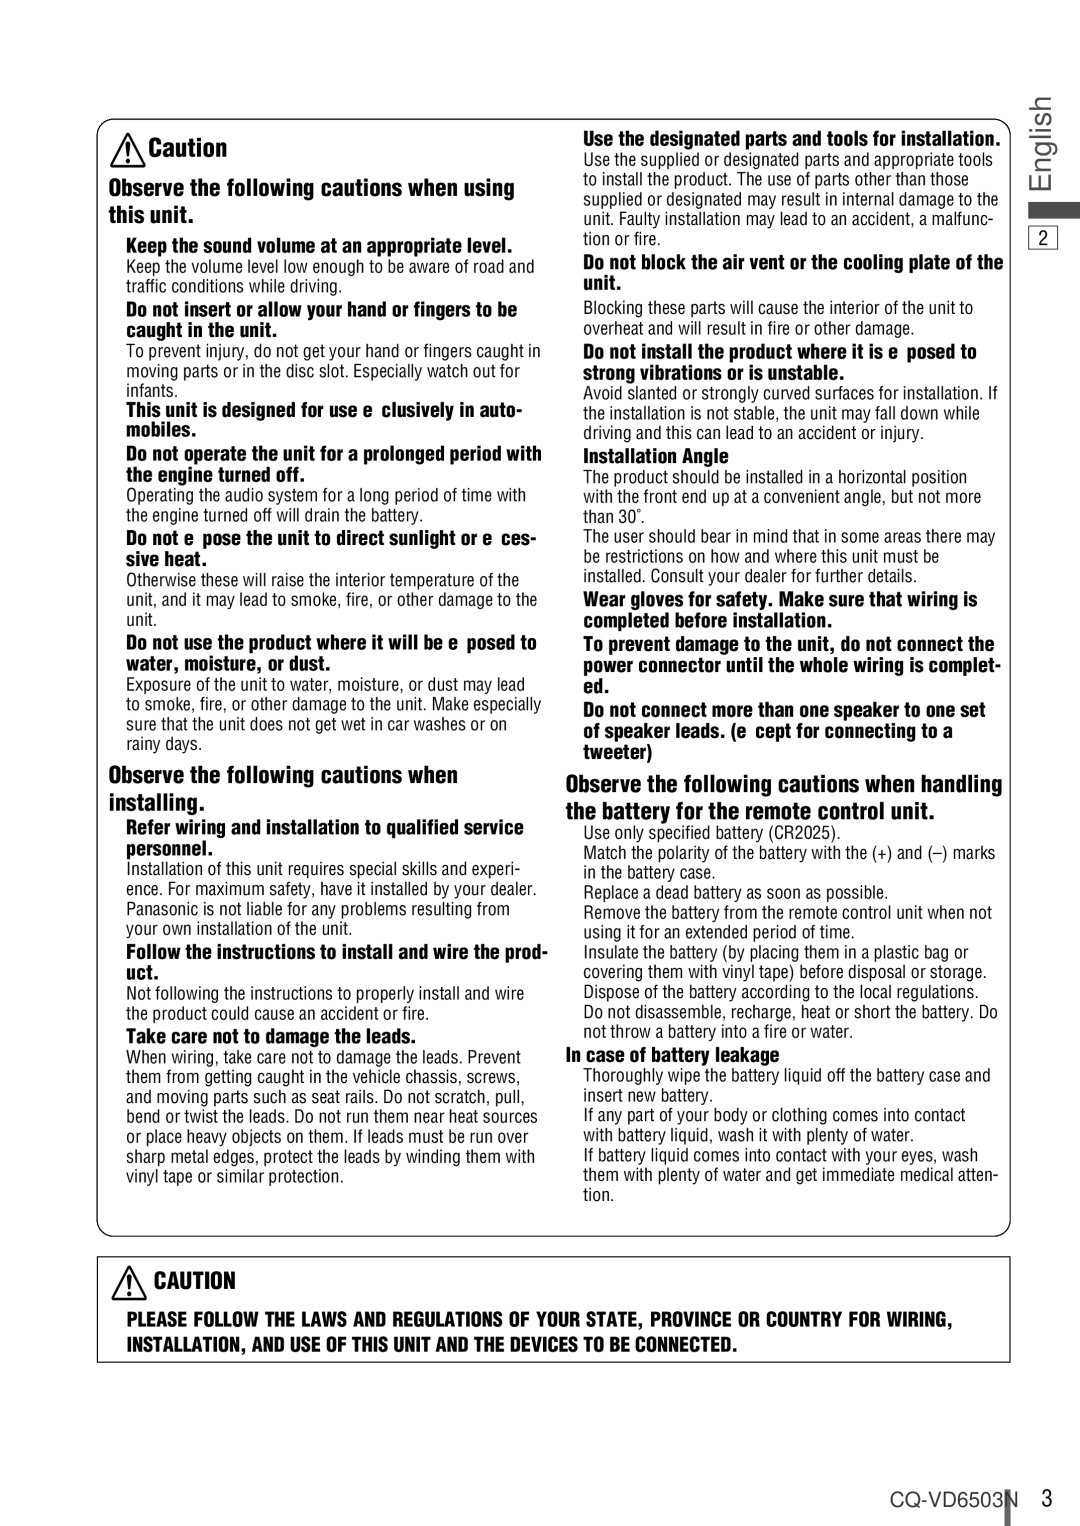
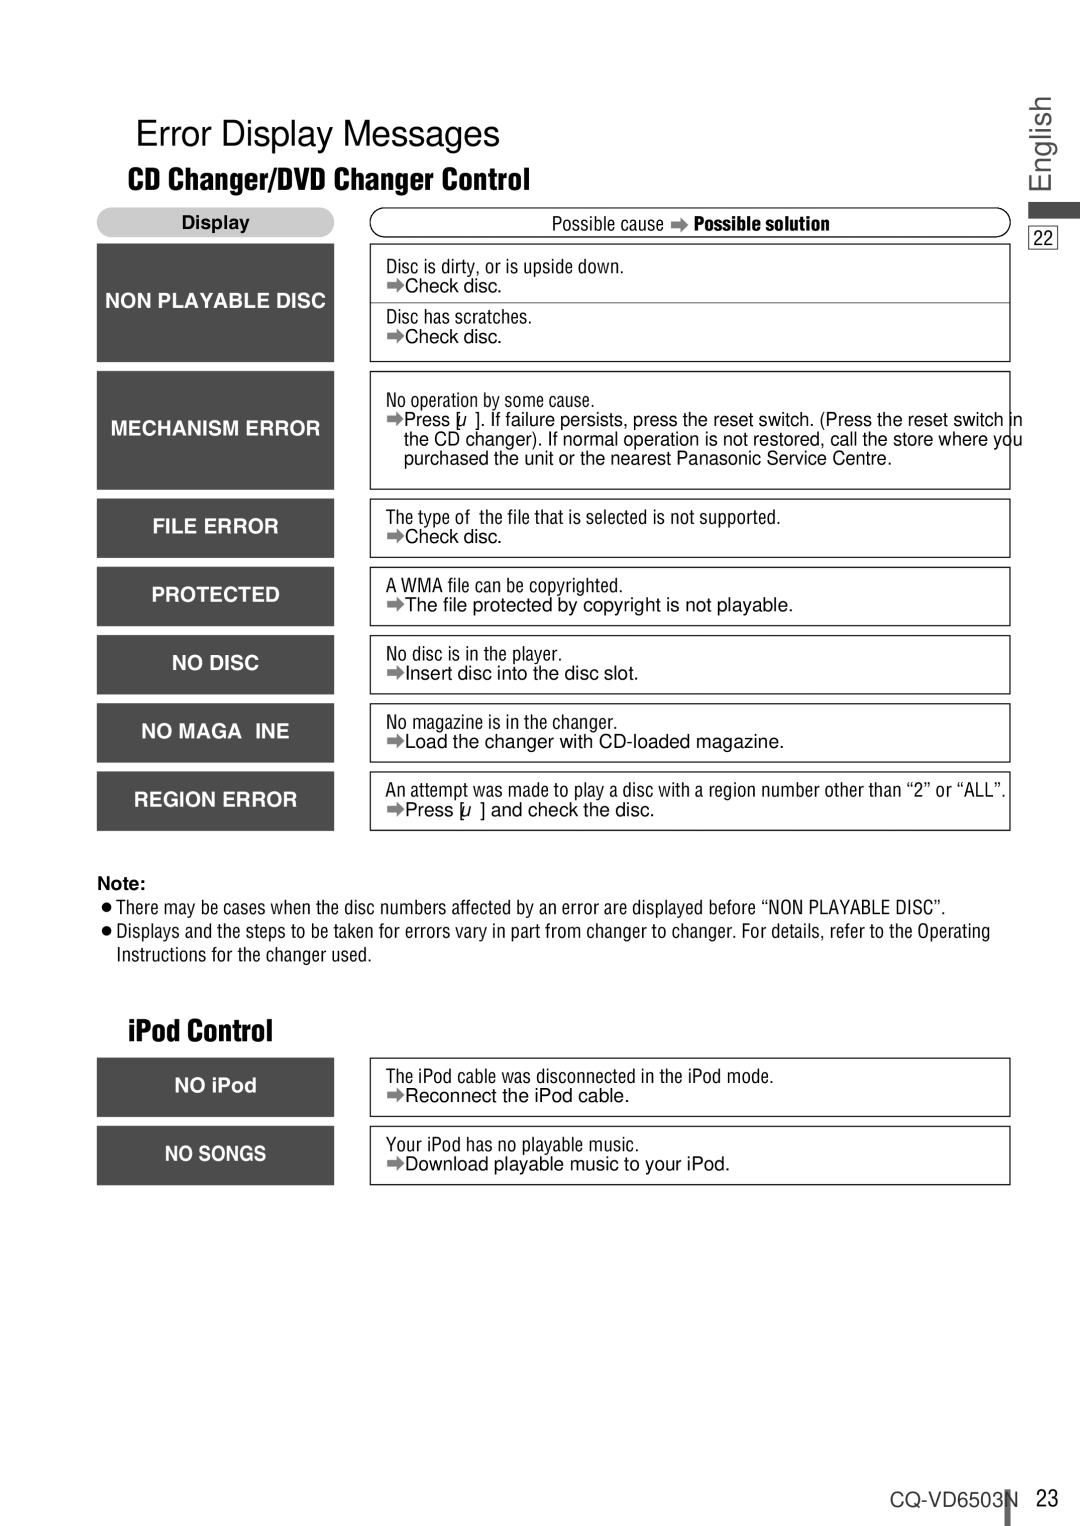
Observe the following cautions when using this unit.

Keep the sound volume at an appropriate level.

Keep the volume level low enough to be aware of road and traffic conditions while driving.

Do not insert or allow your hand or fingers to be caught in the unit.

To prevent injury, do not get your hand or fingers caught in moving parts or in the disc slot. Especially watch out for infants.

This unit is designed for use exclusively in auto- mobiles.

Do not operate the unit for a prolonged period with the engine turned off.

Operating the audio system for a long period of time with the engine turned off will drain the battery.

Do not expose the unit to direct sunlight or exces- sive heat.

Otherwise these will raise the interior temperature of the unit, and it may lead to smoke, fire, or other damage to the unit.

Do not use the product where it will be exposed to water, moisture, or dust.

Exposure of the unit to water, moisture, or dust may lead to smoke, fire, or other damage to the unit. Make especially sure that the unit does not get wet in car washes or on rainy days.

Observe the following cautions when installing.

Refer wiring and installation to qualified service personnel.

Installation of this unit requires special skills and experi- ence. For maximum safety, have it installed by your dealer. Panasonic is not liable for any problems resulting from your own installation of the unit.

Follow the instructions to install and wire the prod- uct.

Not following the instructions to properly install and wire the product could cause an accident or fire.

Take care not to damage the leads.

When wiring, take care not to damage the leads. Prevent them from getting caught in the vehicle chassis, screws, and moving parts such as seat rails. Do not scratch, pull, bend or twist the leads. Do not run them near heat sources or place heavy objects on them. If leads must be run over sharp metal edges, protect the leads by winding them with vinyl tape or similar protection.

Use the designated parts and tools for installation.

Use the supplied or designated parts and appropriate tools to install the product. The use of parts other than those supplied or designated may result in internal damage to the unit. Faulty installation may lead to an accident, a malfunc- tion or fire.

Do not block the air vent or the cooling plate of the unit.

Blocking these parts will cause the interior of the unit to overheat and will result in fire or other damage.

Do not install the product where it is exposed to strong vibrations or is unstable.

Avoid slanted or strongly curved surfaces for installation. If the installation is not stable, the unit may fall down while driving and this can lead to an accident or injury.

Installation Angle

The product should be installed in a horizontal position with the front end up at a convenient angle, but not more than 30˚.

The user should bear in mind that in some areas there may be restrictions on how and where this unit must be installed. Consult your dealer for further details.

Wear gloves for safety. Make sure that wiring is completed before installation.

To prevent damage to the unit, do not connect the power connector until the whole wiring is complet- ed.

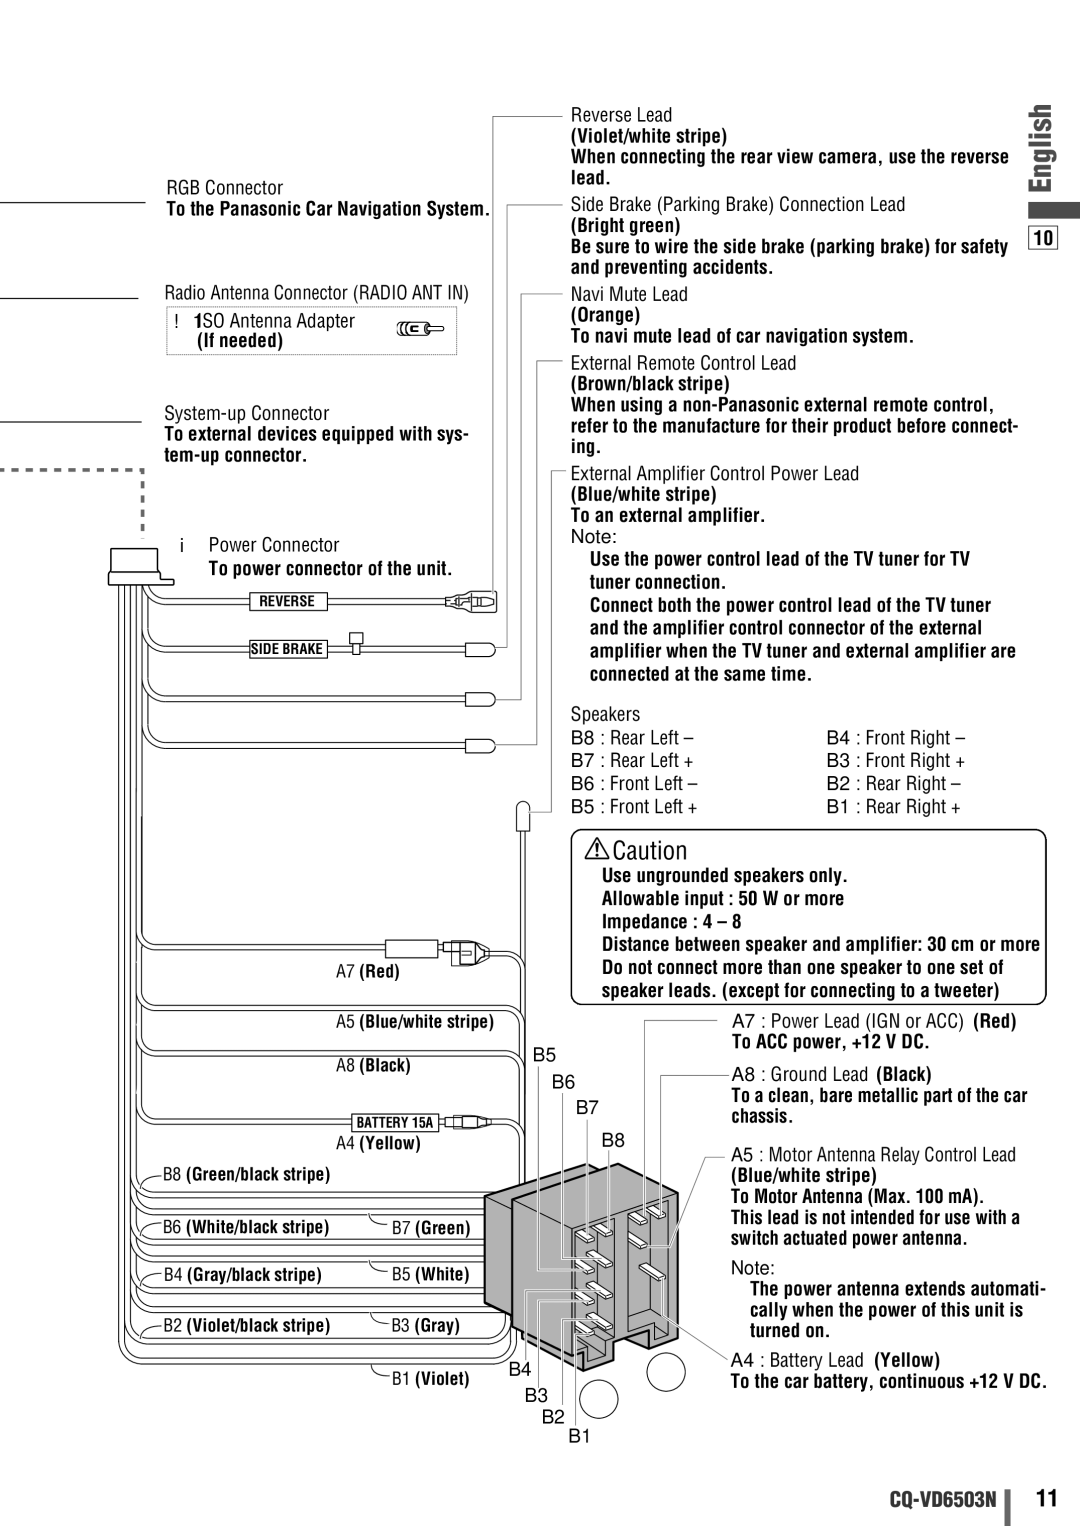
Do not connect more than one speaker to one set of speaker leads. (except for connecting to a tweeter)

Observe the following cautions when handling the battery for the remote control unit.

Use only specified battery (CR2025).

Match the polarity of the battery with the (+) and (–) marks in the battery case.

Replace a dead battery as soon as possible.

Remove the battery from the remote control unit when not using it for an extended period of time.

Insulate the battery (by placing them in a plastic bag or covering them with vinyl tape) before disposal or storage.

Dispose of the battery according to the local regulations.

Do not disassemble, recharge, heat or short the battery. Do not throw a battery into a fire or water.

In case of battery leakage

Thoroughly wipe the battery liquid off the battery case and insert new battery.

If any part of your body or clothing comes into contact with battery liquid, wash it with plenty of water.

If battery liquid comes into contact with your eyes, wash them with plenty of water and get immediate medical atten- tion.

English

2

CAUTION:

PLEASE FOLLOW THE LAWS AND REGULATIONS OF YOUR STATE, PROVINCE OR COUNTRY FOR WIRING, INSTALLATION, AND USE OF THIS UNIT AND THE DEVICES TO BE CONNECTED.

CQ-VD6503N

3

Image 79
Contents Model CQ-VD6503N Do not disassemble or modify the unit Use the proper power supplyDo not use the unit when it is out of order Protect the Deck MechanismTake care not to damage the leads Follow the instructions to install and wire the prod- uctInstallation Angle Case of battery leakageDeck Ass’y Upper Side Safety InformationConnection of side brake connecting lead Laser ProductLiquid Crystal Panel ComponentsConnectable devices FeaturesContents Preparation SettingsRemote Control Unit Battery ReplacementPictographs Symbols used in this manualDisc Marks Name of Controls and Functions ENT Enter Band RET Return RETMute + VOL ENTENTER/BAND TOP MENU/DVD MenuSource Button Touch Panel Operation OverviewState of Operation Screen Display ButtonShowing the hidden part of the screen Switching the DisplayHow to Call up Operation Screen Radio Disc Player DVD/VCD *1OFF PowerGeneral General OperationsTilt VolumeMute Tilt AngleDiscs that can be Played Back Before Disc PlaybackDisc Insert Disc Insert/EjectDisc Eject Audio Mode Disc Mode DVD SelectionVideo Mode VCD Video CD mode displayFast Reverse Track chapter/fileSelection Fast ForwardChapter/title Selection Angle Useful FunctionSubtitle Language Audio LanguageMP3 CommonDisplayed items Displayable charactersCopyright No warrantySupported file systems Maximum number of files/foldersTuning Radio Mode SelectionRadio Preset Memory RDS Basics RDS Radio Data SystemOther RDS functions AF on/off TA on/offPI Seek Program Identification Seek PTY Program Type PTY Menu Operation on RDSRegion Source Selection Screen Press SRC to change to the desired mode¡Connect an optional external device to the AV1/AV2 AV1/AV2 onEnglish User SettingsScreen Touch in Operation Screen Touch desired settingExample setting screen of Display Unit a Menu OperationTilt How to set your ID code for the first timeHow to change your ID code How to cancel the known ID codeSecurity LED BeepTint Adjusting level of each presetBright Color¡TruBass SelectTruBass MixingSUR PhaseFront CenterAV1 Level Adjusting the output balance¡After setting the input level Center tingTV Type MenuSubtitle AudioAV2 Skip Mono Aspect Ratio ¡Be sure to set to OFF when you do not use the private mode Private Mode39 on Sound setting menu while private mode is active ACheck the speaker wiring TroubleshootingCommon Poor reception or noise None appears when Selecting PTYCheck the wiring of the antenna battery lead RadioASecure the unit to the console box Picture is dark. Display SettingsPicture is whitish. Something Remote control unit Sound settingsCase you forget the ID code Error Display MessagesCD/MP3/WMA/DVD/VCD Video CD Maintenance ¡Damaged or deformed discs How to hold the discDisc cleaning DVD-Rs/RWsOther cases... a Language Code ListCode Language Name Interactive DVD Dolby DigitalDolby Pro Logic DtsSales and Support Information SpecificationsFor UK and Ireland customers only YFM284C551ZA PTW0206-0 Model CQ-VD6503N Safety Information DVD Changer Upgrade OptionsTV Tuner Display Unit CY-TUP153N, option Rear Monitor IPod CD ChangerPreparation Dashboard InstallationInstallation Opening Installation PrecautionsMm for installation. a Before InstallationInstallation Hardware For Installation Diagram QtyMounting Procedures a When using Mounting Collar w Installation GuideMethod for Fixing the Rear of the Unit Removing Procedures Mounting Procedures BWhen not using Mounting Collar w Side Brake Parking Brake Connection Lead Hand brakeFoot brake Side Brake Parking Brake Connection Lead Bright greenElectrical Connections Precautions ISO ConnectorWiring Diagram Power Connector RGB ConnectorRadio Antenna Connector Radio ANT in !1ISO Antenna Adapter System-up ConnectorRCA Cord DIN ConnectorCX-DH801N option Ground Lead BlackCX-DP880N option Battery Lead YellowDIN Cord Black DIN Connector Conversion Cable for DVD/CD Connection with CD Changer CX-DP880NTV Tuner External Amplifier Control Power LeadConnection with TV Tuner CY-TUP153N CY-TUP153N optionCY-EM100N option Example Connection with Rear MonitorRear View Camera option Connecting the Reverse LeadConnection with Rear View Camera Rear View Camera Control Unit optionCamcorder option Connection with VCR or CamcorderNavi Mute Lead CN-DV2300N optionCar Navigation System RGB CordYFM294C069ZA PTW0206-0 Model CQ-VD6503N Safety Information Observe the following cautions when using this unit Before Reading These Instructions System upgrade sampleTV Tuner Rear Monitor Display Unit CY-TUP153N, option Connectable devices IPod System-up Connector CD ChangerBluetooth technology Simultaneous Multi-Device ConnectionEAB-CF2 Channel Surround SystemMenu Setting, a Operating Instructions CD Changer a TV tuner *1 a DVD Changer *1 aTV Tuner Control TV Mode SelectionPreset Channel Writing PresetCalling Deleting Preset Current Disc CD Changer ControlDisc Selection Track SelectionTrack/file Selection DVD Changer ControlTouch Source Button Touch CH-C Mode Basic OperationsChapter/title/track Selection ¡Touch/press and hold in the pauseNavi Car Navigation SystemInformation Bluetooth Hands-Free KitWhen receiving a call CarSource AdjustmentPhone receiver Volume Back to Previous Adjustment of RingNext track/file Beginning of the current track/file IPod ControlFast reverse Release to resume playback Operation Screen Shuffle SongsShuffle Albums Standard ScreenCamera DVD INPUT/OUTPUT RadioScale When the Expansion Module CY-EM100N, option is connected When the Expansion Module CY-EM100N, option is disconnectedRear view camera is not connected correctly ProblemPicture from a rear View camera is not Displayed Picture from a car navigation system is not displayedNo magazine is in the changer IPod cable was disconnected in the iPod modeCD Changer/DVD Changer Control IPod ControlYFM284C575ZA PTW0206-0