Sony MZ-N510 Selecting the play mode, Listening to selected tracks only Bookmark Play

Page 30

Selecting the play mode

You can select from various play modes such as repeat play, shuffle play, or bookmark play.

MENU

4-way control key

(ENTER • N, ., >, x)

1 While the recorder is playing, press MENU.

2 Press . or > repeatedly until “P-MODE” flashes in the display, and then press ENTER again.

3 Press . or > repeatedly to select play mode, and then press

ENTER.

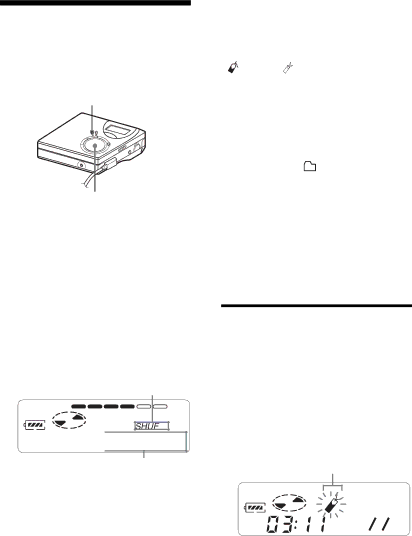
Display window on the recorder

A

Shuff

B

When you press >, B changes. When you press ENTER, A appears.

Indication A/

Play mode

B1)


Normal/—

All the tracks are


played once.


Indication A/

Play mode

B1)


1 Trk/1

A single track is


played once.


TrPLAY/

Bookmarked tracks


play back in order


of their track


number.


Shuff/SHUF

All the tracks are


played in random


order


1)Group play mode ( ) appears whenever you play a disc with group settings. For more details, see “Selecting the play mode for group play (Group Play Mode)” (page 41).

4 Select “RepON” (playing a track repeatedly) or “RepOFF”.

When you select “RepON”, “ ” appears on A and the playback repeats with the play mode selected in step 2.

Listening to selected tracks only (Bookmark Play)

You can bookmark tracks on a disc and play them only. The sequence of bookmarked tracks cannot be changed.

To bookmark the tracks

1While playing the track you want to bookmark, press and hold N for 2 seconds or more.

Flashing slowly

B 007

The first track of the bookmark play is set.

2Repeat step 1 to bookmark other tracks. You can bookmark up to 20 tracks.

30

Image 30
Contents Portable MiniDisc Recorder Avoid Exposure to Beam InformationOn the supplied software Table of contents Using the group function Editing recorded tracksOther operations Troubles and solutions Power sourcesTroubleshooting and explanations Additional informationWhat is a Net MD? Basic Operations Advanced operationsOther information Settings and PrecautionsUninstalling the SonicStage software Information and explanationsPage Before using this product When using the recorderChecking the supplied accessories AC power adaptor NH-7WMAA Nickel metalLooking at controls RecorderDisplay window of the recorder 2 1Headphones/earphones with a remote control Stop button Search/AMS buttonGetting started Charge the rechargeable battery Disconnect the AC power adaptorConnect firmly Battery life Connect the headphones/earphonesWith the remote control to When recordingPress Open to open the lid CheckFirmly and completely into the appropriate jacks Press MARK1Press N on the recorder Or on the remote controlVolume To stop play, press Control Way control keyOperation on Operation on the remote Recorder Control If the play does not startViewing various information When you press ENTER, a and B appear in the displayVarious ways of recording Way control key Enter NMark To stop recordingPress LP2 Recording Display Mode Window Time RecorderLong-time recording Mdlp LP4Adding track marks manually Recording from a TV or a radio Analog RecordingAdding track marks while recording You can add track marks track number while recordingTo cancel Auto Time Stamp Adding track marks automatically Auto Time StampSelect OFF in or stop recording While pressing X, press REC Adjusting the recording level manuallyTo switch back to automatic level control Fifth segmentVarious ways of playback Selecting the play mode Listening to selected tracks only Bookmark PlayAdjusting treble or bass Digital Sound Preset Selecting the sound qualityAdjusting the sound quality To cancel selectingPress Cancel Labeling recordings Name Editing recorded tracksBefore editing LabelingMoving recorded tracks Move Example To cancel movingDividing a track Divide Before moving After movingTrack numbers will change as follows Combining tracks combineDividing a track directly Track numbers decrease Way control keyErasing tracks and a whole disc contents Erase To erase the whole disc Recording tracks using the group function Using the group functionWhat is the group function? Recording a track to a new groupPlaying a track in group play Playing groupsRecording a track to an existing group Press . or repeatedly to Select Normal, and then pressDisplay Play mode Selecting the play mode for group play Group Play ModeAssigning tracks or groups as a new group Group Setting Editing groupsReleasing a group setting To cancel the operationMoving a track in a disc with group setting Labeling recorded groupsPress . or until G Rls appears in the display, and press Changing the order of a group on a disc Group Move Destination groupTo erase a group You can erase tracks in a selected groupUseful settings Other operationsCategory Function What it does Site Editing How to use the menu items To return the preceding settingTo cancel the operation while setting Turning off the beep sound Creating a new group when recordingStarting the playback quickly Quick Mode Recording without overwriting existing materialTo cancel the Avls Protecting your hearing AvlsSelect Avls OFF List of menus Menus on the recorderMenu OFF y on factory setting Option AvlsBeep When to replace the batteries Power sourcesBattery life Unit approx.hoursJEITA1Precautions Additional informationTo protect a recorded MD On cleaningOn the MiniDisc cartridge Tab Back of the MDSpecifications While charging Troubleshooting and explanationsTroubles and solutions While recordingLid does not open until Edit disappears in the display After recordingWhile playing While Editing LP4 stereo mode cannot be erased. You cannot combine tracks While using group functionStereo mode or monaural mode, or 48 seconds long recorded Long recorded in SP stereo, 24 seconds long recorded in LP2Others Error message Meaning/Remedy MessagesMemory No CHGNo OPR Temp SavedSEL GR TOC ERRExplanations Difference between digital optical and analog line inputsDifference Digital optical input Analog line input Digital Meaning of no soundHome Recordable About the DSP TYPE-S for ATRAC/ATRAC3Recording audio data to your computer Audio CDs InternetYou can transfer audio data stored in your computer to an MD To a Net MDBasic operational flow using the Net MD Basic OperationsThis manual, recording from an audio CD is explained Providing the required system environment System requirementsInstalling the software onto your computer Before installing the softwareInstalling SonicStage Ver.1.5 Click SonicStageFollow the displayed instructions Connecting the Net MD to your computer Power Dedicated jackTo the USB jack Storing audio data to your computer Starting SonicStageSonicStage starts up and the main window appears Recording navigation window* appears in the display Recording audio CDs to the hard disk driveCD window appears in the display Display changes to the recording windowIf the list panel is not displayed, click Click hereLabeling audio data List of the audio files in that album appearsEditing panel appears in the display Checking out audio files to the Net MD PlaylistTo cancel a check-out Playlist appears in the displayClick Stop Page Listening to an MD Listening to an MD with the Net MD connected to the computerAdvanced operations Using other functionsUsing the SonicStage online help To display online helpViewing online help Tabs Left side frame Device/MediaWhen using SonicStage under Windows XP Settings and PrecautionsSettings according to OS Other informationPage Page Backing up the audio data Control Panel window appears Uninstalling the SonicStage softwareFor Windows XP users Add/Remove Programs dialog box appearsFor Windows 2000 users Add/Remove Programs Properties window appearsTroubleshooting Check the symptoms in this Troubleshooting sectionCheck the symptoms in the SonicStage 1.5 online help Page Is the Net MD connected correctly to your computer? If the installation was not successfulIf your computer does not recognize the Net MD Is an MD inserted in the Net MD?Check for the appearance of an error message beneath If the installation seems to be stoppedProblem Cause/Remedy While longerNet MD FAQ On the Net MD What is a Net MD?Information and explanations On Editing Can checked-out tracks be edited on the Net MD? On copyright protection Restrictions on audio content Features by copyright protection by OpenMGGlossary 100Windows Media Audio Recording mode Bit rate101 Windows Media TechnologyCD-ROM Index102 DSP TYPE-S103 Track mark Add Divide 35 Erase Combime TransferringUSB