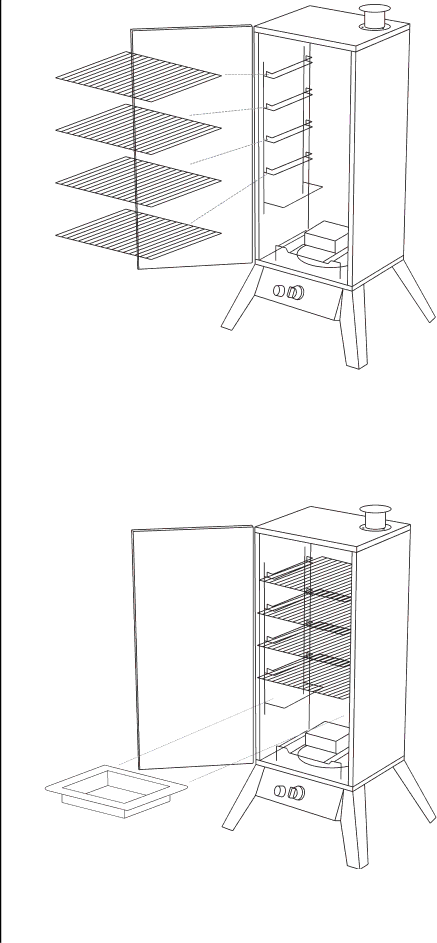
Kenmore 125.15884801 owner manual Step

Page 10

Step 11

Insert all cooking grills into rack supports respectively as shown. Make sure each cooking grill is firm and level.

Step 12

Slide the water pan into the bottom rack position as shown. Make sure water pan is firm and level.

10

Image 10
Contents Outdoor Gas Smoker Table of Contents Important Safety Product Features Carton ContentsParts Diagram for Model Hardware BAG Contents Assembly StepSet the burner assembly onto the cabinet as shown Step Step Heat Resistant Washers Step Gas Smoker Assembled Connecting the LP Tank Checking for Leaks PRE-USE ProceduresOperating Instructions Adding WaterAdding WOOD/CHARCOAL Lighting ProceduresIgniter Lighting System Match Lighting Cooking InstructionsShutting the Smoker OFF Temperature Chart After USE Safety MaintenanceStorage TroubleshootingBefore Storing Your Grill Ahumador a Gas para uso al Aire Libre Tabla DE Contenido PeligroAdvertencias Importantes DE Seguridad AdvertenciaCaracterísticas DEL Producto Contenido DE LA Caja DE CartónDiagrama DE Piezas Para Modelo Contenido DE Bolsa DE Ferretería CantidadEnsamblaje PasoPaso Paso Paso Paso Paso Paso Ensamblaje del ahumador a Gas Conectando EL Tanque DE GAS LP Advertencia Procedimiento Antes DEL USO Instrucciones DE OperaciónCómo Encontrar Fugas Cómo Agregar AguaCómo Agregar Leña O Carbón Cómo EncenderloSistema DE Encendido DEL Encendedor Cómo Encender CON UN Fósforo Instrucciones Para CocinarCómo Apagar EL Ahumador Tabla DE Temperatura Seguridad Y Mantenimiento Después DEL USO AdvertenciaAlmacenamiento Identificación Y Corrección DE ProblemasAntes DE Almacenar SU Parrilla Get it fixed, at your home or ours