Reference 
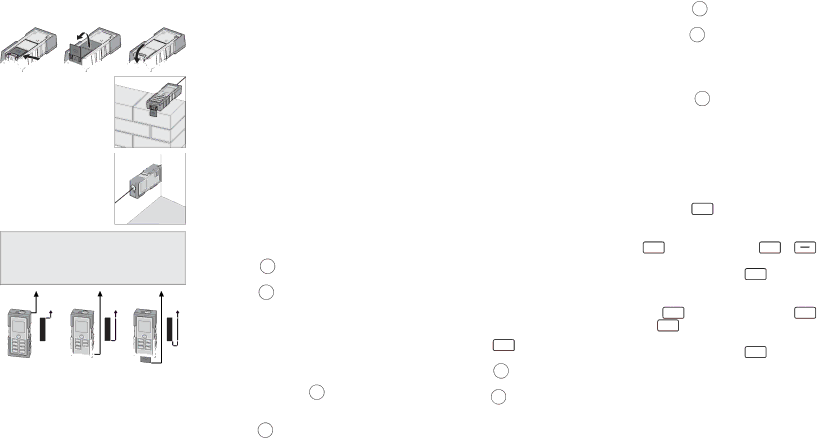
The default reference setting is from the rear of the meter (A). An edge mea- surement with a partially unfolded end bracket (B) will work in default mode.
![]()
![]()
![]()
![]()
![]()
![]()
![]()
![]() A
A ![]()
![]()
![]()
![]()
![]()
![]()
![]()
![]() B
B ![]()
![]()
![]()
![]()
![]()
![]()
![]()
![]() C
C
To measure from an edge (B), fold out the end bracket until it snaps in for the first time.
To measure out of a cor- ![]() ner (C), fold out the end
ner (C), fold out the end ![]()
![]()
![]()
![]()
![]()
![]() bracket, then continue
bracket, then continue ![]()
![]()
![]()
![]()
![]()
![]()
![]()
![]()
![]()
to push it to the right and down until it opens completely.
CAUTION Make sure that when measuring from the unfolded end bracket, the measuring reference is set to "End bracket" (C).
A ![]() B
B ![]() C
C
To set the measuring reference for a single measurement:
1.Press the ![]() button once to mea- sure from the front edge (A). After one measurement, the reference returns automatically to the default setting (B) (rear reference).
button once to mea- sure from the front edge (A). After one measurement, the reference returns automatically to the default setting (B) (rear reference).
2.Press the ![]() button two times to measure from the completely unfolded end bracket (C). After one measure- ment, the reference returns automati- cally to the default setting (B) (rear reference).
button two times to measure from the completely unfolded end bracket (C). After one measure- ment, the reference returns automati- cally to the default setting (B) (rear reference).
3.Press the ![]() button three times to return to the rear reference setting.
button three times to return to the rear reference setting.
To set and hold the measuring reference until the meter is turned off:
1.Press and hold the ![]() button once to measure from the front edge (A).
button once to measure from the front edge (A).
2.Press and hold the ![]() button again to measure from the completely un- folded end bracket (C).
button again to measure from the completely un- folded end bracket (C).
3.Press the ![]() button return to the default setting, measuring from the rear of the meter (B).
button return to the default setting, measuring from the rear of the meter (B).
Measuring 
Single Distance Measurement
1.Press the ![]() button once to turn on the laser.
button once to turn on the laser.
2.Press the ![]() button again to make a distance measurement.
button again to make a distance measurement.
3.The result is displayed in the Main Tar- gets line. Previous measurements are displayed in the Intermediate Lines.
Continuous measurement with
1.Press and hold the ![]() button. The meter will begin to beep and take measurements continuously.
button. The meter will begin to beep and take measurements continuously.
2.Press the ![]() button again to stop the continuous measurements.
button again to stop the continuous measurements.
3.The most recent measured value is displayed in the Main Targets line. The maximum and minimum measurements are displayed in the Intermediate Lines.
Use this function to determine the minimum or maximum distance from a specific measuring point (e.g. the deter- mination of room diagonals (maximum value) or horizontal distance (minimum value)).
Functions
Addition  / Subtraction
1.Press the ![]() button once. The next measurement is added to the previous measurement.
button once. The next measurement is added to the previous measurement.
2.Press the ![]() button once. The next measurement is subtracted from the previous measurement.
button once. The next measurement is subtracted from the previous measurement.
3.Repeat this procedure as many times
as required. Press the ![]() button to cancel the last step.
button to cancel the last step.
4.The result is displayed in the Main Targets line, the most recent mea- surement is displayed in Intermediate Line 1, the previous value is displayed in Intermediate Line 2.
Area 

1.Press the ![]() button once to deter-
button once to deter-
mine area ![]()
![]() .
.
2.Press the ![]() button to take the first measurement (e.g. length).
button to take the first measurement (e.g. length).
3.Press the ![]() button again to take the second measurement (e.g. width).
button again to take the second measurement (e.g. width).
4.The resulting area is displayed in the Main Targets line and the individual measurements are displayed in In- termediate Line 1 and Intermediate Line 2.
Adding and subtracting areas
1.Determine the first Area (see above)
2.Press ![]() or
or ![]() .
.
3.Press the ![]() button to take the first measurement (e.g. length).
button to take the first measurement (e.g. length).
4.Press the ![]() button again to take the second measurement (e.g. width).
button again to take the second measurement (e.g. width).
5.The second area measurement is displayed, along with a flashing "+" or
6.Press the ![]() button to display the resulting added or subtracted area in the Main Targets line. The individual area measurements are displayed in Intermediate Line 1 and Intermediate Line 2.
button to display the resulting added or subtracted area in the Main Targets line. The individual area measurements are displayed in Intermediate Line 1 and Intermediate Line 2.
Example of using stored measurements in a function
1.Press the ![]() button once to deter-
button once to deter-
mine area ![]()
![]() .
.
2.For the first measurement, press the
![]() button, then use the
button, then use the ![]() or buttons to find the desired value.
or buttons to find the desired value.
3.Press and hold the ![]() button to enter the value into the function.
button to enter the value into the function.
4.For the second measurement, press
the ![]() button, then use the
button, then use the ![]()
or |
| buttons to find the desired |
| ||
value. |
| |
5.Press and hold the ![]() button to enter the value into the function.
button to enter the value into the function.
6.The resulting area is displayed in the Main Targets line and the individual measurements from memory are displayed in Intermediate Line 1 and Intermediate Line 2.
6 | 7 |