Delta 36-585 instruction manual Adjusting 90 and 45 Degree Bevel Stops, Sliding Fence

Page 11

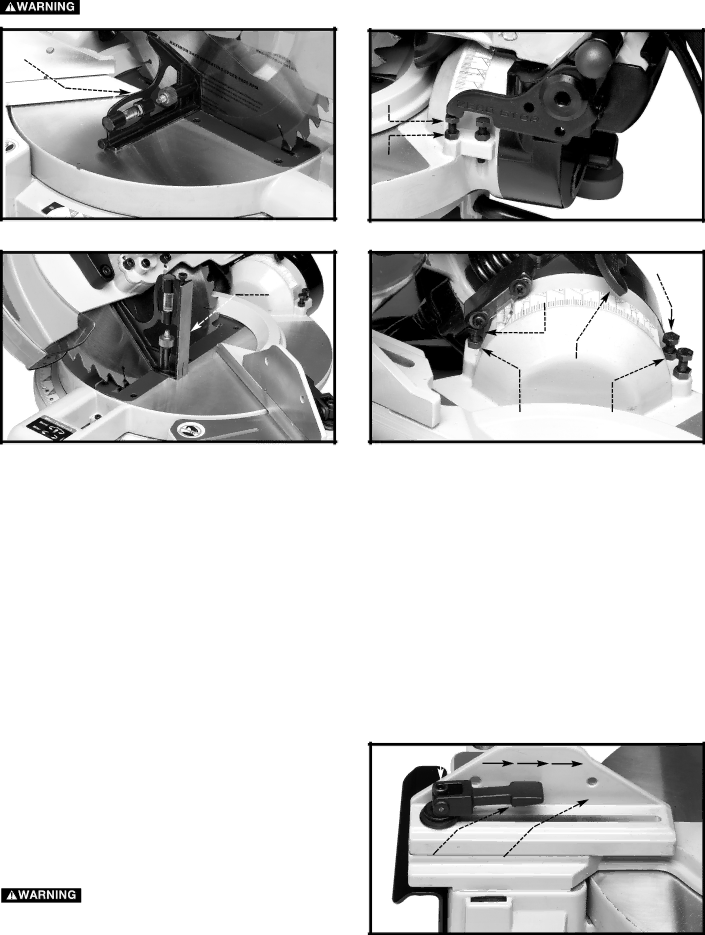
ALWAYS tighten the bevel lock handle (A) FIG. 16 securely before operating the saw.

A

D

C

Fig. 18


Fig. 19


G


A

F


J


E

H

Fig. 20

Fig. 21


ADJUSTING 90° AND 45° DEGREE BEVEL STOPS

DISCONNECT MACHINE FROM POWER SOURCE.

1.Lock the machine in the “down” position.

2.Place one end of a square (A) Fig. 18 on the table and the other end against the blade. Verify that the blade is 90° to the table (Fig. 18).

3.To adjust, push in and turn the lock handle (A) Fig 16 counter-clockwise. Loosen the nut (C) Fig. 19 and turn the screw (D) until the blade is 90° to the table. Tighten the nut (C).

4.Raise the cuttinghead. Push in and turn the lock handle (J) Fig. 21 counter-clockwise to loosen.

5.Move the cuttinghead all the way to the left bevel position and tighten the lock handle.

6.Use a combination square (A) Fig. 20 to verify that the blade is 45° to the table.

7.To adjust, push in and turn the lock handle (A) Fig 16 counter-clockwise. Loosen the nut (E) Fig. 21, and turn the screw (F) until the blade is 45° to the table. Tighten the nut (E). Tighten the lock handle.

8.Adjust the right 45° bevel stop in the same manner with screw (G) and nut (H) Fig. 21.

NOTE: Move the stop arm (B) Fig. 17 down when changing the bevel angle to the right.

SLIDING FENCE

The sliding fence (A) Fig. 22 provides support of large workpieces. Set it as close as possible to the saw blade. When miter cutting at 0° bevel (blade 90° to the table), the fence (A) should be all the way toward the blade (Fig. 22).

Verify that the fence is clear of the blade and blade guard, and that it is locked in place before operating the saw.

C

B A

Fig. 22

11

Image 11
Contents Dual Bevel Compound Miter Saw Important Safety Instructions Safety Guidelines DefinitionsStay ALERT, Watch What YOU are Doing Failure to Follow These Rules MAY Result in Serious Injury Additional Safety Rules for Miter SawsPower Connections Foreword Unpacking and CleaningAssembly Carton ContentsFastening Machine to Supporting Surface Rear SUPPORT/STABILIZER & Carrying HandleDust BAG Work ClampStarting and Stopping Miter SAW Operating Controls and AdjustmentsLocking Switch in the OFF Position Hazard ZoneTilting Cuttinghead for Bevel Cutting Adjusting PointerRotating Table for Miter Cutting Pointer and ScaleSliding Fence Adjusting 90 and 45 Degree Bevel StopsAdjusting Fence 90 Degrees to the Table Auxiliary Wood Fence Adjusting Tension of Cuttinghead Return SpringOperations Helpful HintsGeneral Cutting Operations Side SupportsRight Wrong Cutting AluminumCutting Bowed Material RightIllustrates the two outside corner pieces Cutting Crown MouldingLocking Cuttinghead in the Down Position MaintenanceStorage Blade Changing Wrench StorageS C O N N E C T M a C H I N E F R O M Power Source Brush Inspection and ReplacementPage PARTS, Service or Warranty Assistance AccessoriesCanadian PORTER-CABLE Delta Service Centers