Powermatic WP2510 operating instructions Pressure Bar

Page 15

A chipbreaker set too low or with excessive tension may prevent stock from feeding into the machine.

Pressure Bar

Most planing problems can be traced to improper setting of the pressure bar. Its function is to hold down the material after it passes under the cutterhead and throughout the remainder of the cut. Its basic setting is to be in line with the arc of the cutterhead knives.

If it is too high, a shallow “clip” will occur at each end of the board. If it is too low, stock will not feed through.

Use a gauge to set the full length of the pressure bar to be .000-.001” (.02mm) below the arc of the cutterhead. Figure 11 shows the height adjustment screw (D) and the spring tension adjustment screw (E) for the pressure bar. This initial setup is a starting point and final adjustment may have to be made during a test cut.

Outfeed Rollers

The two outfeed rollers are of smooth, one-piece construction to help avoid marring the finished surface of the material being cut. Their function is to continue to feed the material through the machine after it leaves the infeed roller. The correct free position setting is 1/32” (.8mm) below the arc of the cutterhead knives.

Use a gauge, such as a bed and feed roll gauge or wood gauge block, to check the outfeed rollers in the same manner as the infeed roller.

Adjust as necessary using the screws (F, Figure 11). When finished adjusting, tighten the hex nuts on the screws (F, Figure 11).

Table Rollers

The Planer has two table rollers which help reduce friction of the stock on the table as it feeds through the machine. It is not possible to give exact height setting of the table rollers because each type of wood behaves differently. As a general rule, however, the table rollers should be set high when planing rough stock, and set low for finish cuts.

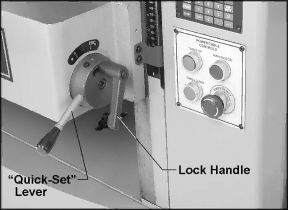
The planer is equipped with a quick-set table roller adjustment. With a single lever, you can raise the rollers from their finishing board height to a roughing board height. See Figure 12. The range is 0.00 to 0.05”.

To adjust the height of the table rollers, loosen


the lock handle (Figure 12) and turn the quick-


set lever. Re-tighten the lock handle to lock the

Figure 12

setting.

15

Image 15
Contents Inch Planer More Information Warranty and ServiceTable of Contents Page Page Page TEFC, 1/2HP, 3Ph Introduction SpecificationsUnpacking Contents of the Shipping ContainerDust Hood Installation and AssemblyVolt Operation Grounding InstructionsController Set-Up AdjustmentsConverting from 230 Volt to 460 Volt Test RunKnife Inserts Feed RateBelt Tension Opening HoodAnti-Kickback Fingers Planer’s Feed SystemChipbreaker Pressure Bar Table Adjustments Feed Restriction Test Cutting and TroubleshootingClip Marks Maintenance OperationLubrication Front Panel Overview Controller M15S Operating InstructionsOperation Modes Manual ModeStart/Stop/Cancel Setting Target ValueExample Fast Program 10 sets Entering preset target valuesExecute Select Counting direction Select Positioning ModeSet Tolerances Set Software Limit Hi/Lo EndTo set low speed limit Set Low Speed LimitSet Linear Correction Enter Parameter Setttings ModeLoad Datum Values Check Software VersionExample 13. IN/MM Conversion Set Device ResolutionCalibration 16. M15S Troubleshooting DisplayPossible cause Incorrect operation Excluding Press to clear 17. M15S Specifications Troubleshooting Planer Operating Problems Troubleshooting Mechanical and Electrical Problems Replacement Parts Column Assembly Index No. Part No Description Size Qty Parts List Column AssemblyWP2510-458 Gearbox Assembly Parts List Gearbox Assembly Parts List Cutterhead Assembly 6012162 Table Assembly Parts List Table Assembly Base Assembly Parts List Base Assembly WP2510-660 122 Parts List Top Cover Assembly Parts List Electrical Box Assembly Electrical Connections 230Volt Electrical Connections 460Volt WMH Tool Group
Related manuals
Manual 56 pages 50.77 Kb