RIDGID R4330 manual Installing handwheel knob, Installing the Dust Hood

Page 15

ASSEMBLY

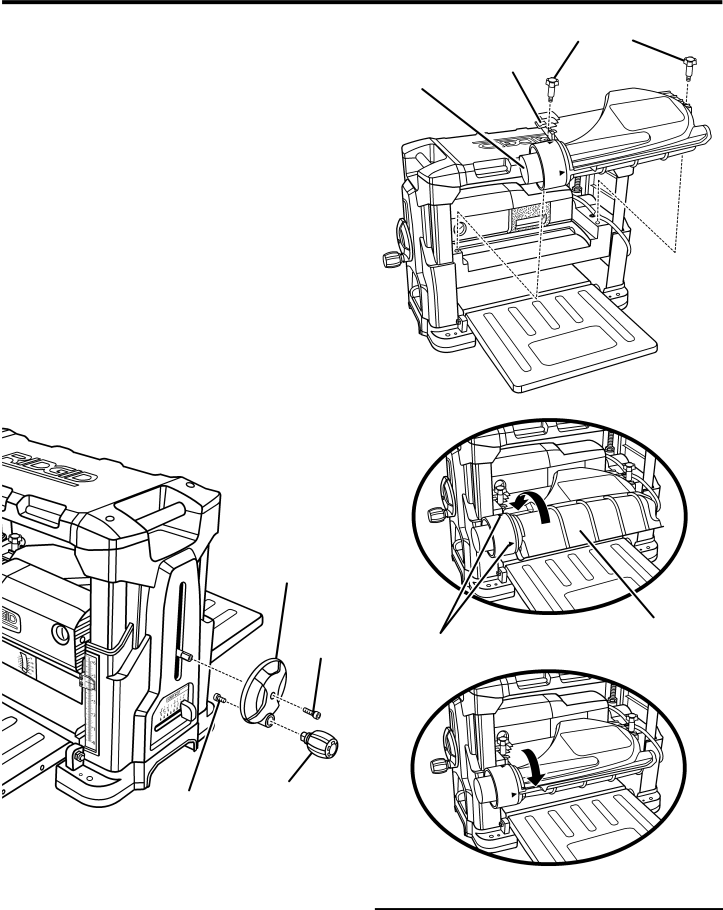
installing handwheel knob

See Figure 7.

Locate the handwheel knob and screw from among the loose parts. Insert the screw through the hole in the handwheel and tighten screw securely.

Using the hex head screw, attach the depth adjustment handwheel securely to the planer.

INSTALLING THE DUST HOOD

See Figure 8.

From the back of the machine, slip the slot on the dust hood over the tab inside the planer and align the dust hood over the holes on the side of the planer. Install the dust hood knobs by turning them clockwise. To minimize sawdust accumulation on your workpiece, attach either a 2-1/2 in. shop vac or a 4 in. dust collection system to the dust hood.

Note: The end of a 4 in. hose fits over the dust adaptor and requires a clamp (not included) to secure.

To open and close the dust hood door, align the arrows on the side.

NOTE: With the dust hood open, the sawdust is ejected from the back. With the dust hood closed, the sawdust is ejected from the adaptor.

DUST hood

KNOBS

DUST slot

ADAPTOR

Depth

adjustment handwheel

HEX HEAD

TO OPEN

DUST HOOD

ARROWS

door

screw


screw

HANDWHEEL

KNOB


Fig. 7


TO CLOSE

Fig. 8

15

Image 15
Contents OPERATOR’S Manual Introduction Table of contentsRead ALL Instructions General Safety Rules Never Start a Tool When ANY ROTATiNG Specific Safety RulesSpecific Safety Rules Symbol Name DESIGNATION/EXPLANATION SymbolsAuthorized Service Center for repair. When servic ServiceGrounding Instructions Speed and WiringElectrical Extension CordsMotor Overload Protector Motor safety protectionChamfer Anti-Kickback Pawls radial arm and table sawsArbor Bevel CutProduct Specifications FeaturesDust Hood AMP MotorAutomatic Feed Blade / Tool StorageLoose Parts Hood Hex key Magnetic Blade toolDust Hood knobs Clamping Planer to Workbench AssemblyUnpacking Mounting the Planer to workbenchInstalling the Dust Hood Installing handwheel knobLock NUT Leveling the Table ExtensionsPlaning tips OperationApplications Thickness planingTo lock the Planer Power SwitchAvoiding Snipe Warped WoodDepth Gauge Adjusting the planing depth See FigureReplaning using repeat-a-cut IndicatorCutterhead Screws AdjustmentsThickness Scale Adjustment Blade AdjustmentReplace the replane indicator Repeat-a-cutReplace the handwheel and hex head screw Maintenance CleaningLubrication Brush Replacement Cord storageBrush Cap Blade Replacement Drive Belt Hex key Loo sen TightenBlade Troubleshooting HOW to Obtain Service What is not Covered WarrantyDAY Satisfaction Guarantee Policy What is Covered Under the 3 Year Limited Service WarrantyModel No R4330 Serial No Customer Service Information