Samsung HMX-E10BP/EDC, HMX-E10OP/EDC, HMX-E10WP/EDC, HMX-E10OP/XER manual Using the Touch Panel

Page 30

basic operation of the camcorder

USING THE TOUCH PANEL

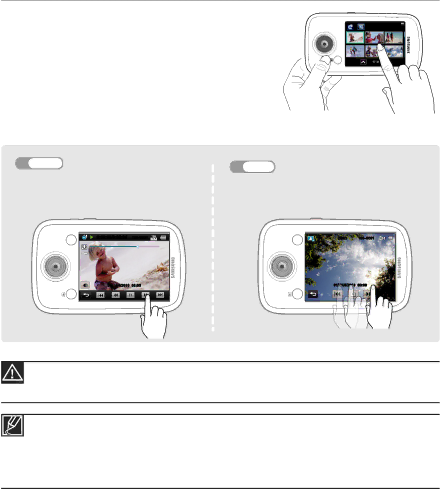
The touch panel lets you play back and record with a simple touch of your finger. Hold the camcorder firmly in one hand to support it. Then, touch the items displayed on the screen.

MENU

Touch

Slightly touch the items or functions to select or execute with your finger.

MENU

0:00:05/0:00:50

100-0001


01/JAN/2010 00:00

Drag

Drag the image left or right on the LCD screen to go to the previous or next file.

MENU

20/33

100–0001

01/JAN/2010 00:00

Do not place a protective film on the LCD screen.

If you leave a film attached to the LCD screen for a long time, strong adhesion between the film and the surface of the screen may cause the touch panel to malfunction.

Be careful not to accidentally press the buttons near the LCD panel while using the touch panel.

The tabs and indicators that appear on the LCD screen depend on the current recording/playback status of your camcorder.

The camcorder does not recognise touches if you touch more than two points on the screen at the same time. Touch one point at a time.

24• Do not use a sharp tipped item such as pen or pencil when using a tool to touch the screen.

Image 30
Contents High Definition Digital Camcorder Safety Warnings PrecautionsImportant Information on USE Before using this camcorderEx Submenu item of Video Resolution ¬page Copyright act and cannot be used without IiiCorrect disposal of batteries in this product Safety information There is a risk of fire or injury Storms.vii Viii Contents Video Resolution Using the hand strapUsing the lens Photo ResolutionDefault Set Setting menu itemsAuto Power Off Storage InfoQuick start guide You can record videos in H.264 formatRecording videos Recording photosViewing videos or photos on the LCD screen Viewing on a high definition TV¬pages 66~71 Sharing videos/photos on Youtube/Flickr/FaceBook Delete videos or photosGetting to know the camcorder Checking your accessoriesOptional accessories Whats Included with Your CamcorderLens Mode button LCD screen Menu button Power button Location of ControlsRear & Right side Front/Right/Bottom side 8 900001 Video Record modeIdentifying the Screen Displays X2.0Photo Record mode Erase protection Video play mode Thumbnail ViewVideo play mode Single View HighlightPhoto play mode Thumbnail View Photo play mode Single ViewClose the battery cover Using the BatteryInserting the battery Ejecting the battery Getting startedCharging the battery Charging CHG indicator Checking the Battery StateBattery level display To check the charging state1080/25P 720/25P Continuous recording time Playback time Available running time for the batteryAbout the battery Continuous Recording without zoomMaintaining the battery About the battery lifeBasic operation of the camcorder Turning Your Camcorder ON/OFFSetting the Operating Modes Mode button Play tabEasy one-handed recording and button operations Using the Touch Panel Rst time settings Built-in rechargeable batteryCharging the built-in rechargeable battery English Š Selecting the OSD LanguageSubmenu items Š Español Š Português Š³Ɋɭɫɫɤɢɣ´ ŠGetting ready to start recording INSERTING/EJECTING a Memory Card not SuppliedTo insert a memory card To eject a memory card Micro Sdhc Micro Secure Digital High Capacity cards Selecting a Suitable Memory Card not SuppliedCompatible memory cards Common cautions for memory cardsHandling a memory card Recordable Time and Capacity Recordable time for videosRecordable number of photos Using the Hand Strap Using the LensBasic recording Recording VideosPage Recording Photos Capturing Photos During Video Recording Dual Recording Slide the Zoom lever Towards T telephoto Zooming in and OUTTo zoom To zoom outChanging the Playback Mode Basic playbackUsing the Touch Screen Playing VideosTo adjust the volume during video playback Touch the Volume tab on the LCD screenVolume control bar appears on the screen Search playback WW Various playback operationsPlayback / Pause X/ ZZ Skip playbackViewing Photos To return to the thumbnails, touch the Return tabViewing a slide show You can view a photo slide showTouch the Slide Show tab during photo playback Advanced recording Using the Menu TAB in the Record ModeUsing the Menu Tab An Example Recording Menu ItemsVideo Resolution You can select the resolution of the video to be recordedPhoto Resolution You can select the resolution of the photo to be recordedSmart Filter Smart Filter Example Panorama mode example PanoramaQuick View Images as soon as the recording is finishedUsing the Menu TAB in the Play Mode Advanced playbackPlayback Menu Items Deleting Files You can erase your recordings one by one, or all at onceSee Submenu items below for additional details Touch Yes Protection from Accidental Erasure Share Mark Touch the thumbnails of the files you want to share markSystem setting Using the Setting Menu TABSetting Menu Items Storage InfoFile No Date/Time SetRecording during playback. ¬page Date/Time Display LCD BrightnessOff Disables the function Auto LCD OffBeep Sound Shutter SoundAuto Power Off Off The camcorder does not turn off automaticallyPC Software Format Default Set LanguageUsing the Demo function DemoWhat YOU can do with a Windows Computer Main functionsSystem requirements Using with a Windows computer Using the Intelli-studio ProgrammeConnecting the USB plug About the Intelli-studio main window Playing back videos or photos Editing videos or photosSharing the videos/photos online Using with a Windows computer StepInstalling Intelli-studio on a Windows computer Using AS a Removable Storage Device Viewing the contents of the storage mediaVideo file H.264  Structure of folders and files on the storage mediaFolder and file structure for storage media is below Photo file Connecting to other devices Connecting to a TVUsing a mini Hdmi cable not supplied TV Image Displays Understanding the Hdmi cableTroubleshooting Storage mediaRecording PlaybackSymptoms and Solutions Symptom Explanation/SolutionDisplay Operable Recording stops Or delete unnecessary files Automatically Playback on your camcorder Adjusting the image during recordingSymptom Playback on other devices TV, etcConnecting to a computer General operations MenuMaintenance LCD screenLens PAL-compatible countries/regions Using Your Camcorder AbroadOn TV colour systems NTSC-compatible countries/regionsVideo signal SpecificationsModel name Contact Samsung World Wide RoHS compliant
Related manuals
Manual 94 pages 40.53 Kb Manual 94 pages 41.52 Kb Manual 94 pages 51.73 Kb Manual 94 pages 20.12 Kb