ASSEMBLING YOUR CORDLESS SWEEPER
Before you start:
Your Cordless Sweeper will require very little assembly. You should remove it from the carton and familiarize yourself with all the components listed per the exploded view drawing (pg.2) This will help you in the assembly and operation of your cordless sweeper.
Note: The charging adapter is shipped inside the dust cup.
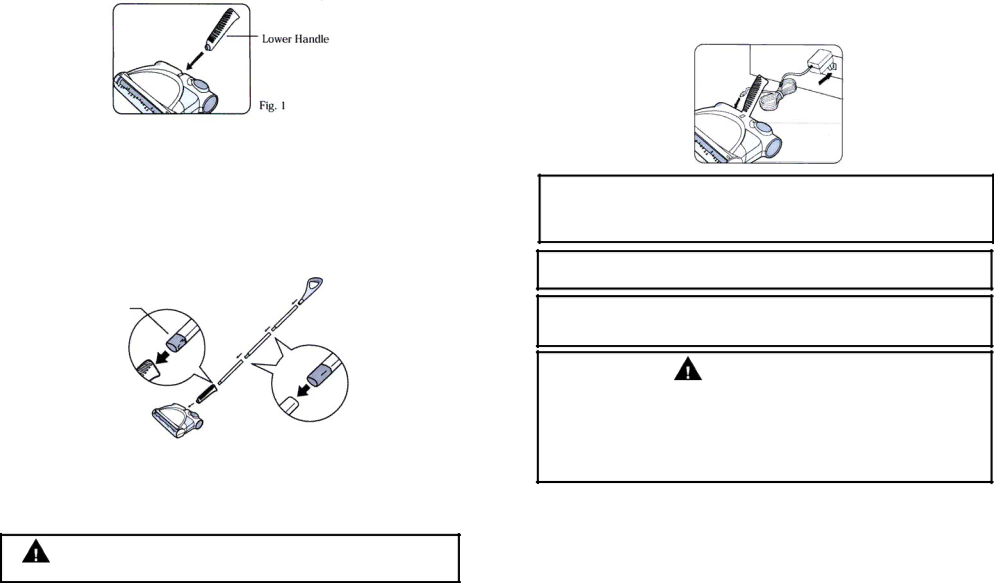
1.Insert the lower handle - small end - into the sweeper power head. Push until firmly in place. (Fig. 1) HANDLE CAN BE ROTATED FOR PROPER USE.
2.Assemble the metal extension handles by pushing the plastic insert into the mating metal tube. Push until only small portion of insert is visible or you cannot press any farther into the tubing. Push the handle assembly into the upper handle.
NOTE: One metal extension tube has a different plastic insert. This tube should be on the bottom of the handle.
Insert the handle assembly into the lower handle so that the tab on the plastic insert snaps into the open slot on the lower handle. (Fig. 2)
Insert into Lower
Handle
Fig. 2
3.Place the handle into the upward storage position.
4.Plug the charging adapter into the sweeper power head charging jack. Plug the charging adapter cord into a standard electrical outlet (120V., 60Hz.) The green charging indicator should illuminate. If it does not, depress the On/Off switch one time.
CAUTION: ALWAYS USE ADAPTOR SUPPLIED (ONLY) WITH SWEEPER
3
RECHARGE DE LE BALAI MOTORISÉE
SANS CORDON
1.Brancher la prise du chargeur dans la fiche de recharge à l'arrière de le balai. Brancher l’adaptateur dans une prise de courant murale (120V.,60Hz.). N'utiliser que le chargeur TechWorld
2.Le balai sans cordon fonctionne à l'aide de piles
3.Lorsqu'on recharge l'appareil, l'interrupteur marche/arrêt doit être en position d'arrêt (OFF).
5.Le témoin de recharge sur le dessus de le balai s'illumine pour indiquer que le balai se recharge.
6.Pour recharger, répéter l'étape 1
Fig. 8
REMARQUE: Si vous tentez de recharger le balai et que le voyant de recharge ne s’allume pas, appuyez sur le bouton de marche/arrêt pour éteindre le balai. Le voyant de recharge devrait maintenant s’allumer.
REMARQUE: On atteindra un rendement optimal seulement après deux (2) ou trois (3) recharges.
IMPORTANT: Afin d'assurer un rendement optimal, on recommande de décharger et de recharger entièrement le balai au moins une fois par mois.
ATTENTION
•N’utilisez que le
•Ne tentez pas de retirer le
•Ne tentez jamais de jeter le
•Ne tentez pas de retirer ou d'endommager l'enveloppe des piles.
•Le
RANGEMENT DE LE BALAI SANS CORDON
Votre balai sans cordon peut être rangée en l’accrochant à une vis fixée dans un mur ou une surface verticale à l’aide de la fente à l’arrière de la poignée supérieure. Utilisez une vis plane No 6 ou à tête cylindrique bombée et les ferrures appropriées pour la surface sur laquelle le balai sera fixée (p. ex. plaque de plâtre). Laissez la tête de la vis dépasser d’au moins 3/16 po de la surface de fixation. Toujours vider le balai avant de la suspendre pour la ranger.
24