Denon AVR-3802 Connecting a video component equipped with S-Video jacks, Connecting a monitor TV

Page 8

Connecting a video component equipped with S-Video jacks

When making connections, also refer to the operating instructions of the other components.

A note on the S input jacks

The input selectors for the S inputs and pin jack inputs work in conjunction with each other.

Precaution when using S-jacks

This unit’s S-jacks (input and output) and video pin jacks (input and output) have independent circuit structures, so that video signals input from the S-jacks are only output from the S-jack outputs and video signals input from the pin jacks are only output from the pin jack outputs. When connecting this unit with equipment that is equipped with S-jacks, keep the above point in mind and make connections according to the equipment’s instruction manuals.

S-VIDEO

OUT


Connecting a monitor TV


MONITOR OUT

DVD player or video disc player (VDP)

• Connect the TV’s S video input (S-VIDEO INPUT) to the

B


OUT jack using a S jack connection cord.


S-VIDEO

MONITOR

Connecting a DVD player or a video disc player (VDP)

DVD

Connect the DVD player’s S-Video output jack to the S-VIDEO DVD IN jack using an S-Video connection cord.

A VDP can be connected to the VDP jacks in the same way.

It is also possible to connect a video disc player, DVD player, video camcorder, game machine, etc., to the VCR-2/V.AUX jacks.

S-VIDEO

IN

Monitor TV


TV or satellite broadcast tuner

S-VIDEO


B


OUT


Connecting a TV/DBS tuner

Connect the TV’s or DBS tuner’s S video output jack (S- VIDEO OUTPUT) to the S-VIDEOTV/DBS IN jack using an S jack connection cord.

S-VIDEO

OUT IN

Video deck 1

Connecting the video decks

• Connect the video deck’s S output jack (S-OUT) to the S-VIDEO VCR-1 IN jack and the video deck’s S input jack

(S-IN) to the S-VIDEOVCR-1 OUT jack using S jack connection cords.

• Connect the video deck’s S output jack (S-OUT) to the

S-VIDEOVCR-2/V.AUX IN jack and the video deck’s S input

jack(S-IN)to the S-VIDEOVCR-2/V.AUX OUT jack using S jackconnection cords.

S-VIDEO

OUT IN

Video deck 2

Connect the components’ audio inputs and outputs as described on page 7.

8

Image 8
Contents AVR-3802 Safety Precautions Safety Instructions Table of Contents Before UsingFeatures Connecting the audio components ConnectionsConnecting video components Connecting a video component equipped with S-Video jacks Precaution when using S-jacksConnecting a monitor TV Connecting the video decksConnecting a DVD player DVD in jacks Connecting a monitor TV Monitor OUT jackConnecting the antenna terminals AM loop antenna assembly FM antenna adapter assemblyConnecting the external input EXT. in jacks Connecting the Multi Zone jacksConnecting banana plugs Precautions when connecting speakersSpeaker system connections ConnectionsProtector circuit Part Names and Functions @9@8@7Front Panel Surround Speaker A/BRemote control unit DISPLAY/SURR. ParaSetting UP the System System Setup buttonPress this to display the system setup menu Cursor buttonsSurround speaker selector function SB Surround Back SpeakerSetting the type of speakers Before setting up the systemSetting the power amplifier assignment Parameters Setting the Crossover Frequency and Subwoofer mode Enter the settingSelect the Subwoofer Mode Select the settingAssignment of low frequency signal range Subwoofer modeSetting Crossover FrequencySetting the delay time PreparationsSetting the channel level Switch to the Channel Level screen Select Test Tone ModeWhen the surround back speaker setting is set to 1spkr for Speaker Configuration, this is set to SBVolume can be adjusted between -12 dB and +12 dB in units When the Manual mode is selectedTo select the digital input jack Setting the Digital In AssignmentTo select the input source Setting the multi vol. level Setting the on-screen display OSDDB, -40 dB VariableAuto tuner presets Press the Enter button Auto Preset Memory screen appearsAfter completing system setup On-screen display signalsInserting the batteries Remote Control UnitUsing the remote control unit Operating Denon audio components CD player CD system buttons Tape deck Tape system buttonsMD recorder MD, CD recorder CDR system buttons Tuner system buttons2, 3 Checking the preset memory settings Operating a component stored in the preset memoryDigital video disc player DVD, DVD Setup system buttons Video disc player VDP systemButtons Video deck VCR/VCR-2 system Monitor TV TV, digital ButtonsLearning function Not ValidStoring system call signals SYS Mode SYS Call5, 6 System callResetting Using the system call functionResetting the system call buttons 5 2, 3, 4, 5Reset PRE Reset LRN Reset ALL Reset SYSResetting the preset memory 5 2, 3, 4, 6Resetting learned buttons 4, 5All reset function 2, 3, 4Auto search function Select AMP using the Receiver button Only when operating with the remote control unitTurn on the power Refer to Connections pages 6 to 13 and check that allExample CD Input mode selection functionPlaying the input source Example Stereo Input mode displayInput signal display Playback using the external input EXT. in jacks Press the EXT. in to switch External inputSet the external input EXT ModeAdjusting the sound quality Tone Listening over headphonesAfter starting playback Turning the sound off temporarily MutingChecking the currently playing program source, etc Playing one source while recording another REC OUT modeMulti-source recording/playback Display switches as follows each When Source is selected, the Multi indicator turnsThis operation is not possible in the REC OUT mode Select Multi using Receiver buttonMulti-zone playback with multi-source Multi Zone Music Entertainment SystemSurround Before playing with the surround function5 1, 4 Fader functionSurround parameters q Pro Logic II Mode Panorama ModeDimension Control Center Width ControlDetect LED Dialogue Normalization Select the various parameters Adjust the parameter settingsDisplay the surround parameter menu Personal Memory Plus Surround modes and their featuresDSP Surround Simulation DSP surround simulation Set the parametersWhen turned clockwise When turned counterclockwise1,3 Press the Surround Parameter buttonTone control setting Cinema MusicSurround modes and parameters Auto tuning Manual tuningListening to the Radio TunerPreset memory Checking the preset stationsInitialization of the Microprocessor Recalling preset stationsLast Function Memory Troubleshooting Types of multi-channel signals Additional InformationTypes of sources Movie audio Movie theater sound fieldSurround back speakers Number of surround back speakersSpeaker setting examples When using different surround speakers for movies and music When not using surround back speakersSurround Dolby Surround Dolby Digital Dolby Surround AC-3Dolby Digital and Dolby Pro Logic Dolby Digital compatible media and playback methodsDTS Digital Surround DTS compatible media and playback methodsDTS-ESTMDiscrete DTS-ESTMMatrixDTS Neo6TM surround DTS Neo6 CinemaSBL & SBR Surround modes and parameters Specifications 14-14, Akasaka 4-CHOME, MINATO-KU, Tokyo 107-8011, Japan

AVR-3802 specifications

The Denon AVR-3802 is a noteworthy feature-rich audio/video receiver that stands out in the realm of home theater systems. Released in the early 2000s, it continues to be appreciated by audiophiles and home cinema enthusiasts alike, thanks to its robust performance and advanced technologies.

One of the standout features of the AVR-3802 is its impressive power output. With a 110 watts per channel rating over 7 channels, it provides ample power to drive a variety of speakers, allowing users to create a dynamic home theater experience. This results in clear, powerful sound across a range of audio formats, from music to movies.

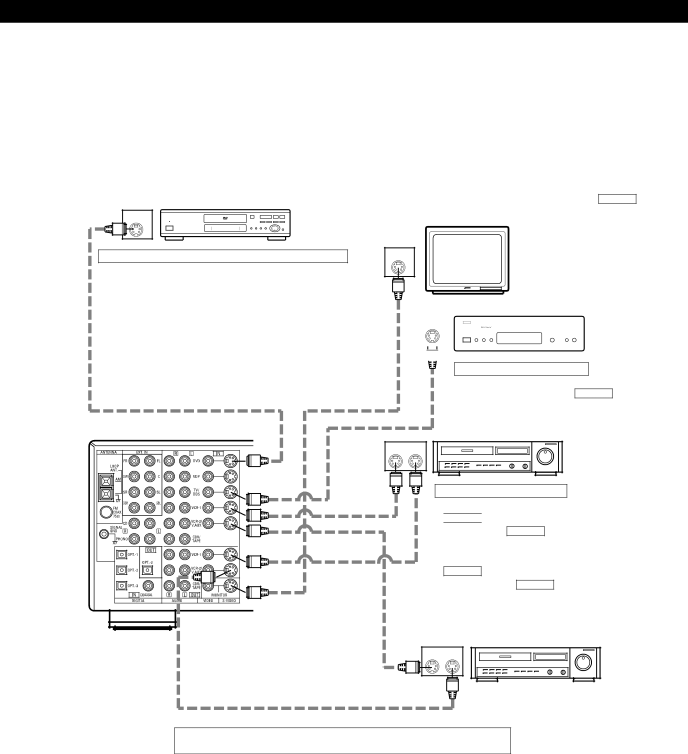
The AVR-3802 is equipped with a comprehensive array of inputs and outputs. It includes multiple analog and digital inputs, allowing for the connection of various audio sources such as CD players, DVD players, and gaming consoles. Additionally, the receiver supports up to seven channels of surround sound, making it compatible with numerous audio formats including Dolby Digital and DTS, which are crucial for cinematic sound experiences.

Another key feature is the incorporation of Denon's proprietary technologies, such as the "Advanced Surround Processing" which enhances the spatial audio experience. This feature helps in creating an immersive environment, utilizing different sound processing modes tailored for different content types, whether it's a concert, movie, or video game.

Denon has also ensured that the AVR-3802 displays excellent video performance. It offers multiple video inputs, including composite, S-video, and component video, facilitating high-quality video playback. The receiver supports up to 1080p video resolution, ensuring compatibility with high-definition displays. Additionally, it includes a built-in video upscaling feature that enhances lower resolution content to optimize the viewing experience.

The user interface on the AVR-3802 is designed with usability in mind. A large, easy-to-read display combined with intuitive remote control navigation simplifies the process of adjusting settings, programming presets, and switching between inputs.

In summary, the Denon AVR-3802 remains a solid choice for those seeking a high-performance audio/video receiver. With its robust power handling, versatile connectivity options, advanced surround sound processing, and high-definition video capabilities, it provides an excellent foundation for building a home entertainment system. Enthusiasts can enjoy rich, immersive audio experiences coupled with stunning video quality, making the AVR-3802 a lasting component in the world of home theaters.