Smeg CE6IPX manual Positioning and levelling the appliance depending on model

Page 29

Instructions for the installer

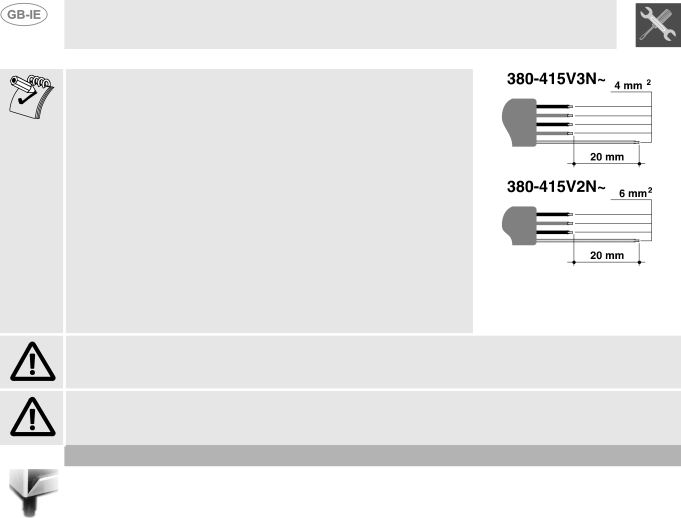
For operation on 380-415V 3N~: use an H05V2V2-F type five-core cable (5 x 4 mm2).

For operation on 380-415V 2N~: use an H05V2V2-F type four-core cable (4 x 6 mm2).

The earth wire (yellow-green) must be at least 20 mm longer than the other wires at the end for connection to the appliance.

WARNING: The values indicated above refer to the cross-section of the internal conductor.

THE MANUFACTURER DECLINES ALL RESPONSIBILITY FOR DAMAGE TO PERSONS OR THINGS CAUSED BY NON-OBSERVANCE OF THE ABOVE PRESCRIPTIONS.

15.2 Positioning and levelling the appliance (depending on model)

After making the electrical connections, level the appliance on the ground by means of its four adjustable feet. For good cooking results, the appliance must be properly levelled. Depending on the model you have purchased, the foot height adjustment range may vary from 70 to 95 mm and from 110 to 160 mm. These heights refer to the distance between the highest point of the foot (fixed part) and the lowest point (movable part which rests on the floor).

60

Image 29
Contents Index Plate Must not be Removed Precautions for USERecycling Instructions OUR Environment Policy Never Attempt to Repair the Appliance Yourself Safety PrecautionsIntended USE General Description Getting to Know Your OvenlAccessories available on request Before InstallationAvailable Accessories Using the Rotisserie ROD when present Description of the Controls on the Front Panel HOB Control Knob Main Oven Temperature Selection Knob PT1Main Oven Functions Selection Knob PT2 Setting the current time Using the Main OvenFirst use Selecting a function10.4.1Semiautomatic cooking Programmed cooking proceduresModifying the data set 10.4.2Automatic cookingAutomatic cooking with selection of a recipe Cooking with selection of a recipeModifying the data set during cooking Making permanent changes to a recipe Table of predefined recipes Secondary menu Description of the selected functions Cooking in the OvenCooking Hints and Tips Hints on Using the AccessoriesCooking tables Cooking zones Using the HOBTotal power consumed Zone number Zone Diameter Power consumed 145 mm180 mm 210 mmOperation Activating temperature Cookware detector signalResidual heat Cooking hob lock-outKeep Warm Function Thermal protection glass-ceramic hobCleaning and Maintenance Before starting the automatic cleaning cycle Pyrolysis automatic oven cleaning on some models onlySetting the cleaning cycle Changing the light bulb Extraordinary MaintenanceRemoving the door Removing the door sealOven display is completely off What to do ifOven does not heat up Controls do not respondElectrical connection Installing the AppliancePositioning and levelling the appliance depending on model