Frigidaire FFEF4017LB Before Setting Oven Controls, Oven vent location, Arranging oven racks

Page 12
Main oven vent location

BEFORE SETTING OVEN CONTROLS

Oven vent location

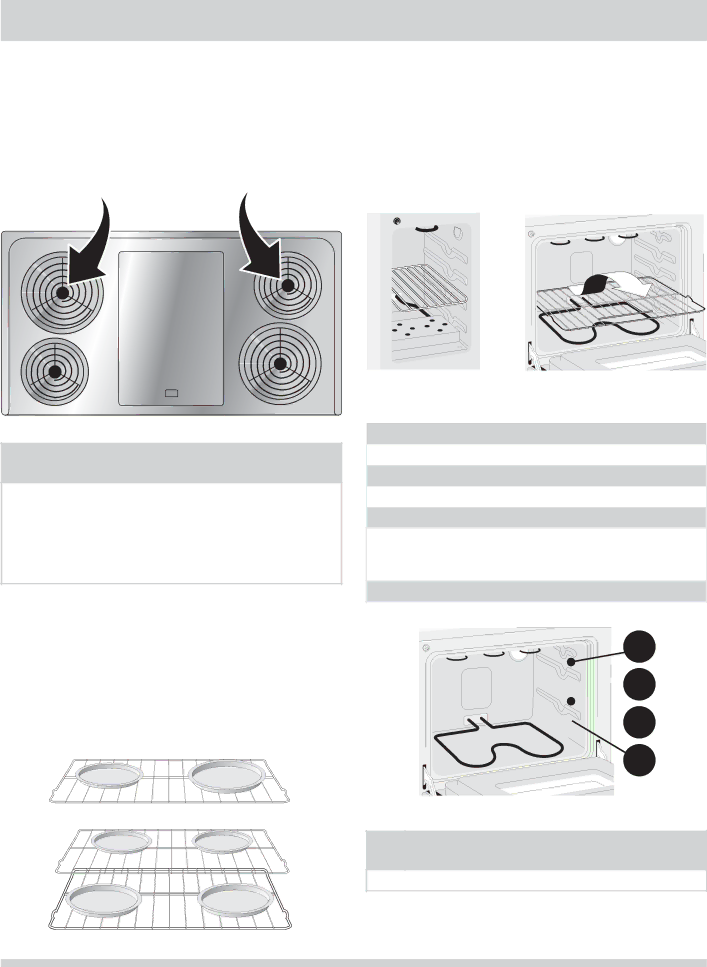
Each oven has its own vent as shown below (Figure

1). When the oven is on, warm air is released through the vent. This venting is necessary for proper air circulation in the oven and good baking results. DO NOT BLOCK OVEN VENT. Never close off the openings with aluminium foil or any other material.

Auxiliary oven vent location

Figure 1

CAUTION

Some models are equipped with a blower which runs in baking and self-cleaning mode to keep all internal components at a cool temperature. The blower may keep running even if the oven has been turned OFF, until the components have cooled down.

Air circulation in the oven

If using 1 rack (Figure 2), place in center of oven. If using multiple racks (Figure 3), stagger cookware as shown.

For best air circulation and baking results allow 2-4" (5-10 cm) around the cookware for proper air circulation and be sure pans and cookware do not touch each other, the oven door, sides or back of the oven cavity. The hot air must circulate around the pans and cookware in the oven for even heat to reach around the food.

Figure 2 - Single Oven Rack

Arranging oven racks

ALWAYS ARRANGE OVEN RACKS WHEN THE OVEN IS COOL (PRIOR TO OPERATING THE OVEN). Always use oven mitts when using the oven.

To remove an oven rack, pull the rack forward until it stops. Lift up front of rack and slide out (Figure 4).

To replace an oven rack, fit the rack onto the guides on the oven walls. Tilt the front of the rack upward and slide the rack back into place.

Figure 4

Recommended rack positions

Food

Rack Position


Broiling meats, chicken or fish

4


Cookies, cakes, pies, biscuits & muffins


Using a single rack

2 or 3


Using two racks

2 and 4

Frozen pies, angel food cake, yeast, bread,

1 or 2 casseroles, small cuts of meat or 1 or 2 poultry

Turkey, roast or ham

1

4

3 2


1


Rack

Figure 5

positions


NOTE

Always use caution when removing food from the oven.

12

Figure 3 - Multiple Oven Racks

Image 12
Contents Use &Care Welcome & Congratulations Register Your ProductProduct Important Safety Instructions DefinitionsImportant Instructions for Using Your Cooktop Know which knob controls each surface heating unitImportant Safety Instructions for Using Your Oven Important Safety Instructions for Cleaning Your OvenSELF-CLEANING Oven only For Glass Cooktop onlyFeatures AT a Glance Model a Your Range FeaturesModel B Features AT a Glance Features AT a Glance Model C Before Setting Surface Controls Using proper cookwareCookware material types Setting Surface Controls Surface Cooking SettingsElement on indicator light Coil surface elementsRecommended Settings For the Griddle Food To Operate the Griddle model C onlyGriddle Before Setting Oven Controls Oven vent locationAir circulation in the oven Arranging oven racksModel a Setting Main Oven Controls To Change the Temperature Display ModeTo SET the Minute Timer Press Timer ON/OFF padSetting Main Oven Controls Model a To SET or Change the Temperature for BakingAdjusting Your Oven Temperature To BroilModel B & C Setting Main Oven Controls Oven can be Programmed toFor a Silent Control Panel Setting Main Oven Controls Model B & C To SET Control for Continuous Bake or 12 Hour Energy SavingTo SET Control for Oven Lockout To SET or Change the Temperature for Normal Baking Setting BroilTo Set the Controls for Normal Baking Broiling TipsTo SET the Bake Time Feature Recalibrating Your Oven TemperatureWhen the Set Bake Time Runs Out To Adjust Oven TemperatureSELF-CLEANING Adhere to the following cleaning precautionsWhat to Expect during Cleaning To Start the Self-Clean Cycle To Set the Controls for a Self-Clean CycleWhen the Self-Clean Cycle is Completed Model B & C Setting Auxiliary Oven Controls To BakeRack Position From Top Food Broil Stop PositionCleaning various parts of your appliance Surfaces How to CleanCare & Cleaning General CleaningSurface Elements and Drip Bowls Cleaning the Griddle some models Changing oven lightTo Replace the Light Bulb Removing and replacing the main oven door some models To remove and replace the main oven door some modelsTo Remove Oven Door To Replace Oven DoorStorage Drawer some models To Remove the Storage DrawerTo Replace the Storage Drawer To Remove Storage DrawerOven baking Be accessible for Service Entire range or ovenCode error ex. F10 Range is not levelSelf-cleaning cycle Soil not completely removed after self- cleaning cycleAreas Discoloration withPage Major Appliance Warranty Exclusions This warranty does not cover the following