Instructions | Using the oven. |
|
|
|
|
|
|
| |
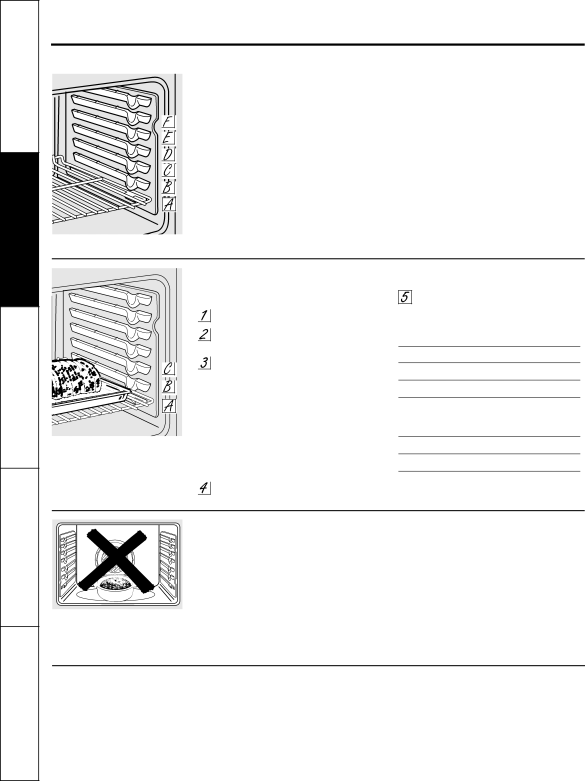
| To avoid possible burns, place the shelves in the desired position before you turn the oven on. |
| ||
|
| Before you begin… |
|
|
Safety |
| The shelves have | CAUTION: When you are using the shelf in the lowest | |
| placed correctly on the shelf supports (A | position (A), you will need to use caution when pulling | ||
|
| |||
|
| through F), they will stop before coming | the shelf out. We recommend that you pull the shelf | |
|
| completely out, and will not tilt. | out several inches and then, using two pot holders, pull | |
|
| When placing and removing cookware, | the shelf out by holding the sides of it. The shelf is low | |
Instructions |
| and you could be burned if you place your hand in the | ||
| pull the shelf out to the bump on the shelf | |||
| middle of the shelf and pull all the way out. Be very | |||
|
| |||
|
| support. | ||
|
| careful not to burn your hand on the door when using | ||
|
| To remove a shelf, pull it toward you, tilt the | ||
|
| the shelf in the lowest position (A). | ||
|
| front end up and pull it out. |
|
|
|
| To replace, place the end of the shelf |
|
|
Operating |
|
| Touch the CLEAR/OFF pad when baking | |
| Your oven is not designed for | |||
| The oven has 6 shelf positions. | and push the shelf in. |
|
|
|
| How to Set the Oven for Baking or Roasting |
| |
|
| Touch the BAKE pad. | is finished and then remove the food | |
|
| from the oven. |
| |
|
| Touch the + or – pads until the |
| |
Cleaning |
| Type of Food | Shelf Position | |
| desired temperature is displayed. | |||
|
| |||
|
| Frozen pies (on cookie sheet) | D | |
|
| Touch the START/ON pad. | ||
|
| The oven will start automatically. The display | Angel food cake | A |
|
|
|
| |
and |
| will show PrE while preheating. When the | Bundt or pound cakes | C or D |
| oven reaches the selected temperature, the | Biscuits, muffins, brownies, | C or D | |
Care |
| oven control will beep several times and the | cookies, cupcakes, |
|
| display will show the oven temperature. | layer cakes, pies |
| |
|
|
| ||
|
| To change the oven temperature during BAKE cycle, | Casseroles | C or D |
|
| touch the BAKE pad and then the + or – pads to get | Turkey | A |
|
| the new temperature. | ||
|
|
|
| |
Tips |
| Check food for doneness at minimum |
|
|
| time on recipe. Cook longer if necessary. |
|
| |
Troubleshooting |
|
|
| |
| Preheating and Pan Placement |
|
| |
|
|
|
| |
|
| Preheat the oven if the recipe calls for it. | Baking results will be better if baking | |
|
| Preheating is necessary for good results | pans are centered in the oven as much | |
|
| when baking cakes, cookies, pastry and | as possible. If baking with more than one | |
|
| breads. | pan, place the pans so each has at least | |
|
| To preheat, set the oven at the correct | 1″ to 11⁄2″ of air space around it. | |
|
|
|
| |
| Do not place foods directly on the | temperature. The control will beep when | If baking four cake layers at the same time, | |
| the oven is preheated and the display will | place two layers on rack B and two layers on | ||
| oven floor. | |||
| show your set temperature. This will take | rack D. Stagger pans on the rack so one is | ||
Support |
| |||
| approximately | not directly above the other. | ||
| Aluminum Foil |
|
| |
|
|
|
| |
Consumer |
| Do not use aluminum foil on the bottom | A smaller sheet of foil may be used to | |
| of the oven. | catch a spillover by placing it on a lower | ||
|
| |||
|
| Never entirely cover a shelf with | shelf several inches below the food. | |
|
|
|
| |
|
| aluminum foil. This will disturb the heat |
|
|
|
| circulation and result in poor baking. |
|
|
| 12 |
|
|
|