Heartland Bakeware 9200/7200 manual Oven Cleaning, Surface Burners

Page 25

Oven Cleaning

Your range must be kept clean and free of accumulations of grease or spillovers which may ignite. This is most important in the oven and broiling compartment. When cleaning the oven, make sure it is turned “Off” and is cool. For simple spills, clean the oven with a strong solu- tion of detergent, then wipe with a clean damp cloth and dry.

When food or grease has burned on the oven lining, apply a strong oven cleaning compound. Follow directions on the package, but avoid applying a strong cleaner to the front flanges or sides of end panels because it may destroy the oven door seals or plated surfaces.

Oven racks, oven rack supports, broiler pan rack, oven bottoms, and broiler pan are all removable for easy cleaning. Oven racks may be cleaned in your sink with dish cloth and detergent. If spillage has remained on the racks for an extended period, more vigorous clean- ing with a steel wool soap pad may be required.

Surface Burners

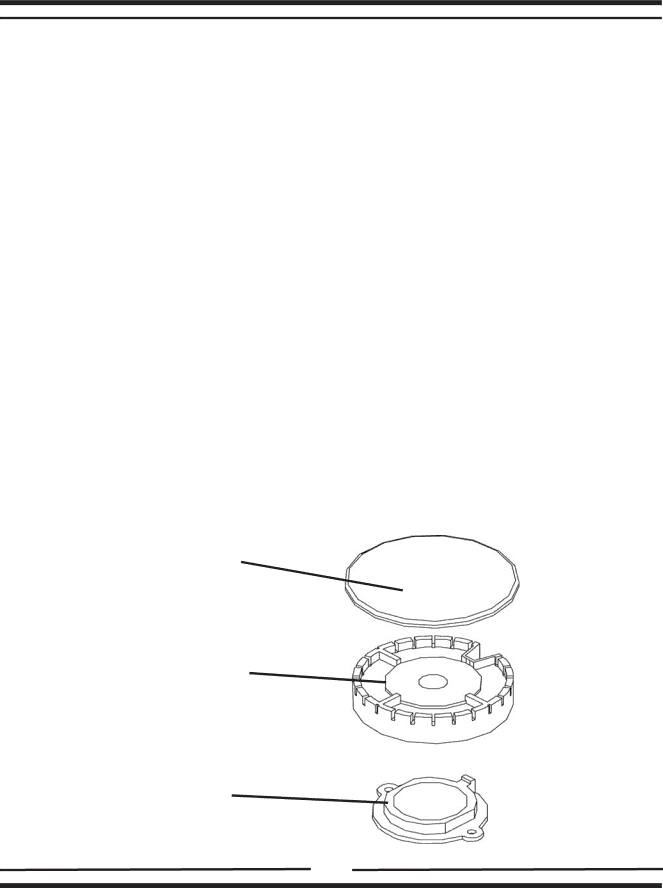
Top burners require little care other than to wipe off the head of each burner. If a boilover occurs, the burner cap can be easily lifted out so burner port holes can be cleaned in hot soapy water with a soft brush. There are no bolts or screws to remove. The igniter must also be kept clean to ensure quick positive starts. Simply lift the burner cap and clean. When replacing, be sure the tab is locked securely in position on the burner base. For normal or everyday cleaning of light spills, wipe the burner caps with a damp cloth. For heavy duty cleaning—cooked spills, oil stains, etc. scrub with a tub and tile type of cleaner. Rinse thor- oughly after every cleaning operation. Wipe away excess water.

cap

flame spreader

burner base

Figure 22

25

Image 25
Contents Model 9200 Model Installation and Operating InstructionsREV When moving range for service or cleaning For Your SafetyWhat to do if YOU Smell GAS Gas Models 9200/7200 Table of Contents Positioning the Range Assembly of Exhaust Hood to RangeExhaust Hood Electrical Connection Electrical InstallationVented Installation, Tools, Material, and Dimensions Ventless InstallationTools required to install vented hood Exhaust HoodInstallation through an outside wall Installation of DuctingInstallation through an attic to an outside wall ModelGas Line Installation Venting Safety GuidelinesAppliances installed in the state of Massachusetts How to StepsSafety ModelRough Measurements Model DimensionsAppliances 47-1/2 101 cm 121 cm RoughExhaust Hood Safety Important Safety InstructionsOven Safety Cooking Controls Sealed Burner Features see figOther Features see fig Oven FeaturesModel Control Panel Control Panel LayoutLighting the Top Burners Top Burner OperationOven Lighting Oven CookingRange Thermostat BroilManually Lighting the Top Burners Power Failure OperationManually Lighting the Oven Burner Functions Power on Clock / TimerReset minute minder SignalMeat Roasting Guide Cooking GuideBroiling Guide Baking GuideKeeping it clean Care and Cleaning PorcelainSurface Burners Oven CleaningNickel-Plated Trim Oven and Cabinet Light ReplacementRack Supports Interior Oven RackRemoval of Oven Door Broiling Pan BroilingBurner Setup & Adjustment Setup and TroubleshootingOven Burner Assembly Air Shutter Adjustment oven burner onlyOven Burner Problem Cause Remedy Spark IgnitionConversion Kits and Information Model Products See our complete line of kitchen appliances7200/9200 Parts Diagram Model 7200/9200 Range Parts List Model 7200/9200 Technical Data Wiring Diagrams