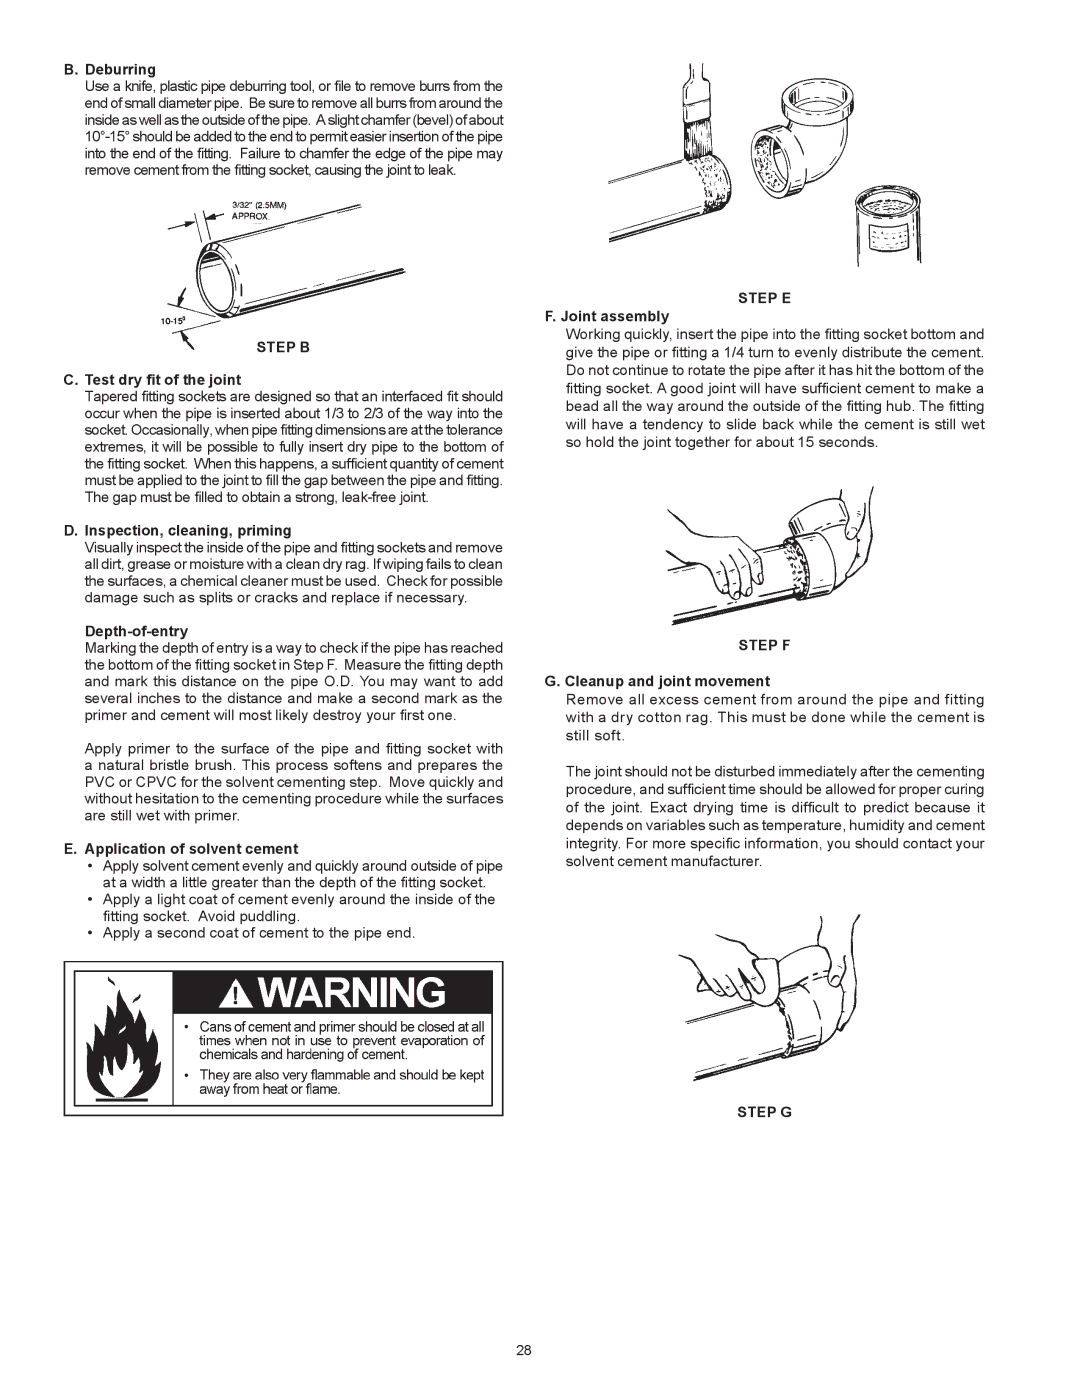
B.Deburring

Use a knife, plastic pipe deburring tool, or file to remove burrs from the end of small diameter pipe. Be sure to remove all burrs from around the inside as well as the outside of the pipe. A slight chamfer (bevel) of about 10°-15° should be added to the end to permit easier insertion of the pipe into the end of the fitting. Failure to chamfer the edge of the pipe may remove cement from the fitting socket, causing the joint to leak.

STEP B

C.Test dry fit of the joint

Tapered fitting sockets are designed so that an interfaced fit should occur when the pipe is inserted about 1/3 to 2/3 of the way into the socket. Occasionally, when pipe fitting dimensions are at the tolerance extremes, it will be possible to fully insert dry pipe to the bottom of the fitting socket. When this happens, a sufficient quantity of cement must be applied to the joint to fill the gap between the pipe and fitting. The gap must be filled to obtain a strong, leak-free joint.

D.Inspection, cleaning, priming

Visually inspect the inside of the pipe and fitting sockets and remove all dirt, grease or moisture with a clean dry rag. If wiping fails to clean the surfaces, a chemical cleaner must be used. Check for possible damage such as splits or cracks and replace if necessary.

Depth-of-entry

Marking the depth of entry is a way to check if the pipe has reached the bottom of the fitting socket in Step F. Measure the fitting depth and mark this distance on the pipe O.D. You may want to add several inches to the distance and make a second mark as the primer and cement will most likely destroy your first one.

Apply primer to the surface of the pipe and fitting socket with a natural bristle brush. This process softens and prepares the PVC or CPVC for the solvent cementing step. Move quickly and without hesitation to the cementing procedure while the surfaces are still wet with primer.

E.Application of solvent cement

Apply solvent cement evenly and quickly around outside of pipe at a width a little greater than the depth of the fitting socket.

Apply a light coat of cement evenly around the inside of the fitting socket. Avoid puddling.

Apply a second coat of cement to the pipe end.

STEP E

F. Joint assembly

Working quickly, insert the pipe into the fitting socket bottom and give the pipe or fitting a 1/4 turn to evenly distribute the cement. Do not continue to rotate the pipe after it has hit the bottom of the fitting socket. A good joint will have sufficient cement to make a bead all the way around the outside of the fitting hub. The fitting will have a tendency to slide back while the cement is still wet so hold the joint together for about 15 seconds.

STEP F

G. Cleanup and joint movement

Remove all excess cement from around the pipe and fitting with a dry cotton rag. This must be done while the cement is still soft.

The joint should not be disturbed immediately after the cementing procedure, and sufficient time should be allowed for proper curing of the joint. Exact drying time is difficult to predict because it depends on variables such as temperature, humidity and cement integrity. For more specific information, you should contact your solvent cement manufacturer.

STEP G

28

Page 28
Image 28
A.O. Smith BTX-80 SERIES 100 instruction manual Step B, Step E, Step F, Step G

BTX-80 SERIES 100 specifications

The A.O. Smith BTX-80 Series 100 is a cutting-edge heating solution designed for effective and efficient water heating. This model is particularly well-suited for residential applications, offering an impressive balance of performance and energy efficiency.

One of the standout features of the BTX-80 Series 100 is its innovative design, which incorporates a high-efficiency condensing technology. This allows the unit to capture and utilize heat that would otherwise be lost in traditional systems, thereby maximizing energy usage and reducing overall operating costs. With an impressive energy factor (EF) rating, this water heater contributes to lower utility bills while promoting environmental sustainability.

The BTX-80 is equipped with a powerful 80-gallon tank, providing ample hot water for households of varying sizes. Its large capacity ensures that multiple appliances can operate simultaneously without running out of hot water, making it an ideal choice for families with high demand. The model also incorporates a robust heating element that ensures rapid recovery and maintains consistent water temperatures.

Safety and convenience are paramount in the design of the BTX-80. It features a comprehensive digital control system that allows users to set precision temperature settings according to their needs. The intuitive interface simplifies adjustments and monitoring, while safety mechanisms like temperature and pressure relief valves provide peace of mind during operation.

A.O. Smith has also prioritized quality and durability in the construction of the BTX-80 Series 100. The tank is made from high-quality materials and comes with a robust enamel coating that resists corrosion and extends its lifespan. Additionally, the unit is backed by a lengthy warranty, reflecting the manufacturer's confidence in its longevity.

Installation and maintenance are straightforward with the BTX-80, as it is designed to fit seamlessly into existing plumbing configurations. Furthermore, the unit operates quietly, ensuring minimal disruption in the home environment.

In conclusion, the A.O. Smith BTX-80 Series 100 stands out in the market as a reliable, energy-efficient, and user-friendly water heating solution. With its advanced technologies and emphasis on safety and durability, it proves to be a smart investment for any household looking to improve their hot water system.