CheetaHub
Contents
Introduction | 1 |
Package Contents | 1 |
Description of Hardware | 1 |
Mounting the Hub | 1 |
Stacking Hubs on a Flat Surface | 2 |
Mounting Hubs in a Rack | 2 |
Connecting the Hub System | 2 |
Making a Connection via an | 2 |
Making a Connection via the MDI | 3 |
Making a Connection to the BNC Port | 3 |
Making a Connection to the AUI Port | 3 |
Powering on the Hub | 3 |
Verifying Hub Status | 4 |
Applications | 4 |
Product Specifications | 4 |
Base Unit | 4 |
Network Criteria | 5 |
Troubleshooting | 5 |
Diagnosing Hub Indicators | 5 |
Power and Cooling Problems | 6 |
Installation | 6 |
Port and Cable Assignments | 6 |
6 | |
EMI Certification | 6 |
FCC Class A (USA) | 6 |
Class A (Canada Department of Communications) | 7 |
Class A (Taiwan Bureau of Commodity Inspection) | 7 |
Class A Compliance (Korea) | 7 |
VCCI Class A Compliance (Japan) | 7 |
CE Mark Declaration of Conformance for EMI and Safety (EEC) | 7 |
Safety Compliance | 8 |
Underwriters Laboratories Inc. (USA) | 8 |
Wichtige Sicherheitshinweise (Germany) | 8 |
Warranty | 9 |
Quick Installation Guide
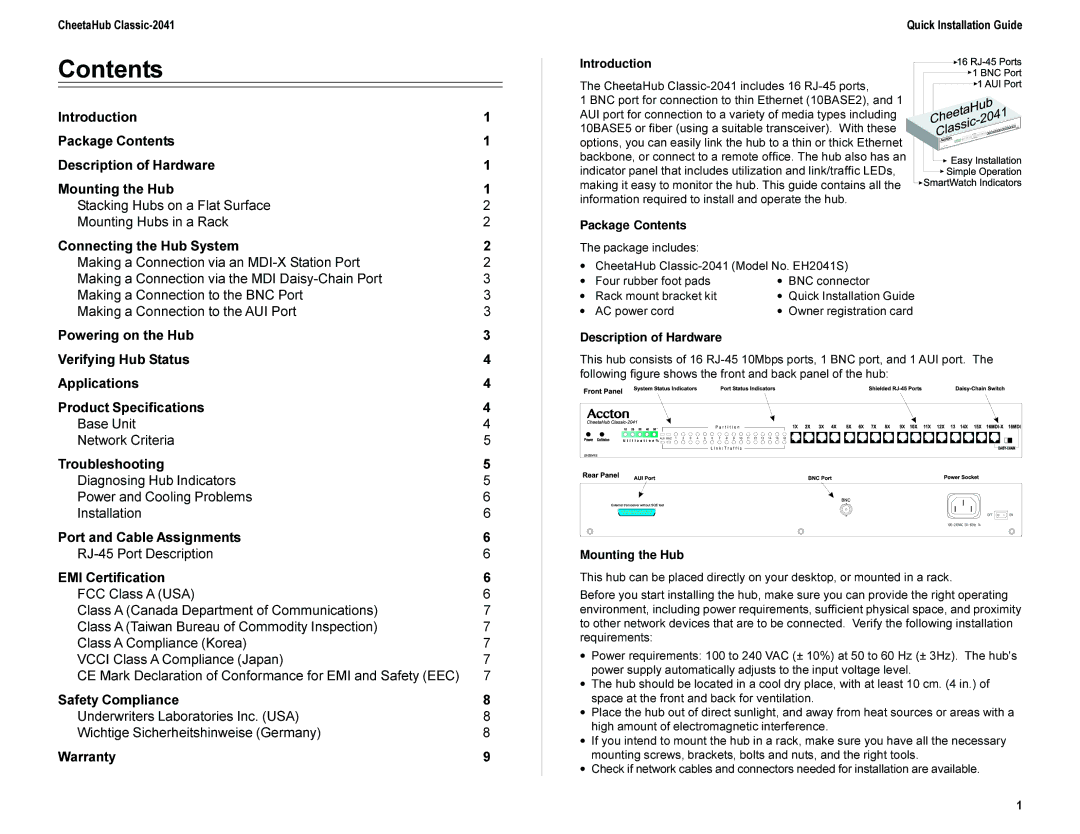
Introduction
The CheetaHub
1 BNC port for connection to thin Ethernet (10BASE2), and 1 AUI port for connection to a variety of media types including 10BASE5 or fiber (using a suitable transceiver). With these options, you can easily link the hub to a thin or thick Ethernet backbone, or connect to a remote office. The hub also has an indicator panel that includes utilization and link/traffic LEDs, making it easy to monitor the hub. This guide contains all the information required to install and operate the hub.
Package Contents
The package includes:
∙CheetaHub
∙ Four rubber foot pads | ∙ | BNC connector | |
∙ | Rack mount bracket kit | ∙ | Quick Installation Guide |
∙ | AC power cord | ∙ | Owner registration card |
Description of Hardware
This hub consists of 16
Mounting the Hub
This hub can be placed directly on your desktop, or mounted in a rack.
Before you start installing the hub, make sure you can provide the right operating environment, including power requirements, sufficient physical space, and proximity to other network devices that are to be connected. Verify the following installation requirements:
∙Power requirements: 100 to 240 VAC (± 10%) at 50 to 60 Hz (± 3Hz). The hub's power supply automatically adjusts to the input voltage level.
∙The hub should be located in a cool dry place, with at least 10 cm. (4 in.) of space at the front and back for ventilation.
∙Place the hub out of direct sunlight, and away from heat sources or areas with a high amount of electromagnetic interference.
∙If you intend to mount the hub in a rack, make sure you have all the necessary mounting screws, brackets, bolts and nuts, and the right tools.
∙Check if network cables and connectors needed for installation are available.
1