6 OPERATING METHOD
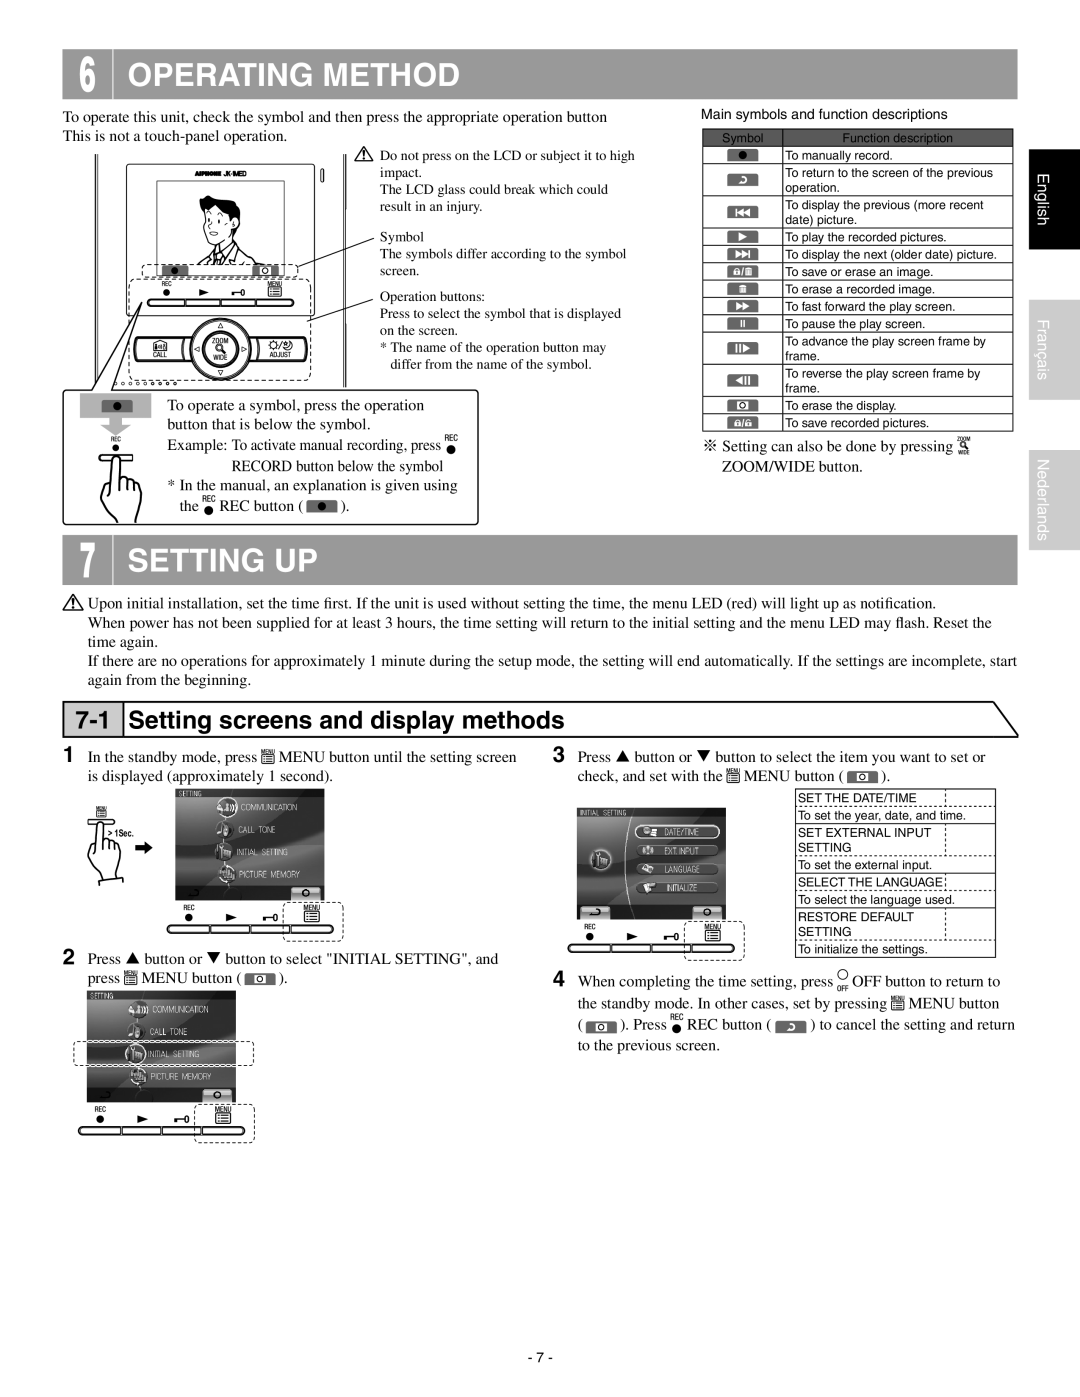
To operate this unit, check the symbol and then press the appropriate operation button This is not a
![]() Do not press on the LCD or subject it to high impact.
Do not press on the LCD or subject it to high impact.
The LCD glass could break which could result in an injury.
Symbol
The symbols differ according to the symbol screen.
Operation buttons:
Press to select the symbol that is displayed on the screen.
* The name of the operation button may differ from the name of the symbol.
To operate a symbol, press the operation button that is below the symbol.
Example: To activate manual recording, press ![]()
![]() RECORD button below the symbol
RECORD button below the symbol
*In the manual, an explanation is given using
the 
 REC button (
  ).
).
7 SETTING UP
Main symbols and function descriptions
Symbol | Function description | |||
|
|
|
| To manually record. |
|
|
|
| To return to the screen of the previous |
|
|
|
| operation. |
|
|
|
| To display the previous (more recent |
|
|
|
| date) picture. |
|
|
|
| To play the recorded pictures. |
|
|
|
| To display the next (older date) picture. |
|
|
|
| To save or erase an image. |
|
|
|
| To erase a recorded image. |
|
|
|
| To fast forward the play screen. |
|
|
|
| To pause the play screen. |
|
|
|
| To advance the play screen frame by |
|
|
|
| frame. |
|
|
|
| To reverse the play screen frame by |
|
|
|
| |
|
|
|
| frame. |
|
|
|
| |
|
|
|
| To erase the display. |
|
|
|
| |
|
|
|
| |
|
|
|
| To save recorded pictures. |
※Setting can also be done by pressing 
 ZOOM/WIDE button.
English
Français
Nederlands
![]() Upon initial installation, set the time first. If the unit is used without setting the time, the menu LED (red) will light up as notification.
Upon initial installation, set the time first. If the unit is used without setting the time, the menu LED (red) will light up as notification.
When power has not been supplied for at least 3 hours, the time setting will return to the initial setting and the menu LED may flash. Reset the time again.
If there are no operations for approximately 1 minute during the setup mode, the setting will end automatically. If the settings are incomplete, start again from the beginning.
7-1 Setting screens and display methods
1 In the standby mode, press ![]()
![]() MENU button until the setting screen is displayed (approximately 1 second).
MENU button until the setting screen is displayed (approximately 1 second).
> 1Sec.
2 Press button or button to select "INITIAL SETTING", and
press ![]()
![]() MENU button (
MENU button ( ![]() ).
).
3 Press button or button to select the item you want to set or
check, and set with the ![]()
![]() MENU button (
MENU button ( ![]() ).
).
SET THE DATE/TIME
To set the year, date, and time.
SET EXTERNAL INPUT
SETTING
To set the external input.
SELECT THE LANGUAGE ![]()
To select the language used.
RESTORE DEFAULT
SETTING
To initialize the settings.
4 When completing the time setting, press ![]() OFF button to return to the standby mode. In other cases, set by pressing
OFF button to return to the standby mode. In other cases, set by pressing ![]()
![]() MENU button
MENU button
( ![]() ). Press
). Press ![]()
![]() REC button (
REC button ( ![]() ) to cancel the setting and return to the previous screen.
) to cancel the setting and return to the previous screen.
- 7 -
