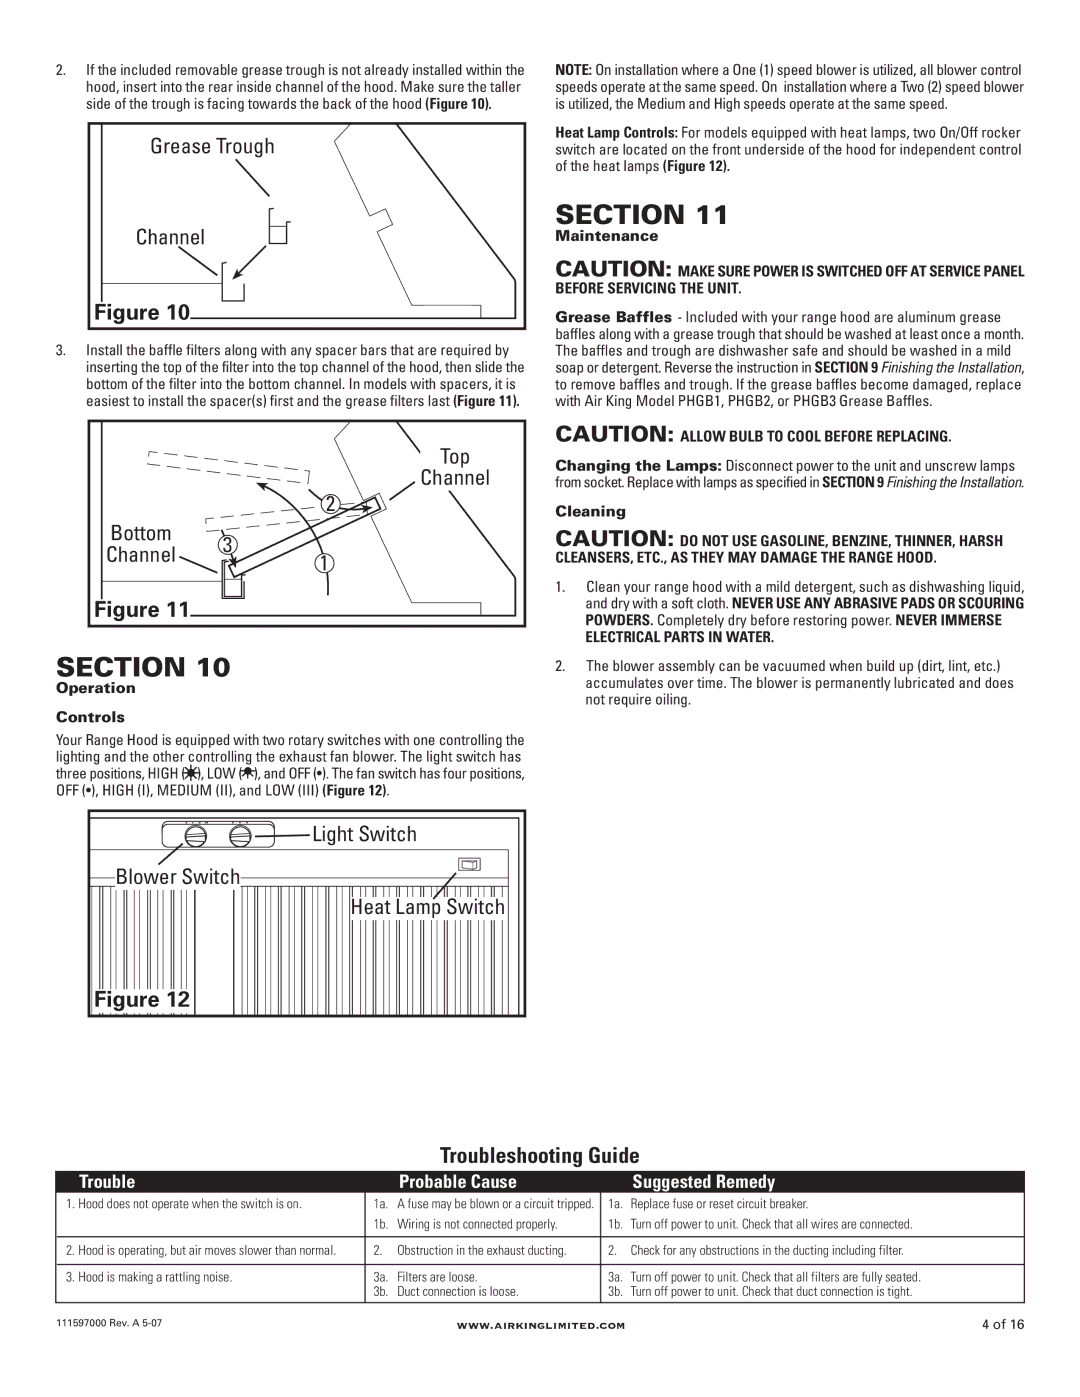
2.If the included removable grease trough is not already installed within the hood, insert into the rear inside channel of the hood. Make sure the taller side of the trough is facing towards the back of the hood (Figure 10).
Grease Trough |
Channel |
Figure 10 |
3.Install the baffle filters along with any spacer bars that are required by inserting the top of the filter into the top channel of the hood, then slide the bottom of the filter into the bottom channel. In models with spacers, it is easiest to install the spacer(s) first and the grease filters last (Figure 11).
| Top | |
| Channel | |
| 2 | |
Bottom | 3 | |
Channel | ||
1 | ||
| ||
Figure 11 |
|
NOTE: On installation where a One (1) speed blower is utilized, all blower control speeds operate at the same speed. On installation where a Two (2) speed blower is utilized, the Medium and High speeds operate at the same speed.
Heat Lamp Controls: For models equipped with heat lamps, two On/Off rocker switch are located on the front underside of the hood for independent control of the heat lamps (Figure 12).
SECTION 11
Maintenance
CAUTION: MAKE SURE POWER IS SWITCHED OFF AT SERVICE PANEL BEFORE SERVICING THE UNIT.
Grease Baffles - Included with your range hood are aluminum grease baffles along with a grease trough that should be washed at least once a month. The baffles and trough are dishwasher safe and should be washed in a mild soap or detergent. Reverse the instruction in SECTION 9 Finishing the Installation, to remove baffles and trough. If the grease baffles become damaged, replace with Air King Model PHGB1, PHGB2, or PHGB3 Grease Baffles.
CAUTION: ALLOW BULB TO COOL BEFORE REPLACING.
Changing the Lamps: Disconnect power to the unit and unscrew lamps from socket. Replace with lamps as specified in SECTION 9 Finishing the Installation.
Cleaning
CAUTION: DO NOT USE GASOLINE, BENZINE, THINNER, HARSH CLEANSERS, ETC., AS THEY MAY DAMAGE THE RANGE HOOD.
1.Clean your range hood with a mild detergent, such as dishwashing liquid, and dry with a soft cloth. NEVER USE ANY ABRASIVE PADS OR SCOURING POWDERS. Completely dry before restoring power. NEVER IMMERSE
ELECTRICAL PARTS IN WATER.
SECTION 10
Operation
Controls
Your Range Hood is equipped with two rotary switches with one controlling the lighting and the other controlling the exhaust fan blower. The light switch has three positions, HIGH (![]() ), LOW (
), LOW (![]() ), and OFF (•). The fan switch has four positions, OFF (•), HIGH (I), MEDIUM (II), and LOW (III) (Figure 12).
), and OFF (•). The fan switch has four positions, OFF (•), HIGH (I), MEDIUM (II), and LOW (III) (Figure 12).
Light Switch
Blower Switch
Heat Lamp Switch
Figure 12
2.The blower assembly can be vacuumed when build up (dirt, lint, etc.) accumulates over time. The blower is permanently lubricated and does not require oiling.
Troubleshooting Guide
| Trouble |
| Probable Cause |
| Suggested Remedy |
1. | Hood does not operate when the switch is on. | 1a. | A fuse may be blown or a circuit tripped. | 1a. | Replace fuse or reset circuit breaker. |
|
| 1b. | Wiring is not connected properly. | 1b. | Turn off power to unit. Check that all wires are connected. |
|
|
|
|
|
|
2. | Hood is operating, but air moves slower than normal. | 2. | Obstruction in the exhaust ducting. | 2. | Check for any obstructions in the ducting including filter. |
|
|
|
|
|
|
3. | Hood is making a rattling noise. | 3a. | Filters are loose. | 3a. | Turn off power to unit. Check that all filters are fully seated. |
|
| 3b. | Duct connection is loose. | 3b. | Turn off power to unit. Check that duct connection is tight. |
111597000 Rev. A | www.airkinglimited.com | 4 of 16 |