INSTALLATION INSTRUCTIONS
CAUTION: MAKE SURE POWER IS SWITCHED OFF AT SERVICE PANEL BEFORE STARTING INSTALLATION.
SECTION 1
Preparing the Range Hood
1.Unpack hood from the carton and confirm that all pieces are present. In addition to the range hood you should have:
1 - Package containing:
3 - 2" wood screws
8 - 3/4" wood screws (36" models: 12 / 42", 48" models: 16)
4 - wall anchors (36" models: 6 / 42", 48" models: 8)
30" models: 2 - PHGB3 large baffles, one spacer
36" models: 2 - PHGB3 large baffles, one PHGB1 small baffle
42" models: 2 - PHGB3 large baffles, one PHGB2 medium baffle
48" models: 2 - PHGB3 large baffles, two spacer 1 - Grease trough
1 - Wood mounting strip
1 - Instruction/Safety Sheet
NOTE: Some hoods may be shipped with a protective plastic adhered to the range hood. It is recommended to leave this in place during installation to protect the hood from scratching. Remove when the installation is complete.
SECTION 2
Ductwork
CAUTION: ALL DUCTING MUST COMPLY WITH LOCAL AND NATIONAL BUILDING CODES.
WARNING: TO REDUCE THE RISK OF FIRE, USE ONLY METAL DUCTWORK.
1.Determine the type of ducting you will require (Figure 1).
Horizontal |
|
| Roof Cap |
| Outlet |
| Adapter |
Wall Cap |
|
Figure 1 | Vertical |
2.Install the proper sized outlet adapter (available separately) to the hood by matching up the four holes on the flange of the adapter to the four corresponding holes on the hood and secure in place with the provided screws. Ensure an airtight seal around the adapter by securing all connections with ducting tape (Figure 2).
Outlet Adapter |
|
| Screws |
Hood | Flange |
| |
Figure 2 |
|
3.It is highly recommended that a back draft damper be installed to prevent outside air from flowing back into the home. Choose a back draft damper (available separately) sized to fit the diameter of the outlet adapter. Attach the back draft damper into the outlet adapter, press fit it into the round opening of the adapter until it is fully seated, making sure the damper opens away from the hood otherwise airflow will be restricted (Figure 3).
Damper |
Outlet Adapter |
Hood |
Figure 3 |
CAUTION: MAKE SURE POWER IS SWITCHED OFF AT SERVICE PANEL BEFORE STARTING INSTALLATION.
CAUTION: WHEN CUTTING OR DRILLING INTO WALL DO NOT DAMAGE ELECTRICAL WIRING AND OTHER HIDDEN UTILITIES.
SECTION 3
Measuring the Hood Installation
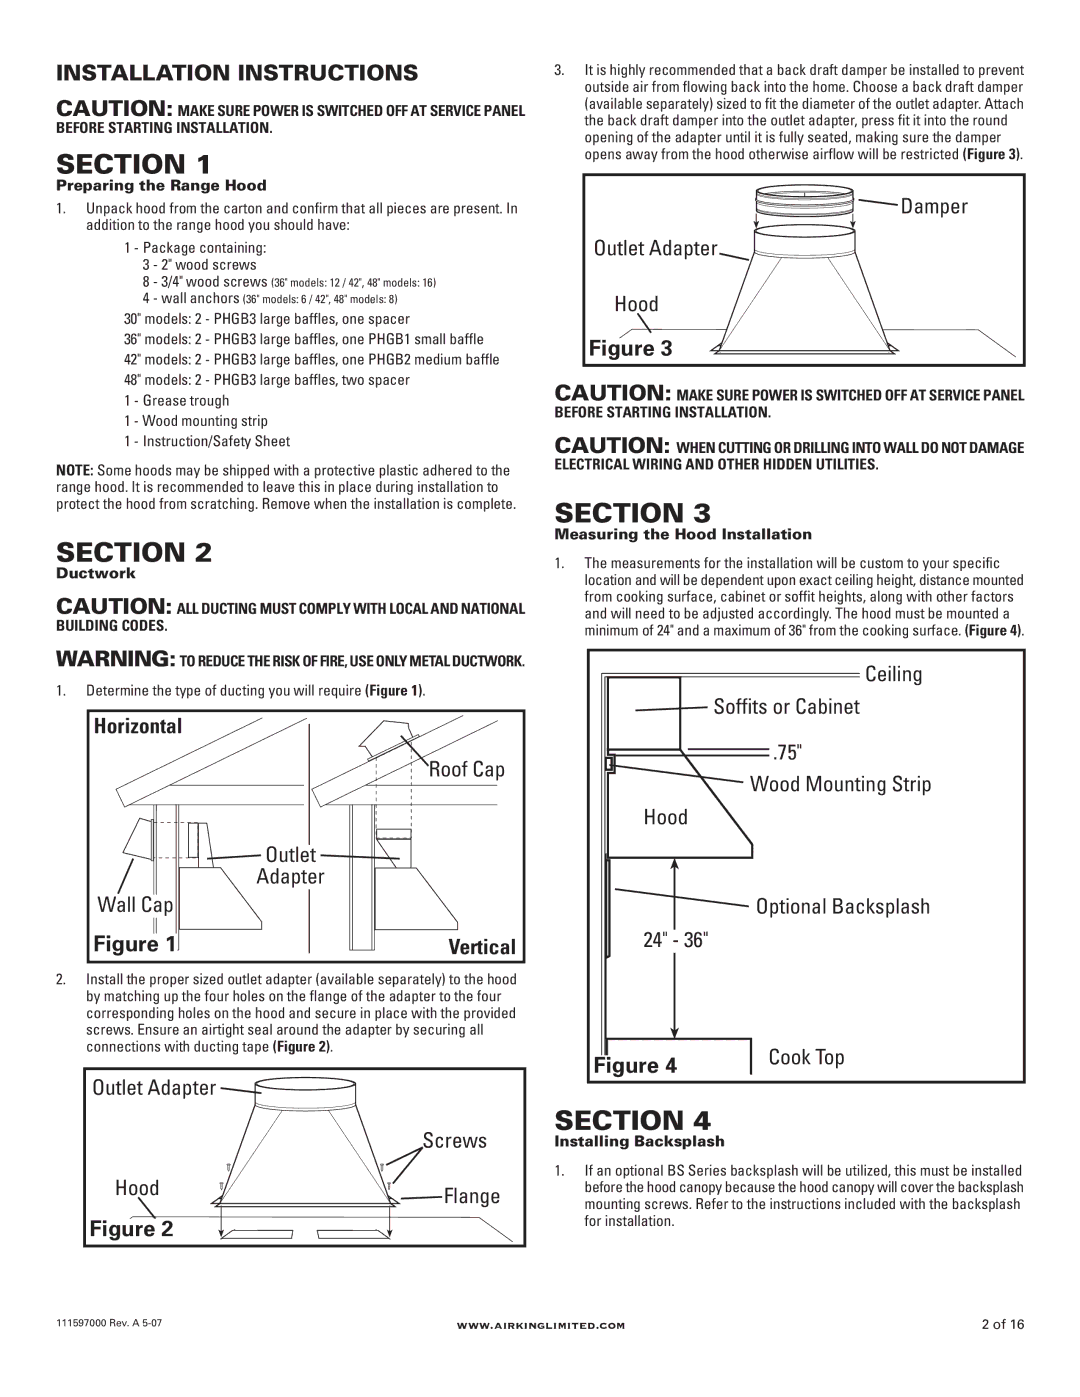
1.The measurements for the installation will be custom to your specific location and will be dependent upon exact ceiling height, distance mounted from cooking surface, cabinet or soffit heights, along with other factors and will need to be adjusted accordingly. The hood must be mounted a minimum of 24" and a maximum of 36" from the cooking surface. (Figure 4).
Ceiling
Soffits or Cabinet
.75"
Wood Mounting Strip
Hood
Optional Backsplash
24" - 36"
| Cook Top | |
Figure 4 | ||
|
SECTION 4
Installing Backsplash
1.If an optional BS Series backsplash will be utilized, this must be installed before the hood canopy because the hood canopy will cover the backsplash mounting screws. Refer to the instructions included with the backsplash for installation.
111597000 Rev. A | www.airkinglimited.com | 2 of 16 |