OWNER’S MANUAL

SERVICE

PROCEDURES

Continued

FAN

IMPORTANT: Remove fan from motor shaft before removing motor from heater. The weight of the motor resting on the fan could damage the fan pitch.

1.Remove upper shell (see page 8).

2.Use 1/8" allen wrench to loosen set- screw which holds fan to motor shaft.

3.Slip fan off motor shaft.

4.Clean fan using a soft cloth moistened with kerosene or solvent.

5.Dry fan thoroughly.

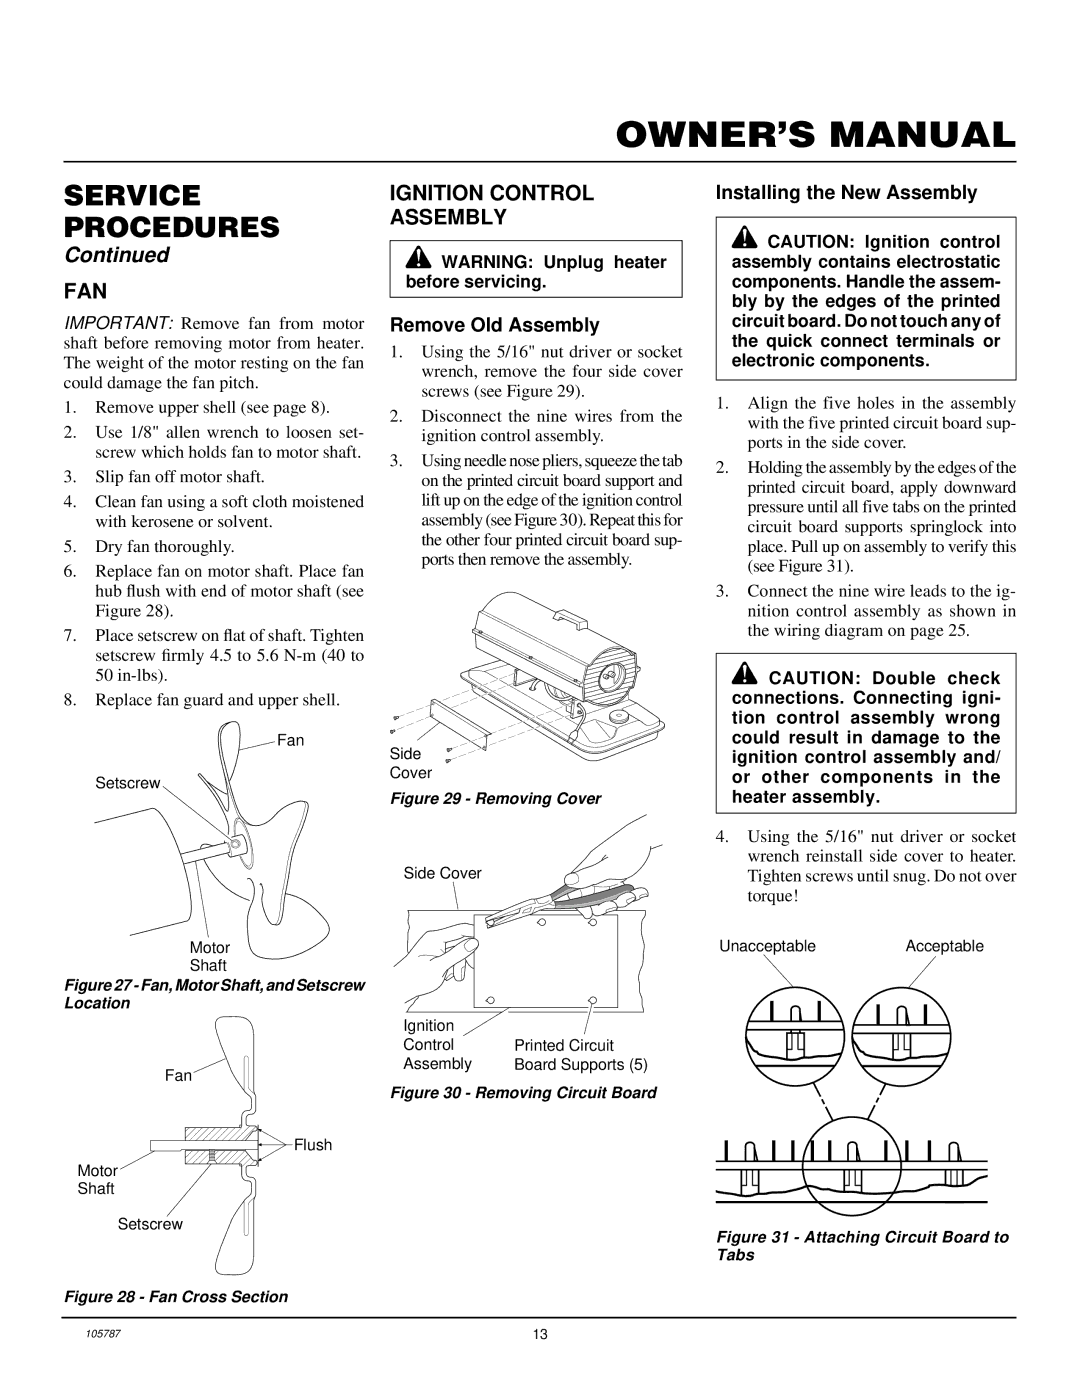
6.Replace fan on motor shaft. Place fan hub flush with end of motor shaft (see Figure 28).

7.Place setscrew on flat of shaft. Tighten setscrew firmly 4.5 to 5.6 N-m (40 to 50 in-lbs).

8.Replace fan guard and upper shell.

Fan

Setscrew

Motor

Shaft

Figure 27 - Fan, Motor Shaft, and Setscrew Location

Fan

Flush

Motor

Shaft

Setscrew

IGNITION CONTROL

ASSEMBLY

WARNING: Unplug heater before servicing.

Remove Old Assembly

1.Using the 5/16" nut driver or socket wrench, remove the four side cover screws (see Figure 29).

2.Disconnect the nine wires from the ignition control assembly.

3.Using needle nose pliers, squeeze the tab on the printed circuit board support and lift up on the edge of the ignition control assembly (see Figure 30). Repeat this for the other four printed circuit board sup- ports then remove the assembly.

Side

Cover

Figure 29 - Removing Cover

Side Cover

Ignition


Control

Printed Circuit

Assembly

Board Supports (5)

Figure 30 - Removing Circuit Board

Installing the New Assembly

CAUTION: Ignition control assembly contains electrostatic components. Handle the assem- bly by the edges of the printed circuit board. Do not touch any of the quick connect terminals or electronic components.

1.Align the five holes in the assembly with the five printed circuit board sup- ports in the side cover.

2.Holding the assembly by the edges of the printed circuit board, apply downward pressure until all five tabs on the printed circuit board supports springlock into place. Pull up on assembly to verify this (see Figure 31).

3.Connect the nine wire leads to the ig- nition control assembly as shown in the wiring diagram on page 25.

CAUTION: Double check connections. Connecting igni- tion control assembly wrong could result in damage to the ignition control assembly and/ or other components in the heater assembly.

4.Using the 5/16" nut driver or socket wrench reinstall side cover to heater. Tighten screws until snug. Do not over torque!

UnacceptableAcceptable

Figure 31 - Attaching Circuit Board to Tabs

Figure 28 - Fan Cross Section

105787

13

Page 13
Image 13
Desa NTH150-2, NTH50-2, NTH35-2, NTH100-2 Fan, Ignition Control Assembly, Remove Old Assembly, Installing the New Assembly

NTH35-2, NTH70-2, NTH50-2, NTH100-2, NTH150-2 specifications

Desa NTH series includes advanced models like NTH150-2, NTH70-2, NTH50-2, NTH100-2, and NTH35-2. Each of these models is designed to cater to diverse needs in heating, ventilation, and air conditioning systems, ensuring optimal performance and energy efficiency.

The NTH150-2 is a powerful unit boasting an output capacity of 150,000 BTU. It features a dual-stage heating system, allowing for rapid temperature changes while maintaining energy efficiency. This model is equipped with advanced sensor technology that automatically adjusts the heating output based on room conditions, creating a comfortable indoor environment. Additionally, its robust build ensures durability and longevity.

Next in line is the NTH70-2, a medium-capacity heater suitable for residential settings. This model focuses on user-friendliness with an intuitive digital control panel, offering precise temperature settings and timer functions. The NTH70-2 is also designed with an eco-mode feature, significantly reducing energy consumption while still delivering consistent heating performance.

The NTH50-2 is designed for smaller spaces, providing an output of 50,000 BTU. This model emphasizes portability with a compact design and lightweight construction. It includes safety features like overheat protection and automatic shut-off, making it an excellent choice for individual rooms or smaller apartments. Its noise-reduction technology also ensures quiet operation, enhancing user comfort.

The NTH100-2 strikes a balance between capacity and efficiency, making it a versatile option for various applications. This model incorporates modern inverter technology, enabling it to adjust its power usage based on demand. This results in lower energy bills without compromising the heating experience. The NTH100-2 is also equipped with Wi-Fi connectivity, allowing users to control their heating system remotely via a smartphone app.

Finally, the NTH35-2 serves as an energy-efficient solution for extremely small spaces or as a supplemental heating source. It features low-energy heating technology, which ensures that operational costs remain minimal. This unit is praised for its easy installation and maintenance, making it an ideal choice for those looking for practicality without sacrificing performance.

Overall, the Desa NTH series exemplifies a commitment to innovative heating solutions, blending advanced technology, user-friendly designs, and energy efficiency to meet a wide range of indoor climate needs.