AV-D77
Precautions
Installation
Electric Power
AC power cord
Table of Contents
Connecting Equipment
Before connecting the AC cord
Connections
Connecting SPEAKERS1
Connecting + to +, to terminals
Speaker terminals
Speaker impedance Front and center speakers
Using AC Outlets on the Unit
Connecting the Supplied Antennas
Connecting AN Outdoor Antenna
Positioning the Speakers
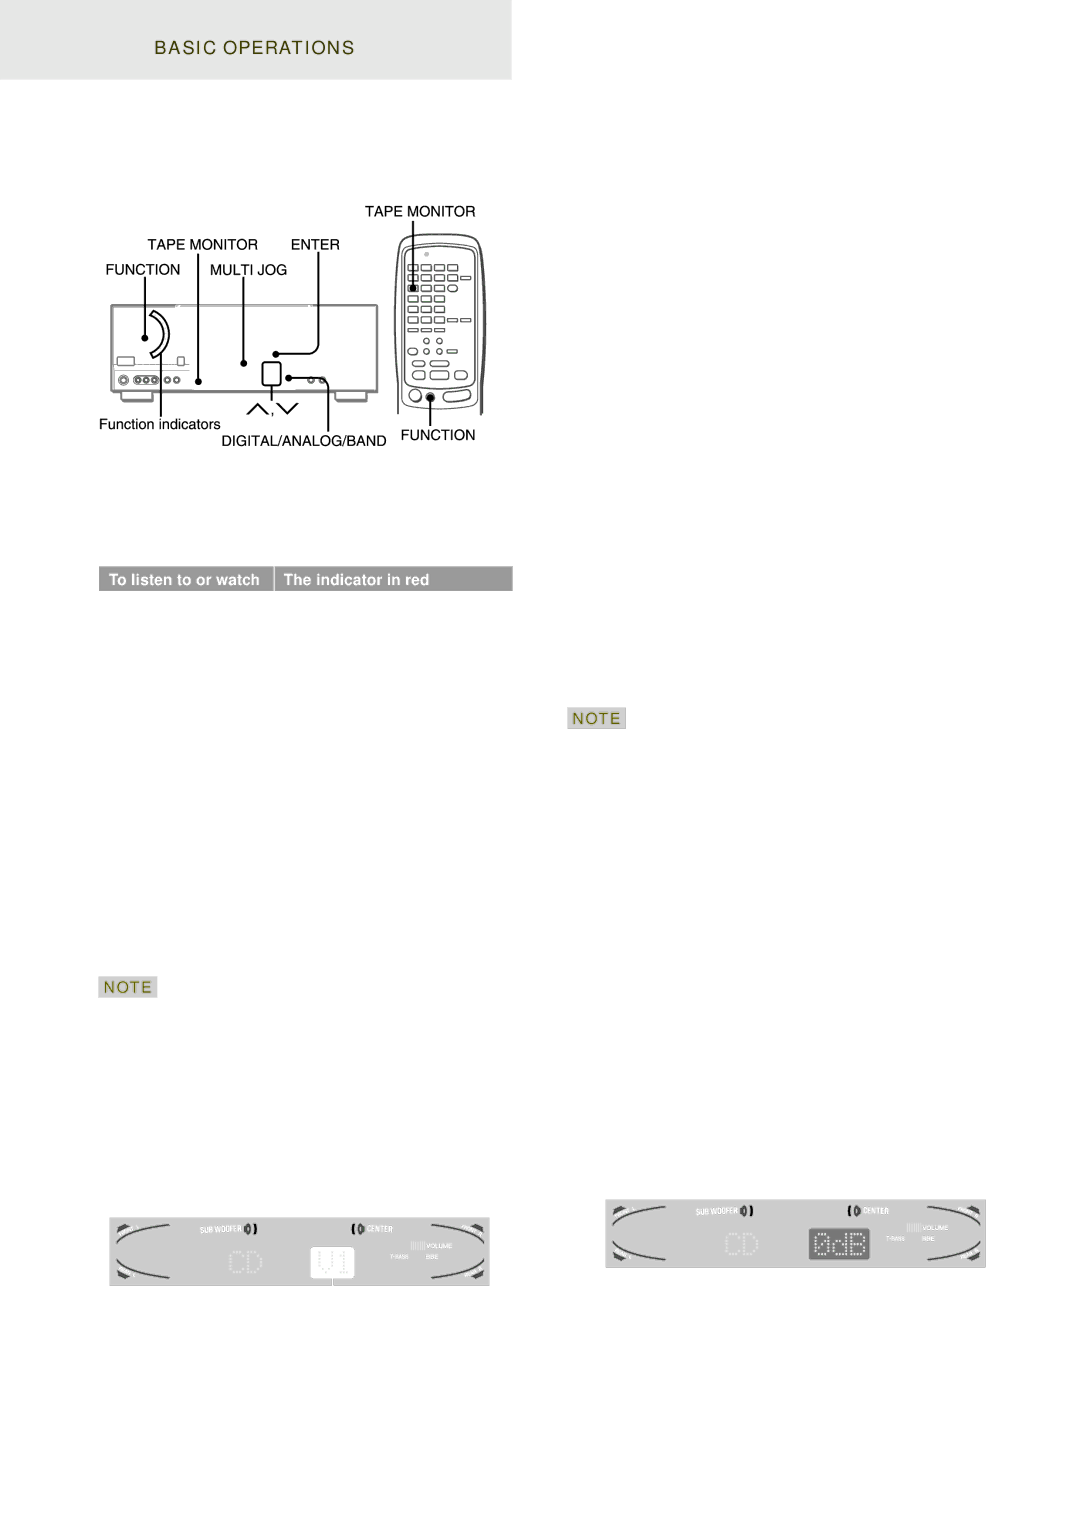
About the Remote Control
Remote control operation
If the receiver cannot be operated with the remote Control
Press the Digit buttons in the order of 0, 4, 0
Power Economizing ECO Mode
Press the Power button
Before Operation
Custom Audio Adjustment
Volume Control
Sound Adjustment During Recording
BBE System
Setting NEW Equalization Curves
Electronic Graphic Equalizer
Within 8 seconds, press the Enter button
When the music source is monaural
To adjust the volume and balance of the surround speakers
DSP Surround
Start the selected program source Adjust the sound
Select the function to be adjusted
Selection of AUDIO/VIDEO Source
Select the program source
Select the program source to be recorded
Before operation
Manual Tuning
Press the N or M button to select a station
Presetting Stations
Preset Number Tuning
To clear a preset station
When using the remote control
To Select a Dolby Surround Mode
Recommended mode
When operating with the remote control
Check the following
Adjusting Speaker Level Balance
Phantom mode Stereo Normal or Wide mode
Dolby D PRO Logic Normal or Wide mode
DTS Surround
Adjust the sound level of the center and surround speakers
About the channels
Adjusting LOW Frequency Sound Effectlfe
Adjusting Dynamic Range
Press the NUP Mdown button or turn
Preparation
To Select a DTS Surround Mode
To restore the sound settings
Selecting DTS Surround
To Listen to the Original DTS Sound
Press and hold the SET UP button for about 3 seconds
Operating TV, Cable TV, VCR and CD Player
To Enter the ID Code of the External Equipment
Confirm the code number of the external equipment
Setting the Clock
Setting the Sleep Timer
Press the Enter button
Press the Aiwa Receiver button Press the Sleep button
Specifications
FM tuner section
AM tuner section
Amplifier section
Care and Maintenance Parts Index
Troubleshooting Guide
To clean the cabinet
General
Page
AOC
CXC
JBL
JCB
APPENDIX/APÉ NDICE/ Annexe
RCA
SSS
TMK
ID Codes for Cable TV
ABC
BBT
NSC
ID Codes for VCR
NDICE/ Annexe
CCE
HI-Q
ID Codes for CD Player
ID Codes for DSS Satellite
HTS
Page
Precauciones
Advertencia
Instalación
Energía eléctrica
Indice
Antena exterior
Mantenimiento
Dañ os que requieren reparació n
Conexiones
Conexion DE Equipos
Antes de conectar el cable de alimentació n de CA
Conexion DE LOS Altavoces
Terminales para altavoces
Impedancia de los altavoces Altavoces delanteros y central
Altavoces perimé tricos y altavoz de subgraves
Ubicacion DE LOS Altavoces
USO DE LAS Tomas DE CA DE LA Unidad
Conexion DE LAS Antenas Suministradas
Conexion DE UNA Antena Exterior
Sobre EL Controlador Remoto
Operació N DEL Controlador Remoto
Presione los botones Digit en el orden de 0, 4, 0, y
Presione el botó n Power
Antes DE LA Operacion
Modo DE Ahorro DE Energía ECO
Control DEL Volumen
Ajuste DEL Sonido a SU Gusto
Sistema BBE
Sistema Super T-BASS
Ecualizador Grafico Electronico
Ajuste DE Nuevas Curvas DE Ecualizació N
Dentro de 8 segundos, presione el botó n Enter
Mode seleccionado
Cuando la fuente de mú sica sea monoaural
JAZ BAL ADE Stadium Ballade
Seleccion DE UNA Fuente DE AUDIO/VIDEO
Sobre la fuente de vídeo para el monitor o el televisor
Seleccione la fuente de programas
Seleccione la funció n que desee ajustar
Con Dolby Digital Surround o DTS surround
Seleccione la fuente de programas que desee grabar
Antes de la operació n
Inicie la reproducció n del disco DVD LD grabado
Sintonia Manual
Presione el botó n No Mpara seleccionar una emisora
Cuando la recepció n contenga ruido de interferencia
Para cambiar el intervalo de sintonía de AM
Sintonizació N DE NÚ Meros Memorizados
Repita los pasos 1 y
Para borrar una emisora memorizada
Al utilizar el controlador remoto
Seleccion DE Dolby Surround
Para Seleccionar UN Modo Dolby Surround
Excepto los modos 2chSTEREO y Phantom
Ajuste DEL Equilibrio DEL Nivel Entre Altavoces
Informació n sobre los canales
Altavoz central
Altavoces perimé tricos
Ajuste DEL Efecto DE Sonido DE Baja Frecuencia LFE
Ajuste DE LA Gama Diná Mica
LFE
Para Seleccionar UN Modo DTS Surround
Para Escuchar EL Sonido DTS Original
Modo recomendado
Para restaurar los ajustes de sonido
Mode Select
Confirme el nú mero de có digo del equipo externo
Presione el botó n TV, CABLE, VCR, o CD del á rea
Para confirmar el có digo de identificació n almacenado
Presione el botó n Enter
Presione el botó n Aiwa Receiver Presione el botó n Sleep
Especificaciones
Secció n del sintonizador de FM
Secció n del sintonizador de AM
Secció n del amplificador
Indice DE LAS Partes
Seccion General
Seccion DEL Sintonizador
Para limpiar el exterior
Page
Signification des symboles graphiques
Avertissement
Electricité
Relevé du propriétaire
Table DES Matieres
Antenne exté rieure
Entretien
Ré parations exigeant l’intervention d’un professionnel
Raccordements
Raccordement DE Tout ’EQUIPEMENT
Avant de raccorder le cordon secteur
Camescope
Raccordement DES Enceintes
Bornes d’enceinte
Impé dance des enceintes Enceintes avant et arrié re
Enceintes surround et caisson de grave
Positionnement DES Enceintes
Utilisation DES Prises D’ALIMENTATION DE L’APPAREIL
Raccordement DES Antennes Fournies
Raccordement D’UN Antenne Exterieure
Propos DE LA Telecommande
Fonctionnement DE LA TÉ LÉ Commande
Si l’ampli-tuner ne fonctionne pas avec la té lé commande
Appuyez sur les touches Digit dans l’ordre de 0, 4, 0 et
Mode D’ECONOMIE D’ENERGIE ECO
Avant DE Commencer
Sé lection de la paire d’enceintes avant
Reglage DE Volume
Systeme BBE
Systeme Super T-BASS
Reglage DU SON Pendant ’ENREGISTREMENT
Egaliseur Graphique Electronique
Reglage DE Nouvelles Courbes D’EGALISATION
Dans un dé lai de 8 secondes, appuyez sur la touche Enter
Pour ajuster le volume et la balance des enceintes surround
Processeur D’AMBIANCE
Quand la source de musique est monophonique
Sé lectionnez la source de programme
Sé lectionnez la fonction dont le niveau doit ê tre ajusté
Appuyez de faç on ré pé té e sur la touche NUP ou Mdown
Enregistrement D’UNE
Pré paratifs
Accord Manuel
Quand une é mission FM sté ré o est parasité e
Si la ré ception est parasité e
Pour changer l’intervalle d’accord AM
Prereglage DES Stations
Accord DES Stations Prereglees
Radio
Pour Selectionner UN Mode Dolby Surround
Selection DU Dolby Surround
Reglage DE LA Balance DU Niveau DES Enceintes
Dolbydts Surround Etsurround
Propos des canaux
Enceinte centrale
Les enceintes gauche et droite créent l’effet stéréo
Enceintes surround
Lorsque le mode surround Dolby Digital est
Reglage DE L’EFFET Sonore Dans LES Basses FRÉ Quences LFE
Reglage DE LA Plage Dynamique
Pré paration
Pour Selectionner UN Mode DTS Surround
Mode conseillé
Pour É Couter LE SON DTS Original
Appuyez pendant environ 3 secondes sur la touche SET UP
Pour Entrer LE Code ID D’UN Appareil Exterieur
Vé rifiez le code ID de lappareil exté rieur
Appuyez sur une des touches indiqué es ci- dessous
Reglage DE L’HORLOGE
Reglage DE LA Minuterie D’ARRET
Appuyez sur la touche Enter
Section Tuner FM
Section Tuner AM
Section Amplificateur
Gé né ralité s
Soin ET Entretien Nomenclature
EN CAS DE Panne
Section Tuner