Call toll free I-800-BUY-AIWA
Digital Aijdio
Electric Power
AC power cord
Audio Adjustments Graphic Equalizer
Manual Tuning Presetting Stations
Setting the Clock Setting the Sleep Timer Setting the Timer
Connecting Optional Equipment Listening to External Sources
Before connecting the AC cord
Check your system and accessories
Connect the right and left speakers to the main unit
INSX-A3041
Connecting AN Outdoor Antenna
Connect the supplied antennas
Connect the AC cord to an AC outlet
AM antenna
When to replace the batteries
To use Shift on the remote control
To use Function on the remote control
To turn the power off
To select with the remote control
To cancel the selected mode
Using the headphones
Sound adjustment during recording
Press TUNER/BAND repeatedly to select the desired band
Press + Down or W UP to select a station
Repeat steps 1
Press Tape and press a Eject to open the cassette holder
Press to start play
To start play when the power is off Direct Play Function
Selecting a track with the remote control
To plav all discs in the disc com~artment, press
To sesrch for a particular point during playback, keep +
Press Prgm while pressing Shift in stop mode
Press numbered buttons O-9 and +10 to program a track
Press Disc Direct Play 1-3 to select a disc
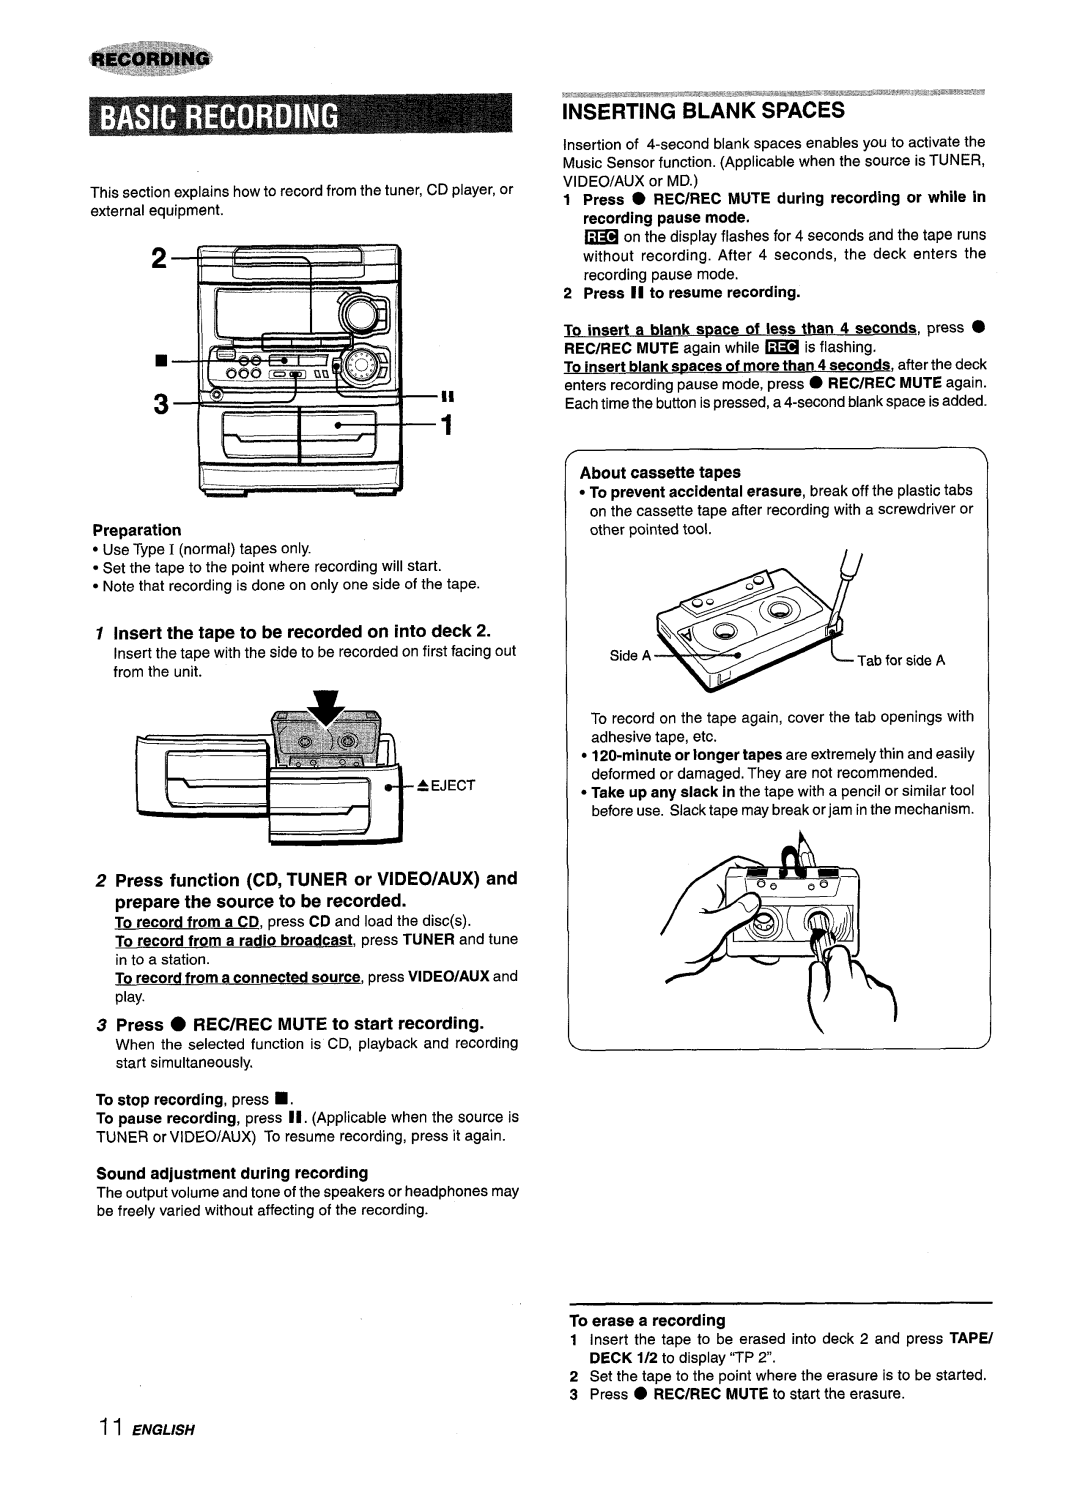
Inserting Blank Spaces
Insert the tape to be recorded on into deck
Press REC/REC Mute to start recording
Press . REC/REC Mute to start recording
Press Sync Dubbing to start recording
To stop dubbing
‘Ml
Insert the tape into deck
Press REC/REC Mute to start recording on the first side
Repeat step For Rest Tracks for Side Ill ~miij
To change the program of each side
Press CLOCK, then press II SET within 4 seconds
Press + Down or UP to designate the hour, then press II SET
Press Down or UP to designate the minute, then press II SET
Repeat to designate the minute of the timer-on time
Prepare the source
Pressing Down or UP, then press
Press Function to select a source, then press
When connecting a turntable
When the CD Digital OUT Optical jack is not being
VIDEO/AUX Jacks
CD Digital OUT Optical Jack
General
Tuner Section
Cassette Deck Section
CD Player Section
Copyright
Page
Espanol
Precauciones
Antes DE LA Operacion
Sintonizacion
Preajuste
Antes de conectar el cable de alimentacion de CA
Compruebe su sistema y Ios accesorios
Surround Speakers R O L
Conecte Ias antenas suministradasi
Conecte el cable de alimentacion de CA a una toma de CA
Para posicionar Ias antenas Antena de FM
Para conectar otro equipo optional -+ pagina
Para cancelar el modo Demo
Para encender la unidad
Jueao de demostracion
Para cancelar el modo seleccionado
Para seleccionar con el control remoto
Para reducir la intensidad de iluminacion del visualizador
Pulse un Graphic Equalizer
Pulse + Down 0 UP para seleccionar una emisora
Repita Ios pasos 1 y
Para buscar rapidamente una emisora btisqueda automatic
Cuando una radiodifusion estereo por FM tenga ruido
Sintonizacion Mediante Numero DE Preajuste
Reproduction DE Discos
Para reproducer todos Ios discos del compartimiento, pulse
Para retxoducir un disco solamente, pulse Disc Direct Play
JOG
DE Reproduction
Modo de parada
Pulse Disc Direct Play 1-3 para seleccionar un disco
Programar una cancion
Insercion DE Espacios SIN Grabar
Inserte la cinta que vaya a grabar en la platina
Pulse REC/REC Mute para iniciar la grabacion
Pulse II para reanudar la grabacion
+-- Y
PulseTAPE/DECK 1/2 para seleccionar la platina
Inserte la cinta en la platina
REC/REC Mute para iniciar la grabacion de la segunda cara
Para detener la grabacion
Para borrar el programa de edition
Para detener la qrabacion
Para comprobar el orden de Ios numeros de Ia.ecanciones
Programadas
Para cambiar el programa de cada cara
Para cancelar el temporizador para dormir
RELOJ?@#ADOR -.=.!%
Cuando se utilice el control remoto
Para cambiar al modo de 24 horas
Pulse Timer para visualizer 0, y Iuego pulse
Haber ajustado el volumen y el tono
Para comprobar la hors y la fuente de sonido especificadas
Pulse VIDEO/AUX
Haga la reproduction en el equipo conectado
Cuando conecte un giradiscos
Cuando no se utilice la toma CD Digital OUT Optical
Seccion DE LA Platina
Derechos DE Autor
Page
Installation
Releve du proprietaire
Entree d’objets et de Iiquide Faire attention a ce que
Chariot et support Si I’appareil
Preparations
Reception Radio
Lecture DE Cassettes
Lecture DE Disques
Contr61er la chaine et Ies accessoires
Avant de brancher Ie cordon secteur
Connexion D’UNE Antenne Exterieure
Connecter Ies antennes fournies
Brancher Ie cordon secteur a une prise de courant
Pour connecter un appareil optionnel +
Utilisation de Shift de la telecommande
Utilisation de Function de la telecommande
Mode Demo Demonstration
Pour annuler Ie mode Demo
Volume
Appuyer sur TUNER/BAND a plusieurs reprises
Appuyer surTUNER/BAND pour selectionner une
Appuyer sur II SET pour memoriser la station
Repeter Ies etapes 1 et
Accord SUR UNE Station Memorisee
Appuyer sur ~ pour demarrer la lecture
Selection d’une plage avec la telecommande
Pour verifier Ie temps restant
Changement de disques pendant la lecture
Pour Iire un ou deux disaues, mettre Ies disques sur Ies
Shift
Insertion D’ESPACES Blancs
Inserer la cassette a enregistrer clans la platine
Appuyer sur Recirec Mute pour demarrer ’enregistrement
Appuyer sur TAPE/DECK 1/2 pour selectionner la platine
Appuyer sur Sync Dubbing pour demarrer l’enregistrement
Inserer la cassette clans la platine
Pour arri+ter I’enregistrement
Pour effacer Ie programme du montage
Duree des cassettes et temps du montage
Repeter ’etape Pour Ie reste Des plages De la Face
Pour contr61er I’ordre des numeros des plage!s programmers
Pour changer Ie programme de chaque face
Appuyer sur EDIT/CHECK tout en appuyant sur Shift de la
Regler
Iei- m-inutes, puis appuyer sur II ‘SET p-our Ies regler
Pour annuler provisoirement Ie mode attente de minuteriie
Preparer la source
Pour ecouter un disaue com~act, mettre Ie disque
Pour ecouter une cassette, la mettre en place clans
Prise CD Digital OUT Optical
Appuyer sur VIDEO/AUX
Pour connecter un tourne-disque
Blanche a la prise VIDEO/AUX L
Partie Magnetocassette
Droits D’AUTEUR
Page
Page
Page
Page/Pagina/Page