Manuals
/
Alpine
/
Home Audio
/
CD Player
Alpine
cda-9805, CDA-9807
owner manual
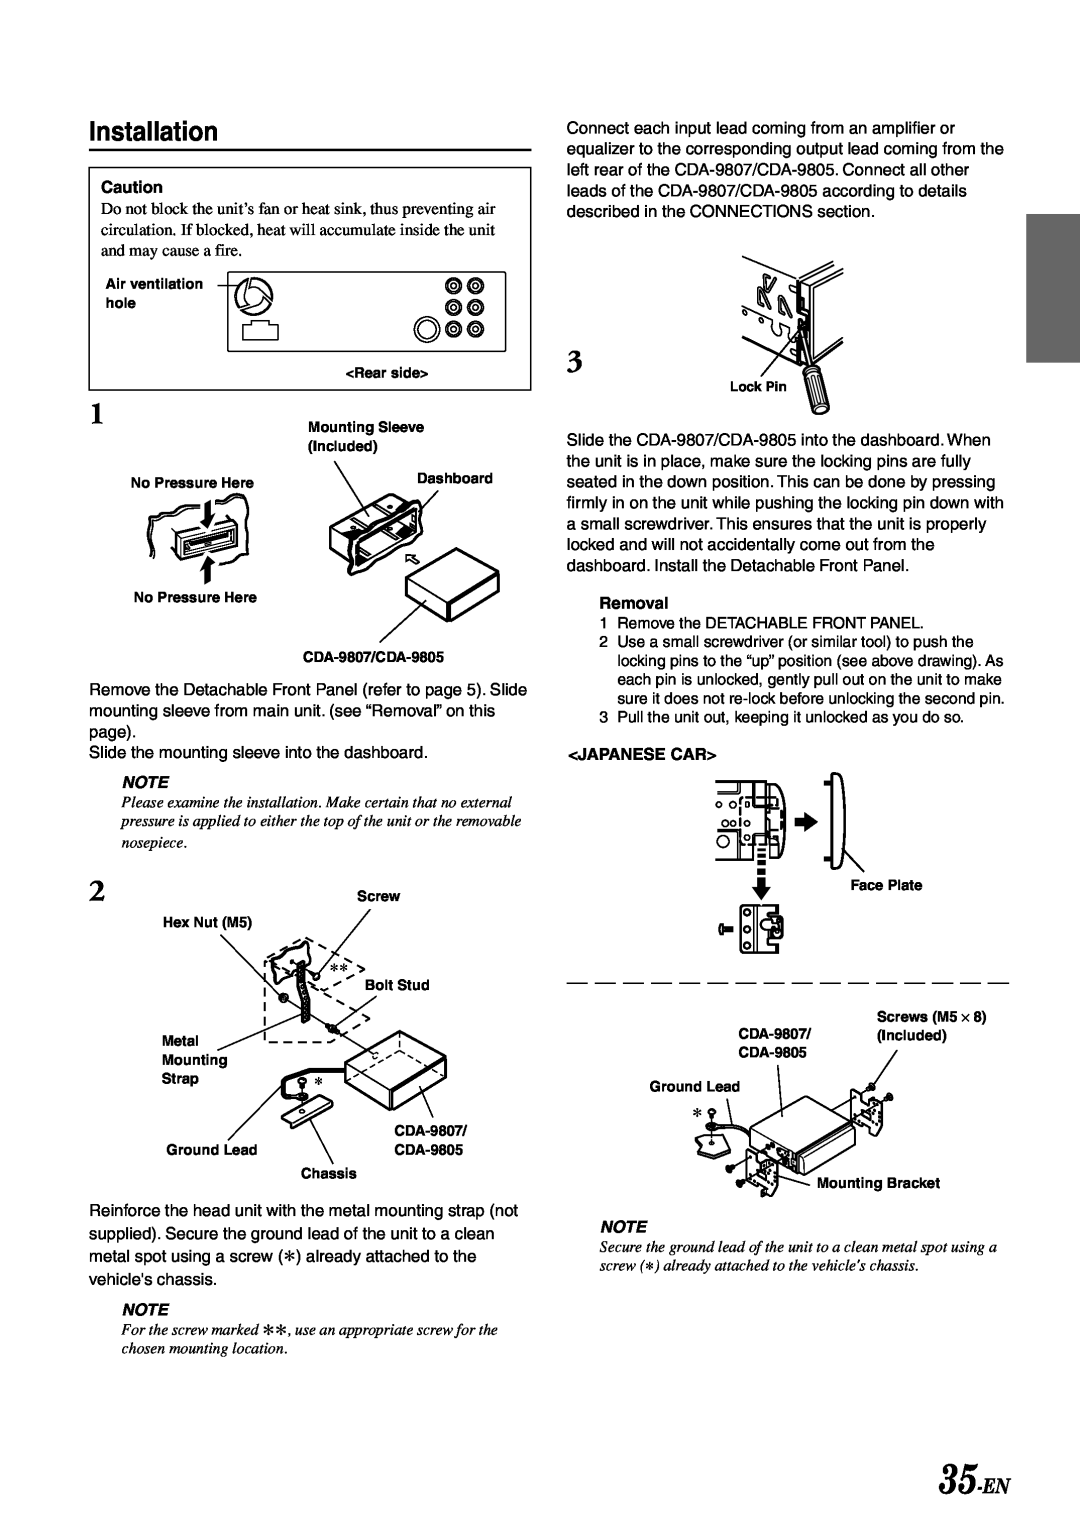
Installation, 35-EN
Models:
cda-9805
CDA-9807
1
37
41
41
Download
41 pages
24.38 Kb
34
35
36
37
38
39
40
41
Specs
Install
Error
Warranty
Storing XM Channel Presets
Disc Accessories
SETUP Operation
Manual Tuning
Setting Time
Remote Control Operation
Page 37
Image 37
Page 36
Page 38
Page 37
Image 37
Page 36
Page 38
Contents
CDA-9807
Please read before using this equipment
CDA-9805
FM/AM CD Receiver
Changeurs de CD Alpine vous avez le choix
Alpine CD Changers Give You More
¡Los cambiadores Alpine de CD le ofrecen más
CHA-S634
Operating Instructions
SETUP Operation
Radio Operation
CD Player Operation
Remote Control Operation
Installation and Connections
LIMITED WARRANTY
XM Radio Operation Optional
3-EN
PRECAUTIONS
PRECAUTIONS
4-EN
Installation Location
Disc Cleaning
Basic Operation
Turning Power On and Off
Initial System Start-Up
Detaching the Front Panel
Setting Time
Adjusting Volume/Balance Between
Left and Right/Fader Between Front
and Rear/Defeat
Setting the Treble Control
Setting the Bass Control
Setting the Bass Type
7-EN
Blackout Mode On and Off
Setting the MX Mode
8-EN
Basic Operation
9-EN
Displaying the Title/Text
Erasing Disc Title/Station Title
Titling Discs/Stations
10-EN
Basic Operation
Scroll Setting
SETUP Operation
Subwoofer On and Off
11-EN
Setting the AUX Mode V-Link
Setting the External Input Defeat
Mode
Turning Mute Mode On/Off
13-EN
Connecting to an External Amplifier
Automatic Seek Tuning
Manual Tuning
Manual Storing of Station Presets
Radio Operation
Tuning to Preset Stations
Automatic Memory of Station Presets
Station Title Search Function
Quick Search Function
Inserting/Ejecting Disc
CD Player Operation
Normal Play and Pause
16-EN
Fast Forward and Backward
Music Sensor Skip
Repeat Play
M.I.X. Random Play
Track Search Function
Scanning Programs
Controlling CD Changer Optional
18-EN
19-EN
Multi-ChangerSelection
Playing MP3 Files with the CD Changer Optional
Playing MP3/WMA Files
CDA-9807only
20-EN
Folder/File Search Function
Scanning files
Playing MP3 Data
21-EN
XM Radio Operation Optional
Storing XM Channel Presets
Checking the XM Radio ID Number
Receiving Stored XM Channels
Setting the Auxiliary Data Field Display
Setting the tuning method
Channel/Category Search Function
Changing the Display
About MobileHub Link
MobileHub Link OperationOptional
Telephone Mode ON/OFF
Incoming Calls
Calling
SMS Short Message Service Operation
25-EN
Calling by using the Speed Dial
Controls on Remote Control CDA-9807only
Remote Control Operation
26-EN
27-EN
Battery Replacement CDA-9807only
About MP3/WMA
Information
28-EN
29-EN
Terminology
30-EN
In Case of Difficulty
Information
Basic
ERROR
ERROR
ERROR
HI TEMP
Information
32-EN
ANTENNA
UPDATING
33-EN
Specifications
Precautions
Installation and Connections
34-EN
35-EN
Installation
36-EN
Connections
Installation and Connections
37-EN
Page
LIMITED WARRANTY
Top
Page
Image
Contents