RS 800 specifications
The APC RS 800 is a high-performance rackmount power backup solution designed specifically for critical IT and telecommunications applications. With a robust set of features, it provides reliable power protection to help safeguard sensitive equipment against power surges, interruptions, and other electrical disturbances.One of the defining characteristics of the APC RS 800 is its capacity. The unit typically offers up to 800 VA of power, making it suitable for a variety of applications in a server room, data center, or network closet. This power capacity ensures that essential devices such as servers, routers, and network switches remain operational even during electrical outages, allowing businesses to maintain their uptime and productivity.
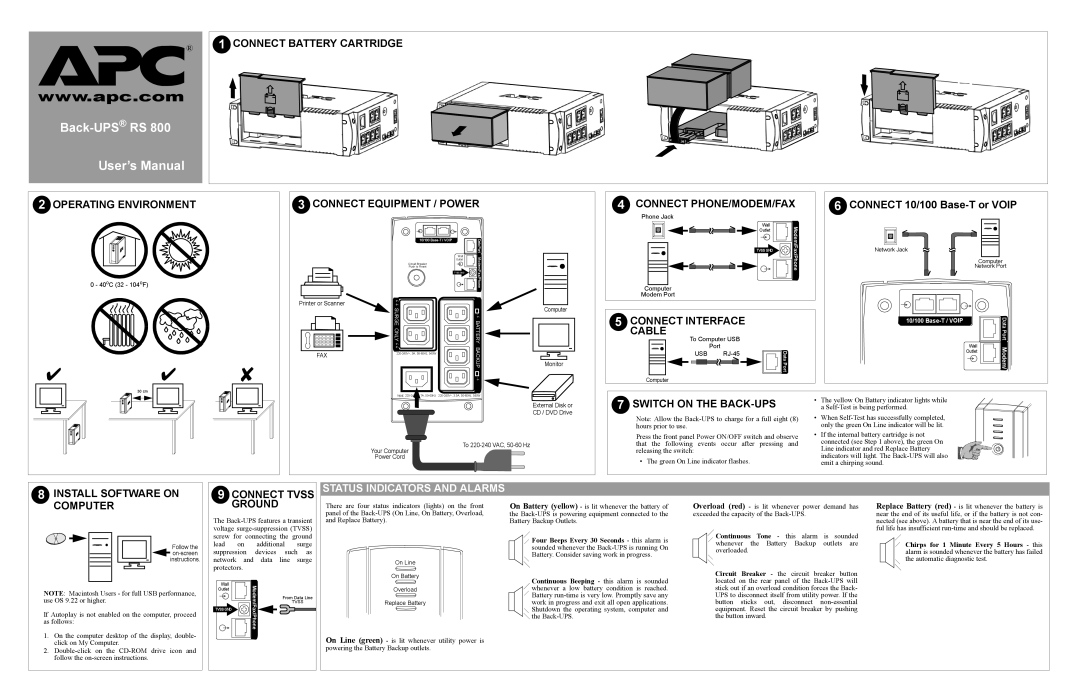
Ease of use is another hallmark of the APC RS 800. It features an intuitive LED interface that provides real-time information on the status of the UPS, including battery charge level, power load, and fault conditions. This ensures that administrators are always aware of their power environment and can act quickly in the event of an issue.
The APC RS 800 employs sophisticated technologies for enhanced performance. It includes Automatic Voltage Regulation (AVR) which stabilizes voltage fluctuations, thereby protecting equipment from harmful surges while ensuring optimal performance. Additionally, the unit incorporates advanced battery management systems that extend battery life and ensure consistent power delivery.
Connection options are versatile, with the UPS typically featuring multiple outlets for various devices, as well as USB and serial communication ports. This allows users to connect the unit to a wider range of equipment while also offering the ability to integrate with network management systems for remote monitoring and control.
The design of the APC RS 800 is tailored for rack-mounted installations, with a compact form factor that saves valuable space in server racks. It also includes mounting hardware, making installation straightforward and hassle-free.
In summary, the APC RS 800 is a robust and reliable UPS solution that delivers essential features for power protection in critical environments. With its solid performance characteristics, ease of use, and advanced technologies, it stands as a key component in maintaining the integrity and reliability of IT infrastructures. Whether for server rooms, telecommunications, or any sensitive electronics, the APC RS 800 provides the peace of mind that comes from knowing critical systems are protected against power disturbances.