Troubleshooting
Issue | Solution | |
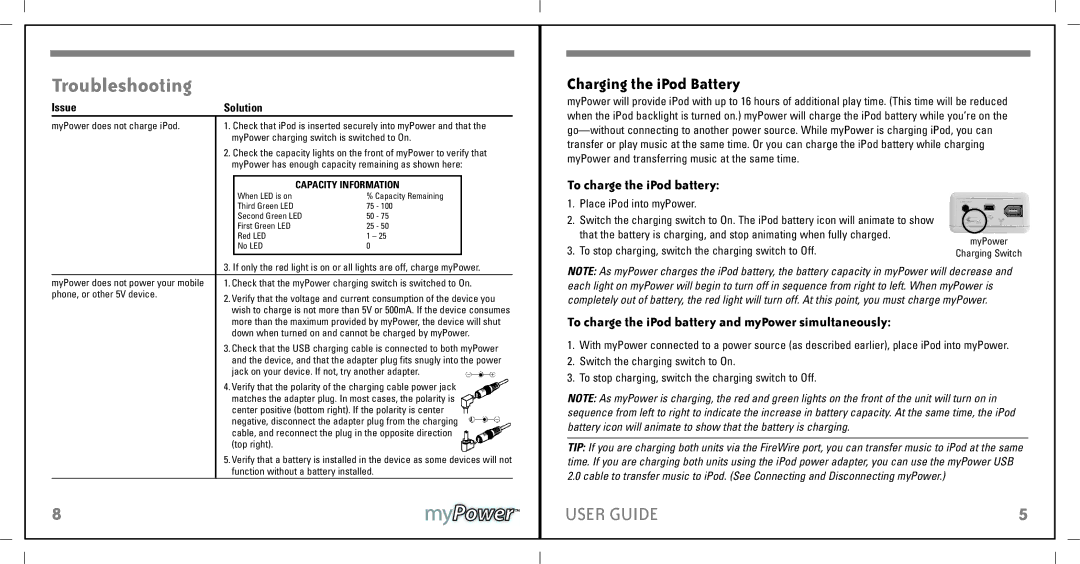
myPower does not charge iPod. | 1. | Check that iPod is inserted securely into myPower and that the |
|
| myPower charging switch is switched to On. |
| 2. | Check the capacity lights on the front of myPower to verify that |
|
| myPower has enough capacity remaining as shown here: |
Charging the iPod Battery
myPower will provide iPod with up to 16 hours of additional play time. (This time will be reduced when the iPod backlight is turned on.) myPower will charge the iPod battery while you’re on the
CAPACITY INFORMATION | ||
When LED is on | % Capacity Remaining | |
Third Green LED | 75 | - 100 |
Second Green LED | 50 | - 75 |
First Green LED | 25 | - 50 |
Red LED | 1 – 25 | |
No LED | 0 |
|
|
|
|
To charge the iPod battery:
1.Place iPod into myPower.
2.Switch the charging switch to On. The iPod battery icon will animate to show that the battery is charging, and stop animating when fully charged.
3.To stop charging, switch the charging switch to Off.
myPower
Charging Switch
| 3. If only the red light is on or all lights are off, charge myPower. | |||
myPower does not power your mobile | 1. Check that the myPower charging switch is switched to On. | |||
phone, or other 5V device. | 2. Verify that the voltage and current consumption of the device you | |||
| ||||
| wish to charge is not more than 5V or 500mA. If the device consumes | |||
| more than the maximum provided by myPower, the device will shut | |||
| down when turned on and cannot be charged by myPower. | |||
| 3. Check that the USB charging cable is connected to both myPower | |||
| and the device, and that the adapter plug fits snugly into the power | |||
| jack on your device. If not, try another adapter. |
|
|
|
|
|
| ||
| 4. Verify that the polarity of the charging cable power jack |
|
|
|
| matches the adapter plug. In most cases, the polarity is |
|
|
|
| center positive (bottom right). If the polarity is center |
|
|
|
| negative, disconnect the adapter plug from the charging |
|
| |
|
| |||
| cable, and reconnect the plug in the opposite direction |
|
| |
| (top right). |
|
| |
|
|
|
| |
| 5. Verify that a battery is installed in the device as some devices will not | |||
| function without a battery installed. | |||
8
NOTE: As myPower charges the iPod battery, the battery capacity in myPower will decrease and each light on myPower will begin to turn off in sequence from right to left. When myPower is completely out of battery, the red light will turn off. At this point, you must charge myPower.
To charge the iPod battery and myPower simultaneously:
1.With myPower connected to a power source (as described earlier), place iPod into myPower.
2.Switch the charging switch to On.
3.To stop charging, switch the charging switch to Off.
NOTE: As myPower is charging, the red and green lights on the front of the unit will turn on in sequence from left to right to indicate the increase in battery capacity. At the same time, the iPod battery icon will animate to show that the battery is charging.
TIP: If you are charging both units via the FireWire port, you can transfer music to iPod at the same time. If you are charging both units using the iPod power adapter, you can use the myPower USB 2.0 cable to transfer music to iPod. (See Connecting and Disconnecting myPower.)
USER GUIDE |
| 5 |
|
|
|
|
|
|
