Manuals
/
Asus
/
Computer Equipment
/
Personal Computer
Asus
G10AJ
manual
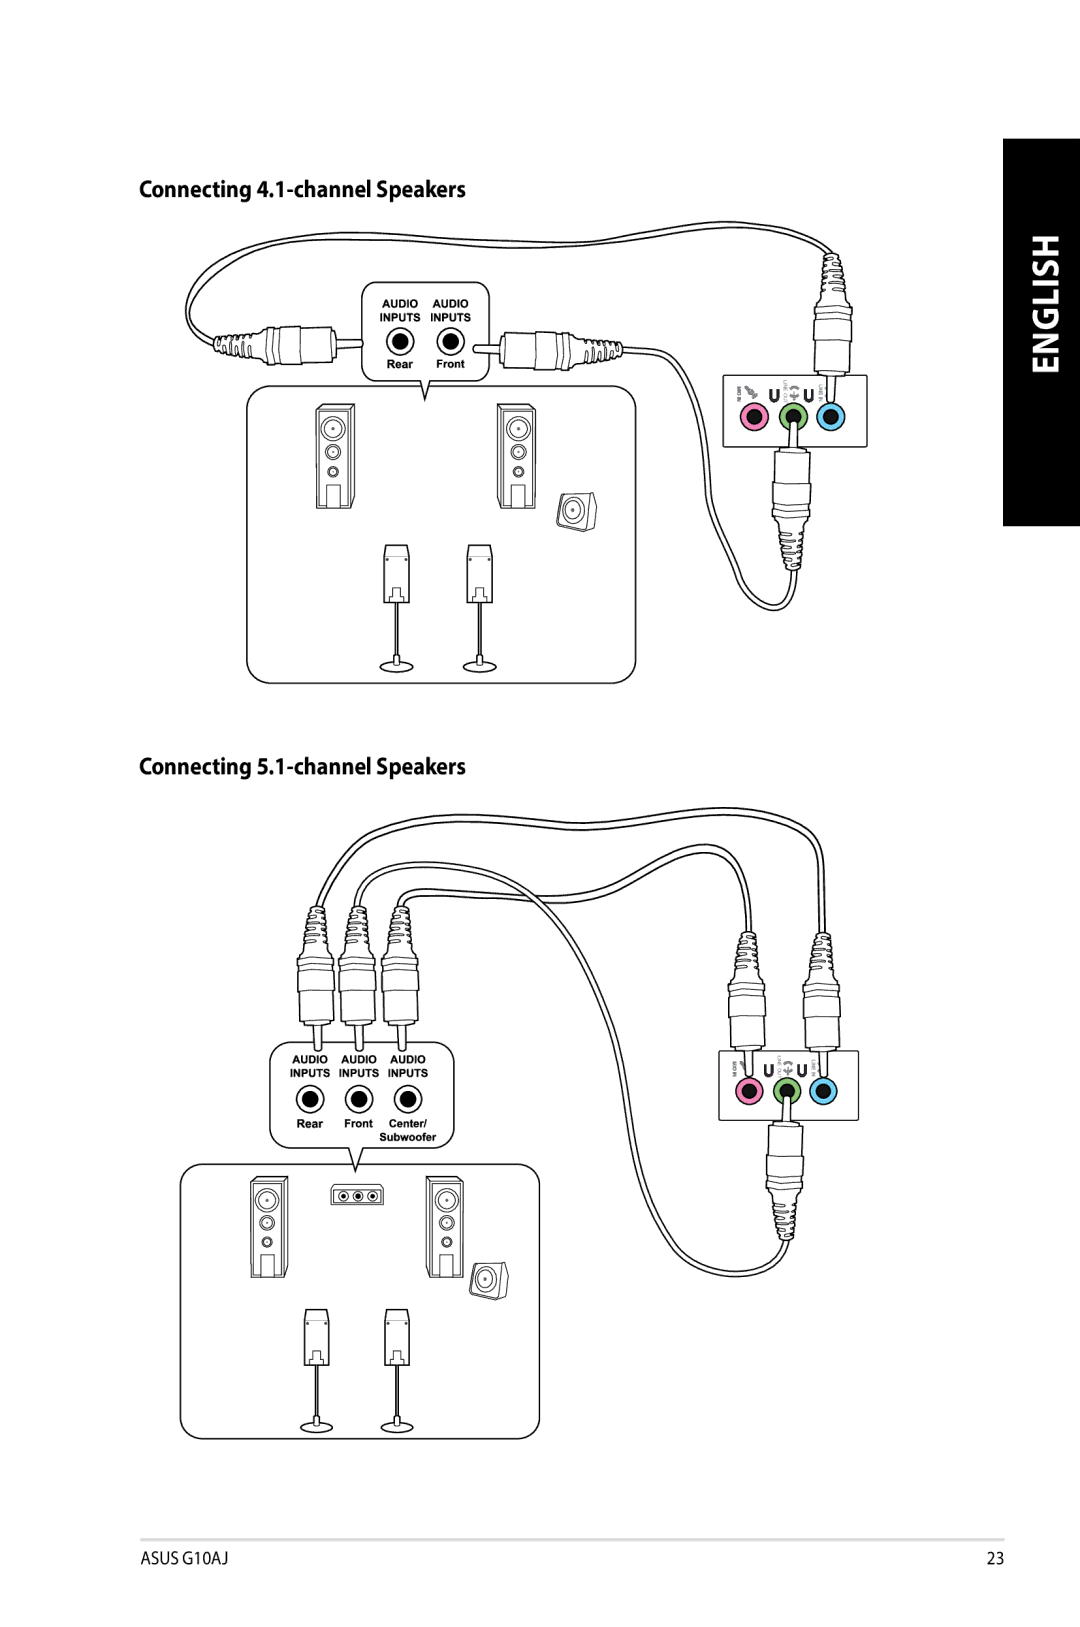
Connecting 4.1-channel Speakers, Connecting 5.1-channel Speakers
Models:
G10AJ
1
23
80
80
Download
80 pages
44.6 Kb
20
21
22
23
24
25
26
27
Troubleshooting
Install
Connecting an external monitor
Windows Resetting your PC
Accessing the All Apps screen
Setting up multiple displays
Quickly enter the Bios
Restoring your system settings
Recovering your system
Wi-Fi
Page 23
Image 23
Connecting
4.1-channel
Speakers
T LINE OU
Connecting
5.1-channel
Speakers
T LINE OU
ENGLISH
ASUS G10AJ
23
Page 22
Page 24
Page 23
Image 23
Page 22
Page 24
Contents
Asus Desktop PC
E9390 Revised Edition May
Contents
Asus contact information
Other Windows 7 / Windows 8.1 functions
Federal Communications Commission Statement
Asus Recycling/Takeback Services
IC Canadian Compliance Statement
RF Equipment Notices
Safety information
Asus websites Asus Local Technical Support
Where to find more information
Conventions used in this guide
Package contents
Getting to know your computer
Welcome
Front panel
Power button. Press this button to turn on your computer
English
Rear panel
Power connector. Plug the power cord to this connector
Port Headset Channel
Microphone port pink. This port connects to a microphone
Status Description
LAN port LED indications
To connect an external monitor using the Asus Graphics Card
Setting up your computer
Connecting an external monitor
Using the Asus Graphics Card on selected models only
Connect your monitor to the onboard display output port
Using the onboard display output ports
Connecting the power cord
Connecting a USB keyboard and a USB mouse
Wait until the operating system loads automatically
Turning your computer ON/OFF
Turning your computer on
To turn your computer on
Insert the USB storage device to your computer
Connecting a USB storage device
To connect a USB storage device
Connecting Headphone and Mic Connecting 2.1-channel Speakers
Connecting microphone and speakers
Connecting 5.1-channel Speakers
Connecting 4.1-channel Speakers
Connecting 7.1-channel Speakers
To set up multiple displays
Connecting multiple external displays
Setting up multiple displays
Connecting an Hdtv
To maintain the proper posture
Proper posture when using your Desktop PC
Insert the memory card into the card slot
Using the memory card reader
To use the memory card
To insert an optical disc
Using the optical drive
Inserting an optical disc
Removing an optical disc
English
To connect via a DSL/cable modem
Wired connection
Connecting via a DSL/cable modem
Set up your DSL/cable modem
To connect via a LAN
Connecting via a local area network LAN
On Windows
Troubleshooting
On Windows Click Applications tab
? When using multiple monitors, only one monitor has display
? The picture on the Hdtv is distorted
Launch the Desktop Mode from the Start screen
Right-click , then click Eject from the menu
On Windows 7, click Computer
Power
Display
System
Audio
If you know how to reinstall
Old Bios version
Latest Bios versions
Update the Bios
Windows 7 / Windows
Page
To start for the first time
Starting for the first time
Using the taskbar
Using Windows 7 desktop
Using the Start menu
Pinning items on the jumplists
Pinning programs on the Start menu or taskbar
Unpinning programs from the Start menu
Unpinning programs from the taskbar
Customizing icons and notifications
Using the notification area
Using Windows Explorer
Managing your files and folders
Sorting your files
Exploring files and folders
Customizing the file/folder view
Arranging your files
Backing up your files
Restoring your system settings
Setting up a backup
Adding a new folder
Protecting your computer
Using Windows 7 Action Center
Using Windows Update
Setting up a user account and password
Activating the anti-virus software
Setting up a user’s password
Getting Windows Help and Support
To start your Desktop PC for the first time
Windows 8.1 lock screen
Windows apps
Using the Windows UI
Start screen
Hotspots on a running app Hotspots on the Start screen
Hotspots
Windows apps
From a running app screen
From the Start screen
Resizing apps
Working with Windows apps
Launching apps
Customizing apps
Pinning an app on the Start screen
Accessing the All Apps screen
Launching the All Apps screen
Launching the Charms bar
Charms bar
Inside the Charms bar
Launch an app then press
Snap feature
Using Snap
To use Snap
Other keyboard shortcuts
Do any of the following to shut down your Desktop PC
Turning your Desktop PC OFF
Putting your Desktop PC to sleep
To turn your Desktop PC OFF
Press Del during Post
Entering the Bios Setup
Quickly enter the Bios
To remove a USB storage device on Windows
Removing a USB storage device
Windows
Personalize Display Change display settings
Configuring the screen resolution settings
To configure the screen resolution settings on Windows
Right-click on your LAN and select
Configuring the Internet connection settings
Wired connection
Windows
Click OK when done
Select Broadband PPPoE and click Next
Select Connect to the Internet and click Next
To configure a dynamic IP/PPPoE network connection
Configuring a static IP network connection
Windows Configuring a dynamic IP/PPPoE network connection
To configure a static IP network connection
Click Obtain an IP address automatically and click OK
Sharing Center
Right-click on your LAN and select Properties
Set up a new connection or network
Configuring a static IP network connection
To connect to a Wi-Fi network
Wireless connection
Connecting to a Wi-Fi network Windows
English
Using the Recovery DVD on selected models
Recovering your system
Using the system recovery partition
About the system recovery partition
Select Reset your PC
Windows Resetting your PC
To reset your PC
To reset your PC by using Recovery DVD
Recovering from a system image file
Creating a USB recovery drive
Launch the Control Panel from the All Apps screen
To create a USB recovery drive
Click Recovery Create a recovery drive
Launch the Charm bar
Removing everything and reinstalling Windows
Asus contact information
Top
Page
Image
Contents