Manuals
/
B&K
/
Computer Equipment
/
Power Supply
B&K
1652, 1651A
instruction manual
Independent operation grounding possibilities sheet 2
Models:
1651A
1652
1
19
88
88
Download
88 pages
22.46 Kb
16
17
18
19
20
21
22
23
Specs
Controls and Indicators
Warranty
Maintenance
Battery Charging
Setting Current Limit
Safety Precautions
Safety
DC Power Supply
Service Information
Page 19
Image 19
___________________________________________________________________________OPERATING INSTRUCTIONS
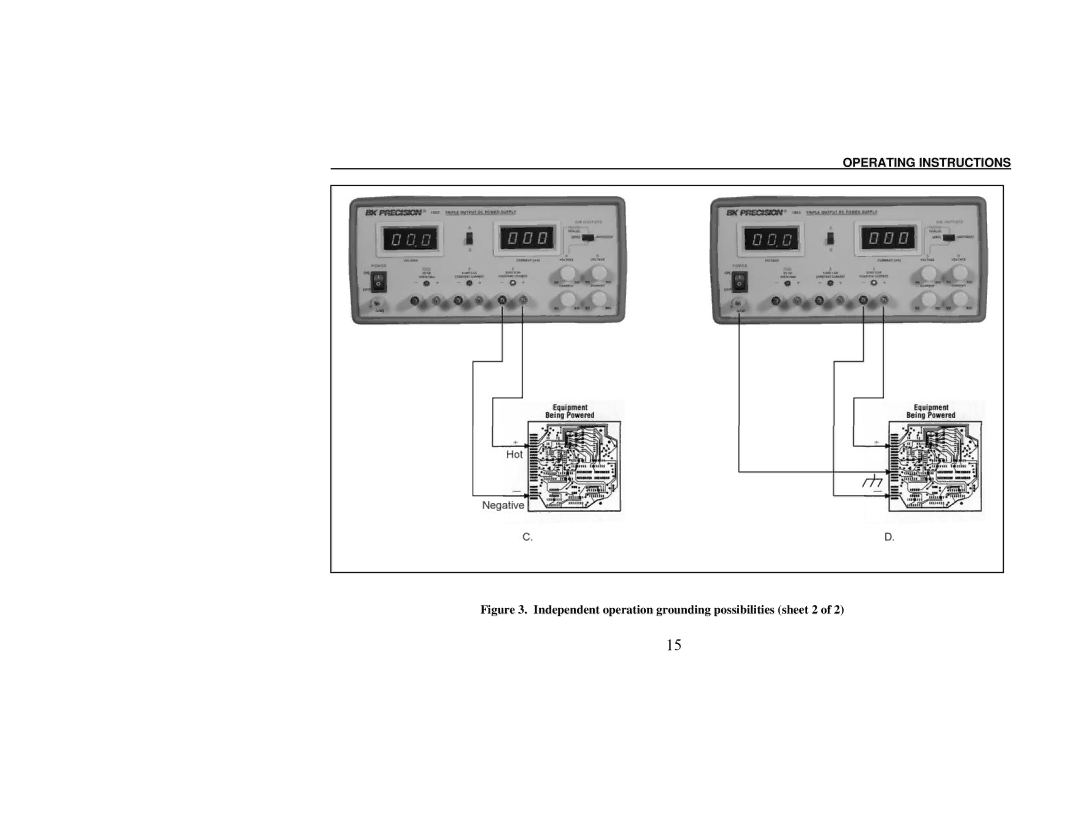
Figure 3. Independent operation grounding possibilities (sheet 2 of 2)
15
Page 18
Page 20
Page 19
Image 19
Page 18
Page 20
Contents
Instruction Manual
Test Instrument Safety
DC Power Supply
Table of Contents
Introduction
Introduction
Features
HOOK-UP Cables
Isolated Output
Overload Protection
Reverse Polarity Protection
B Supplies
Specifications
General
Fixed 5V Supply
Supply Controls and Indicators
Controls and Indicators
Controls and Indicators
Constant Current Indicator
Line Voltage Select Switches. Combination
Fixed 5V Supply Terminals and Indicator Rear Panel Controls
Rear panel controls
Independent USE of a or B Supply
Safety Precautions
Equipment Precautions
Operating Instructions
Operating Instructions Hook-up
Operating Instructions
Independent operation grounding possibilities sheet 2
Setting Current Limit
Setting Current limit
Series Tracking Operation
Constant voltage/constant current characteristic
Operating Instructions
Operating Instructions
Operating Instructions
Parallel Tracking Operation
Parallel tracking operation grounding possibilities sheet 1
Parallel tracking operation grounding possibilities sheet 2
Fixed 5 V Power Supply Operation
Grounding possibilities for fixed 5 V power supply sheet 1
Grounding possibilities for fixed 5 V power supply sheet 2
Operating Instructions
Electronics Servicing
Applications
Electronics Manufacturing
Split Supply
Battery Charging
Electronics Design LAB
Electronics Education
Page
Page
Page
Page
Page
Page
Fuse Replacement
Maintenance
Service Information
Limited One-Year Warranty
Test Instrument Safety
Manual DE Instrucciónes Fuente DE Poder DE CD Triple
Seguridad DEL Instrumento DE Prueba Advertencia
Instrucciones DE Operación
Seguridad DEL Instrumento DE Prueba
Introduccion
Característica DE Rastreo Unica
Salida Triple
Fuente Fija DE
DOS Fuentes DE O a
Protección Contra Sobreflujo
Salida Aislada
Protección DE Polaridad Inversa Cables
Fuentes a Y B
Especificaciones
General
Controles E Indicadores
Figura 1. Controles e indicadores del panel frontal
Controles E Indicadores DE LA Fuente B
Indicador Constant Current
Controles DEL Panel Trasero
Indicadores Y Controles DE LA Fuente DE
Figura 2. Controles del panel trasero
USO Independiente DE LA Fuente a O B
Precauciones Para Seguridad
Instrucciones DE Operación
Page
Page
Figura 4. Operación de voltaje constante típica
Operación de corriente constante típica
Operación DE Rastreo EN Serie
Característica de voltaje constante/corriente constante
Page
Page
Instrucciones DE Operación
Operación DE Rastreo EN Paralelo
Page
Page
Operación DE LA Fuente Fija DE
Page
Page
Instrucciones DE Operación
Manufactura Electrónica
Servicio Electrónico
Fuente Dividida
Laboratorio DE Diseño Electrónico
Educación EN Electrónica
Carga DE Baterias
Aplicaciones
Aplicaciones
Aplicaciones
Aplicaciones
Aplicaciones
Aplicaciones
Mantenimiento
Información de Servicio
Garantía Limitada de Un Ano
Seguridad DE EL Equipo DE Prueba
Declaration of CE Conformity
Savi Ranch Parkway Yorba Linda, CA 2005 B&K Precision Corp
Top
Page
Image
Contents