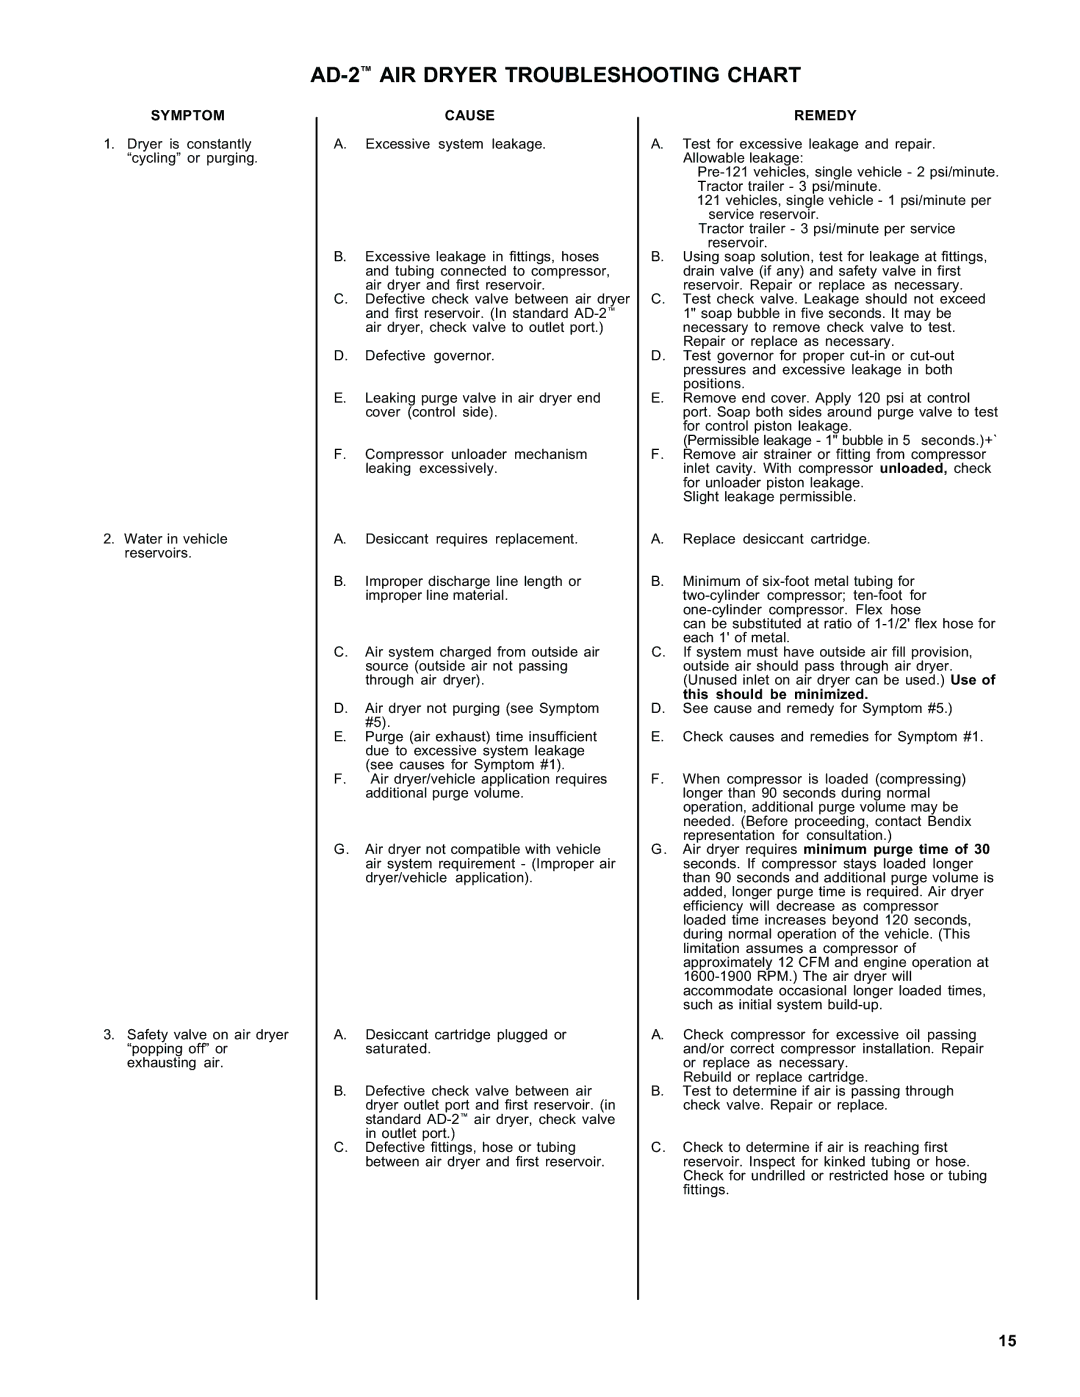
AD-2™ AIR DRYER TROUBLESHOOTING CHART
SYMPTOM
1.Dryer is constantly “cycling” or purging.
2.Water in vehicle reservoirs.
3.Safety valve on air dryer “popping off” or exhausting air.
CAUSE
A.Excessive system leakage.
B.Excessive leakage in fittings, hoses and tubing connected to compressor, air dryer and first reservoir.
C.Defective check valve between air dryer and first reservoir. (In standard
D.Defective governor.
E.Leaking purge valve in air dryer end cover (control side).
F.Compressor unloader mechanism leaking excessively.
A.Desiccant requires replacement.
B.Improper discharge line length or improper line material.
C.Air system charged from outside air source (outside air not passing through air dryer).
D.Air dryer not purging (see Symptom #5).
E.Purge (air exhaust) time insufficient due to excessive system leakage (see causes for Symptom #1).
F.Air dryer/vehicle application requires additional purge volume.
G.Air dryer not compatible with vehicle air system requirement - (Improper air dryer/vehicle application).
A.Desiccant cartridge plugged or saturated.
B.Defective check valve between air dryer outlet port and first reservoir. (in standard
C.Defective fittings, hose or tubing between air dryer and first reservoir.
REMEDY
A.Test for excessive leakage and repair. Allowable leakage:
121 vehicles, single vehicle - 1 psi/minute per service reservoir.
Tractor trailer - 3 psi/minute per service reservoir.
B.Using soap solution, test for leakage at fittings, drain valve (if any) and safety valve in first reservoir. Repair or replace as necessary.
C.Test check valve. Leakage should not exceed 1" soap bubble in five seconds. It may be necessary to remove check valve to test. Repair or replace as necessary.
D.Test governor for proper
E.Remove end cover. Apply 120 psi at control port. Soap both sides around purge valve to test for control piston leakage.
(Permissible leakage - 1" bubble in 5 seconds.)+`
F.Remove air strainer or fitting from compressor inlet cavity. With compressor unloaded, check for unloader piston leakage.
Slight leakage permissible.
A.Replace desiccant cartridge.
B.Minimum of
can be substituted at ratio of
C.If system must have outside air fill provision, outside air should pass through air dryer. (Unused inlet on air dryer can be used.) Use of this should be minimized.
D.See cause and remedy for Symptom #5.)
E.Check causes and remedies for Symptom #1.
F.When compressor is loaded (compressing) longer than 90 seconds during normal operation, additional purge volume may be needed. (Before proceeding, contact Bendix representation for consultation.)
G.Air dryer requires minimum purge time of 30 seconds. If compressor stays loaded longer than 90 seconds and additional purge volume is added, longer purge time is required. Air dryer efficiency will decrease as compressor loaded time increases beyond 120 seconds, during normal operation of the vehicle. (This limitation assumes a compressor of approximately 12 CFM and engine operation at
A.Check compressor for excessive oil passing and/or correct compressor installation. Repair or replace as necessary.
Rebuild or replace cartridge.
B.Test to determine if air is passing through check valve. Repair or replace.
C.Check to determine if air is reaching first reservoir. Inspect for kinked tubing or hose. Check for undrilled or restricted hose or tubing fittings.
15