Digital Projector User Manual
MX880UST Model Name MX712 UST
Welcome
Important safety
Table of contents
Warranty and Copyright
Maintenance
Safety Instructions
Important safety instructions
Safety Instructions Continued
Always place the projector on a level
installation
Ceiling mounting the projector
inverted images for ceiling mount
Introduction
Projector features
Shipping contents
Standard accessories
Optional accessories
Front/upper side
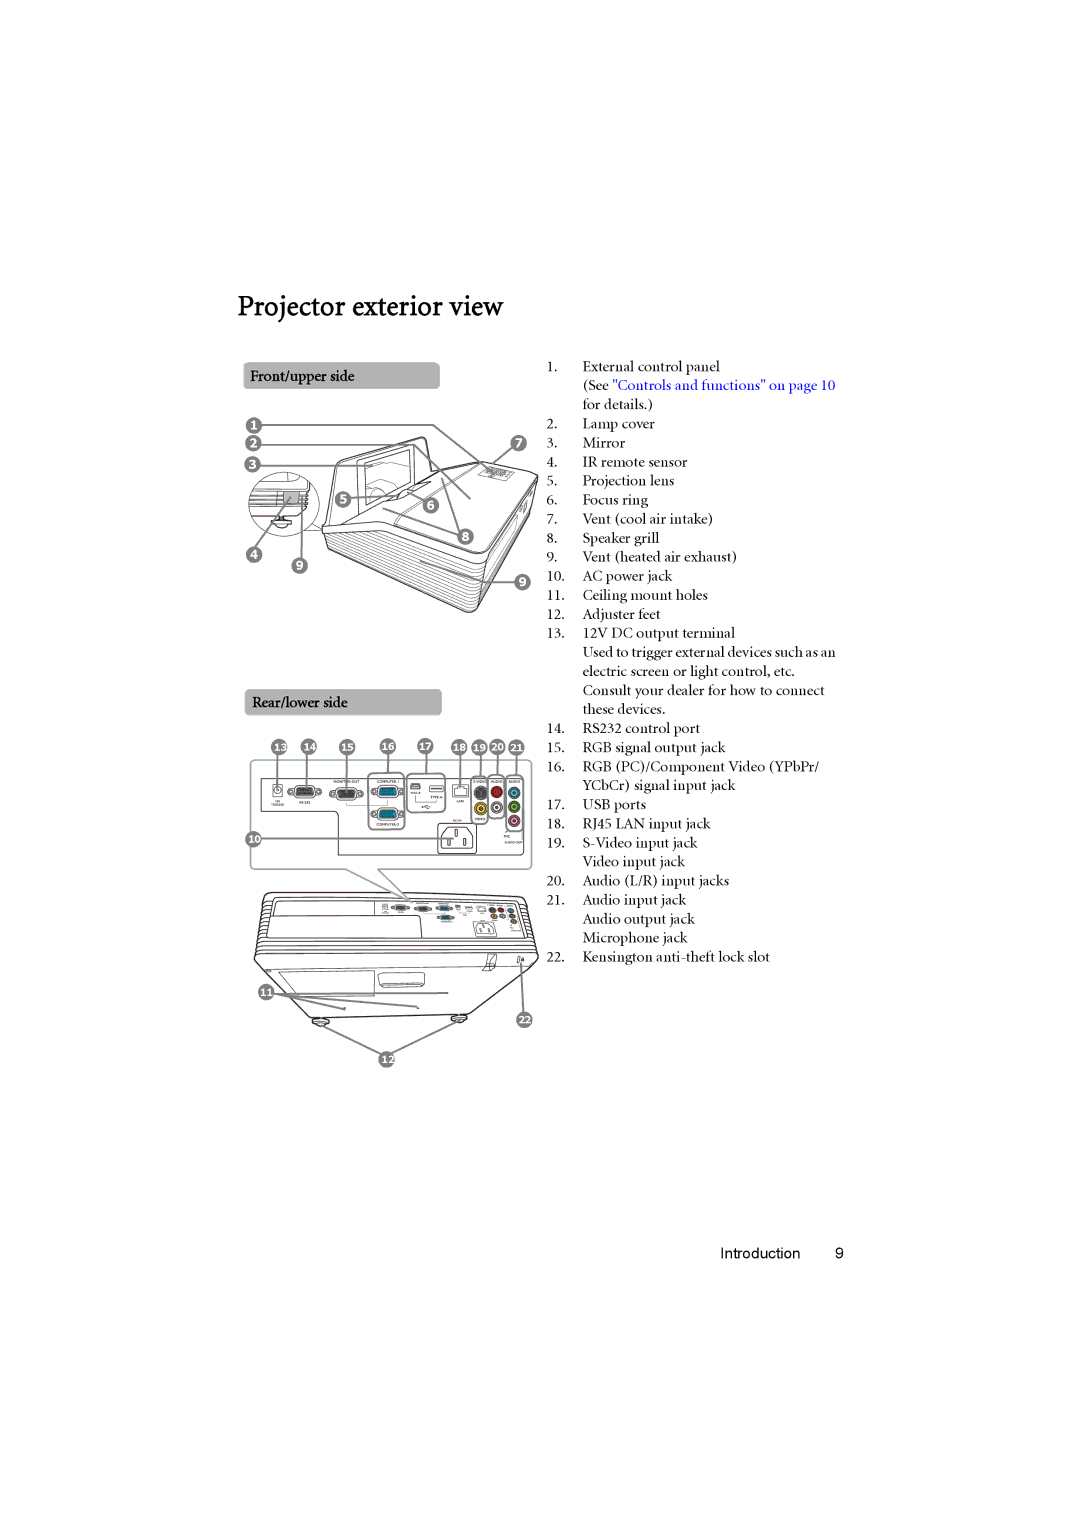
Projector exterior view
Projector
Controls and functions
2. Source selection buttons COMPUTER-1, COMPUTER-2, VIDEO, S-VIDEO
Remote control
17. ZOOM+/ZOOM
Operating the LASER pointer
19. MUTE
20. ASPECT
Remote control effective range
Replacing the remote control batteries
Operating the projector from the front
Choosing a location
Positioning your projector
Obtaining a preferred projected image size
Projection dimensions
Connection
Connecting audio
Connecting video source devices
Signal
Playing sound through the projector
About the microphone input
Parameter
Connection
Starting up the projector
Operation
Adjusting the projection angle
Adjusting the projected image
Auto-adjusting the image
Fine-tuning the image clarity
Correcting keystone
Current input signal
Using the menus
SYSTEM SETUP Basic
SYSTEM SETUP Basic
Utilizing the password function
Using a security cable lock
Setting a password
Securing the projector
Entering the password recall procedure
If you forget the password
Changing the password
Disabling the password function
Switching input signal
Computer1/YPbPr1 Computer2/YPbPr2 Video S-Video Network Display
USB Display USB Reader
Selecting the aspect ratio
Magnifying and searching for details
Auto Scales an image proportionally to fit
About the aspect ratio
169 Scales an image so that it is
horizontal or vertical width. This is suitable
Using Wall Color
Selecting a picture mode
Optimizing the image
Adjusting Brightness
Fine-tuning the image quality in user modes
Adjusting Contrast
Adjusting Color
values to your preference by pressing
3D Color Management
To cancel the timer, perform the following steps
Setting the presentation timer
Remote paging operations
Utilizing FAQ function
Freezing the image
Hiding the image
Operating in a high altitude environment
Locking control keys
Creating your own startup screen
To activate the High Altitude Mode
Adjusting the sound level
Adjusting the sound
Adjusting the microphone volume
Turning off the Power On/Off Ring Tone
Cable connection
Controlling the projector through a LAN environment
3. Highlight Wireless LAN and press MODE/ENTER
Wireless connection
Controlling the projector remotely through a web browser
Operation
40 Operation
Page
ii. You can adjust the Network Settings
Operation
The Wired LAN page allows you to adjust the Wired LAN settings
The Wireless LAN page allows you to adjust the Wireless LAN settings
44 Operation
Page
Displaying images through Q Presenter
Downloading and installing Q Presenter
Using Q Presenter
To activate Remote Desktop function, click Yes. Type the name and password for your computer. Go to the projector OSD menu SYSTEM SETUP Advanced Network Settings Remote Desktop, and enter Account the name for your computer and Password, and highlight Connect, press MODE/ENTER
To allow notification messages to appear, click Yes. Click Apply
When viewing thumbnails
Presenting from a USB Reader
Setting page
Supported image formats
Shutting down the projector
Direct power off
Menu system
Menu operation
52 Operation
Reset lamp timer
Main menu Sub-menu
SETUP
Options
SYSTEM
Description of each menu
See Adjusting Contrast on page 30 for details
picture mode on page 29 for details
image. See Adjusting Color on page 30 for details
See Adjusting Brilliant Color on page 30 for details
Sets the length of time the OSD will remain active after your last key
See Setting Lamp Mode as Economic on page 61 for details
See Adjusting the sound on page 35 for details
See Resetting the lamp timer on page 65 for details
one. See Utilizing the password function on page 24 for details
projector on page 18 for details
Activates the function by selecting On when the selected input signal
sound effects of TV programs and videos that are closed captioned
Selects a preferred closed captioning mode. To view captions, select
6. INFORMATION menu
Cleaning the lens
Maintenance
Cleaning the projector case
Care of the projector
Lamp information
Getting to know the lamp hour
Extending lamp life
Install a new lamp for optimal performance. If the
Timing of replacing the lamp
projector is normally run with Economic selected
whenever you notice that the brightness level has
Replacing the lamp
7. Lift the handle so that it stands up. Use the
Resetting the lamp timer
Power events
Indicators
Light
Status & Description
Troubleshooting
Please see Entering the password recall
procedure on page 25 for details
Projector specifications
Specifications
Wall mount installation
Dimensions
Wall Mount
screw M4 x
Timing chart
Supported timing for PC input
UXGA
Supported timing for Component-YPbPr input
Supported timing for Video and S-Video inputs
Timing
Limited warranty
Warranty and Copyright information
Copyright
Disclaimer
FCC statement for United States users
Regulation statements
EEC statement for European users
WEEE directive
Accessibility Requirements for Rehabilitation Act of 1973, Section