Cutting Base Molding
ALWAYS MAKE A DRY RUN WITHOUT POWER BEFORE MAKING ANY CUTS.
Straight 90˚ cuts
Cutting base molding up to
Position molding as shown in Figure 20. All cuts made with the back of the molding against the fence and bottom of the molding against the table.
INSIDE CORNER:
Left side: | 1. | Miter left 45° |
| 2. | Save left side of cut |
Right side: | 1. | Miter Right 45° |
| 2. | Save right side of cut |
OUTSIDE CORNER: | ||
Left side: | 1. | Miter right at 45° |
| 2. | Save left side of cut |
Right side: | 1. | Miter left at 45° |
| 2. | Save right side of cut |
Material up to 3.9"
When cutting a board between 3.9"
When mitering to the right side of a base molding wider than 3.9"
Cutting
Position molding as shown in Figure 20. All cuts made with the back of the molding against the fence.
INSIDE CORNER:
Left side: 1. Position molding with bottom of molding against the table of the saw
2. Miter left 45°
3. Save left side of cut
Right side: 1. Position molding with top of the molding resting on the table of the saw
2.Miter left 45°
3.Save left side of cut
OUTSIDE CORNER:
Left side: 1. Position molding with bottom of molding against the table of the saw
2.Miter right 45°
3.Save left side of cut
NOTE: If the cut must be made somewhere other than 1" from the
end of the molding: cut off the molding at 90° approx. 1" longer than your final length then make the miter cut as described above.
Right side: 1. Position molding with bottom of the molding against the table of the saw
2. Miter left 45°
3. Save the right side of cut
A third method of making the cut necessary for sketch A (Figure 15) is to make a 0˚ miter, 45˚ bevel cut. Your saw can cut a bevel 7 7/8” wide.
Cutting Base Molding Laying Flat and Using the Bevel Feature
All cuts made with the saw set at 45˚ and 0 miter.
All cuts made with back of molding laying flat on the saw as
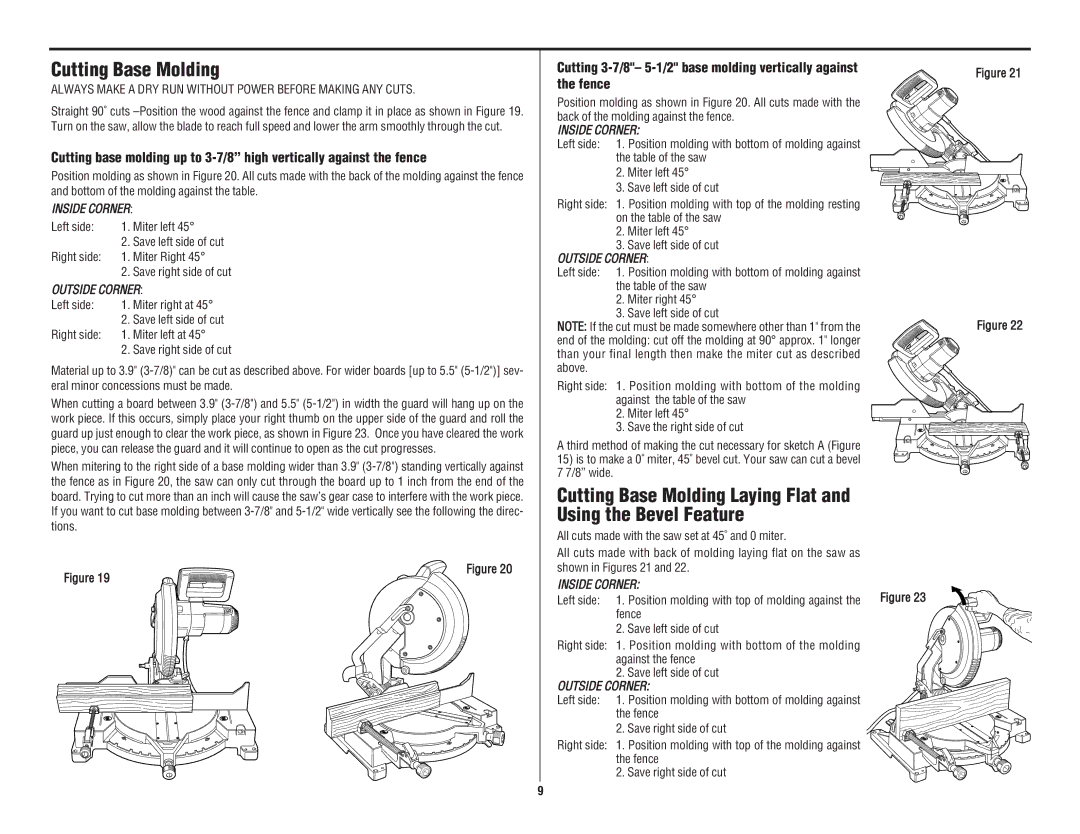
Figure 21
Figure 22
Figure 19
Figure 20
shown in Figures 21 and 22.
INSIDE CORNER: | Figure 23 | |
Left side: | 1. Position molding with top of molding against the | |
| fence |
|
| 2. Save left side of cut |
|
Right side: | 1. Position molding with bottom of the molding |
|
| against the fence |
|
| 2. Save left side of cut |
|
OUTSIDE CORNER: |
| |
Left side: | 1. Position molding with bottom of molding against |
|
| the fence |
|
| 2. Save right side of cut |
|
Right side: 1. Position molding with top of the molding against the fence
2. Save right side of cut
9