SAFETY INSTRUCTIONS - MITER SAWS
For your convenience and safety, the following warning labels are on your miter saw.
ON MOTOR HOUSING:
WARNING: FOR YOUR OWN SAFETY, READ INSTRUCTION MANUAL BEFORE OPERATING SAW.
1. CAUTION: FAILURE TO HEED THESE WARNINGS MAY RESULT IN PERSONAL INJURY AND
SERIOUS DAMAGE TO THE SAW.
2.
3.
4.
5.
6. DO- Keep saw blade sharp and properly set.
WHEN SERVICING, USE ONLY IDENTICAL REPLACEMENT PARTS. ALWAYS WEAR EYE PROTECTION.
ON MOVING FENCE: ALWAYS ADUST FENCE PROPERLY BEFORE USE. CLAMP SMALL PIECES BEFORE CUTTING. SEE MANUAL.
ON GUARD: | DANGER |
KEEP AWAY | |
| FROM BLADE |
DANGER – KEEP AWAY FROM BLADE. |
|
ALWAYS ADJUST FENCE PROPERLY BEFORE USE. CLAMP SMALL PIECES BEFORE CUTTING. SEE MANUAL.
7.
8.
9.
10.
11.
12.
13.
14. DON’T- Use blades larger or smaller than those which are recommended.
15. DON’T- Wedge anything against fan to hold motor shaft.
16.
17. DON’T- Cut ferrous metals (Those with any iron or steel content) or any masonry.
ON TABLE: (2 PLACES)
ALWAYS TIGHTEN ADJUSTMENT KNOBS BEFORE USE. KEEP HANDS 6" FROM PATH OF SAW BLADE. NEVER PERFORM ANY OPERATION FREEHAND. NEVER CROSS ARMS IN FRONT OF SAW BLADE. THINK! YOU CAN PREVENT ACCIDENTS.
DO NOT OPERATE SAW WITHOUT GUARDS IN PLACE. NEVER REACH IN BACK OF SAW BLADE. ALWAYS WEAR EYE PROTECTION. SHUT OFF POWER AND WAIT FOR BLADE TO STOP BEFORE SERVICING, ADJUSTING TOOL, OR MOVING HANDS.
SAVE THESE INSTRUCTIONS FOR FUTURE USE
18.
19.
20.
21.
22.
23.
24.
25.
26.
27.
28. DON’T - Reach underneath the saw unless it is turned off and unplugged. The saw blade is exposed on the underside of the saw.
29. DON’T - Move either hand from saw or work piece or raise arm until blade has stopped.
30. DON’T - Use without Kerf Plate or when kerf slot is wider than 3/8”.
31. CAUTION: Do not connect unit to electrical power source until complete instructions are read and understood.
32. CAUTION: Some wood contains preservatives such as copper chromium arsenate (CCA) which can be toxic. When cutting these materials extra care should be taken to avoid inhalation and min- imize skin contact.
2
Electrical Connection
Be sure your power supply agrees with the nameplate marking. 120 volts, AC/DC means that your saw will operate on alternating or direct current. A voltage decrease of 10 percent or more will- cause a loss of power and overheating. All B&D tools are factory tested. If this tool does not operate, check the power supply.
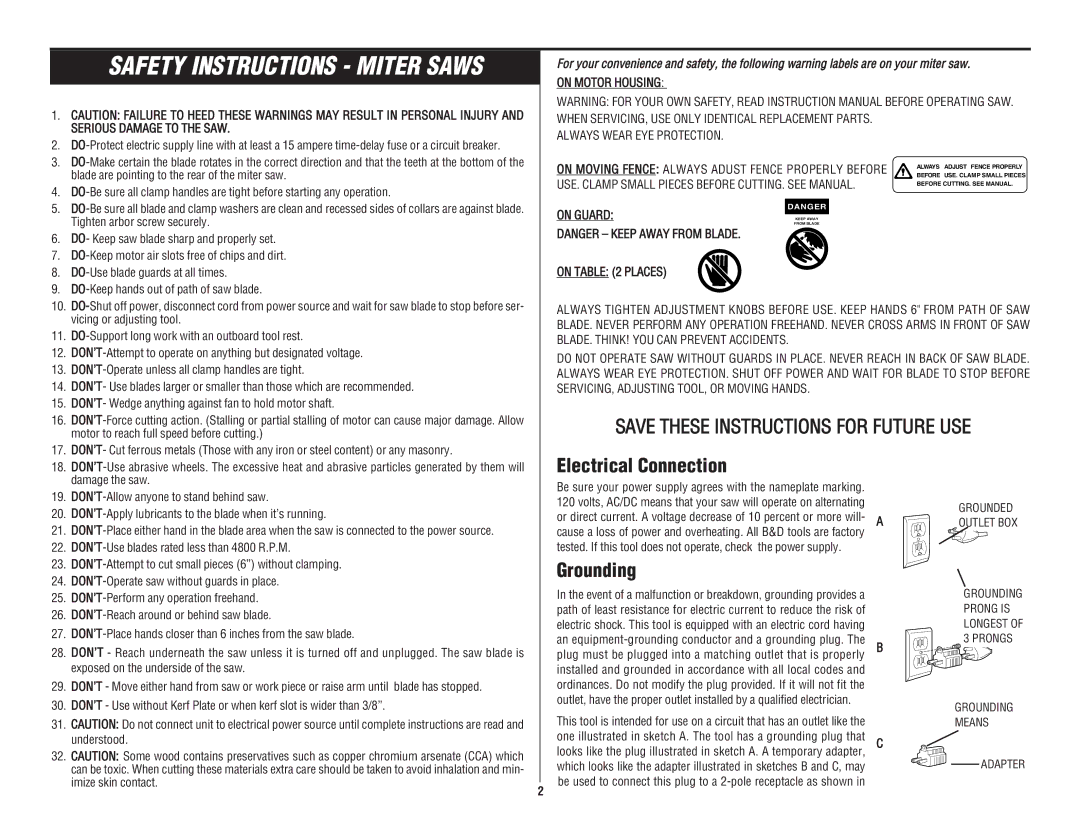
Grounding
In the event of a malfunction or breakdown, grounding provides a path of least resistance for electric current to reduce the risk of electric shock. This tool is equipped with an electric cord having an
This tool is intended for use on a circuit that has an outlet like the one illustrated in sketch A. The tool has a grounding plug that looks like the plug illustrated in sketch A. A temporary adapter, which looks like the adapter illustrated in sketches B and C, may be used to connect this plug to a
A | GROUNDED |
OUTLET BOX |
GROUNDING PRONG IS LONGEST OF 3 PRONGS
B
GROUNDING
MEANS
C
ADAPTER