MULCHING MOWING TIPS |
|
|
| ||
Your mower was shipped from Black & Decker with the mulch insert installed if not equipped with | |||||
is designed to cut the grass clippings into small pieces and distribute them back into the lawn. Under normal conditions, the mulched grass will | |||||
biodegrade quickly to provide nutrients to the lawn. |
|
|
| ||
Please review the following recommendations for optimum mulching performance. |
|
|
| ||
1. | Avoid mowing when the grass is wet from rain or dew. Wet grass may form clumps which interfere with the mulching action and reduce | ||||
2. | The best time to mow grass is in the late afternoon when the grass is dry and the newly cut area will not be exposed to direct sunlight. | ||||
For best mulching performance, set the cutting height to remove about one third of the grass blade length, ideally no more than | |||||
| one time. If the lawn is overgrown, it may be necessary to increase the cut height to reduce the pushing effort and prevent overloading the | ||||
| motor. Slow your cutting pace in tall or thick grass conditions. For extremely heavy mulching, it is advisable to first cut at a high cut height | ||||
3. | setting, and then | ||||
For best performance, keep the mower housing free of | |||||
| blade to come to a complete stop. Then remove the safety key and battery pack and turn mower on its side. Using an object such as a stick, | ||||
| wipe out any accumulation of grass in the blade area. Be careful of the sharp edges of the blade. Clean often in wet, spring grass, and always | ||||
4. | after every use. |
|
|
| |
Certain types of grass or grass conditions may require that an area be mulched a second time to fully disperse the grass throughout the lawn. | |||||
| If cutting a second time, it is advisable to cut perpendicular (across) the first cut pattern. DO NOT CHANGE CUT PATTERN IN ANY WAY | ||||
5. | THAT WOULD CAUSE MOWING DOWN A HILL. |
|
|
| |
Change your cutting pattern from week to week. This will help prevent matting of the lawn. |
|
|
| ||
MAINTENANCE |
|
|
| ||
IMPORTANT: To assure product SAFETY and RELIABILITY, repairs, maintenance and adjustment (including brush inspection and replacement) | |||||
should be performed by BLACK & DECKER Service Centers or other qualified service organizations, always using Black & Decker replacement | |||||
parts. When servicing use ONLY IDENTICAL REPLACEMENT PARTS. |
|
|
|
| |
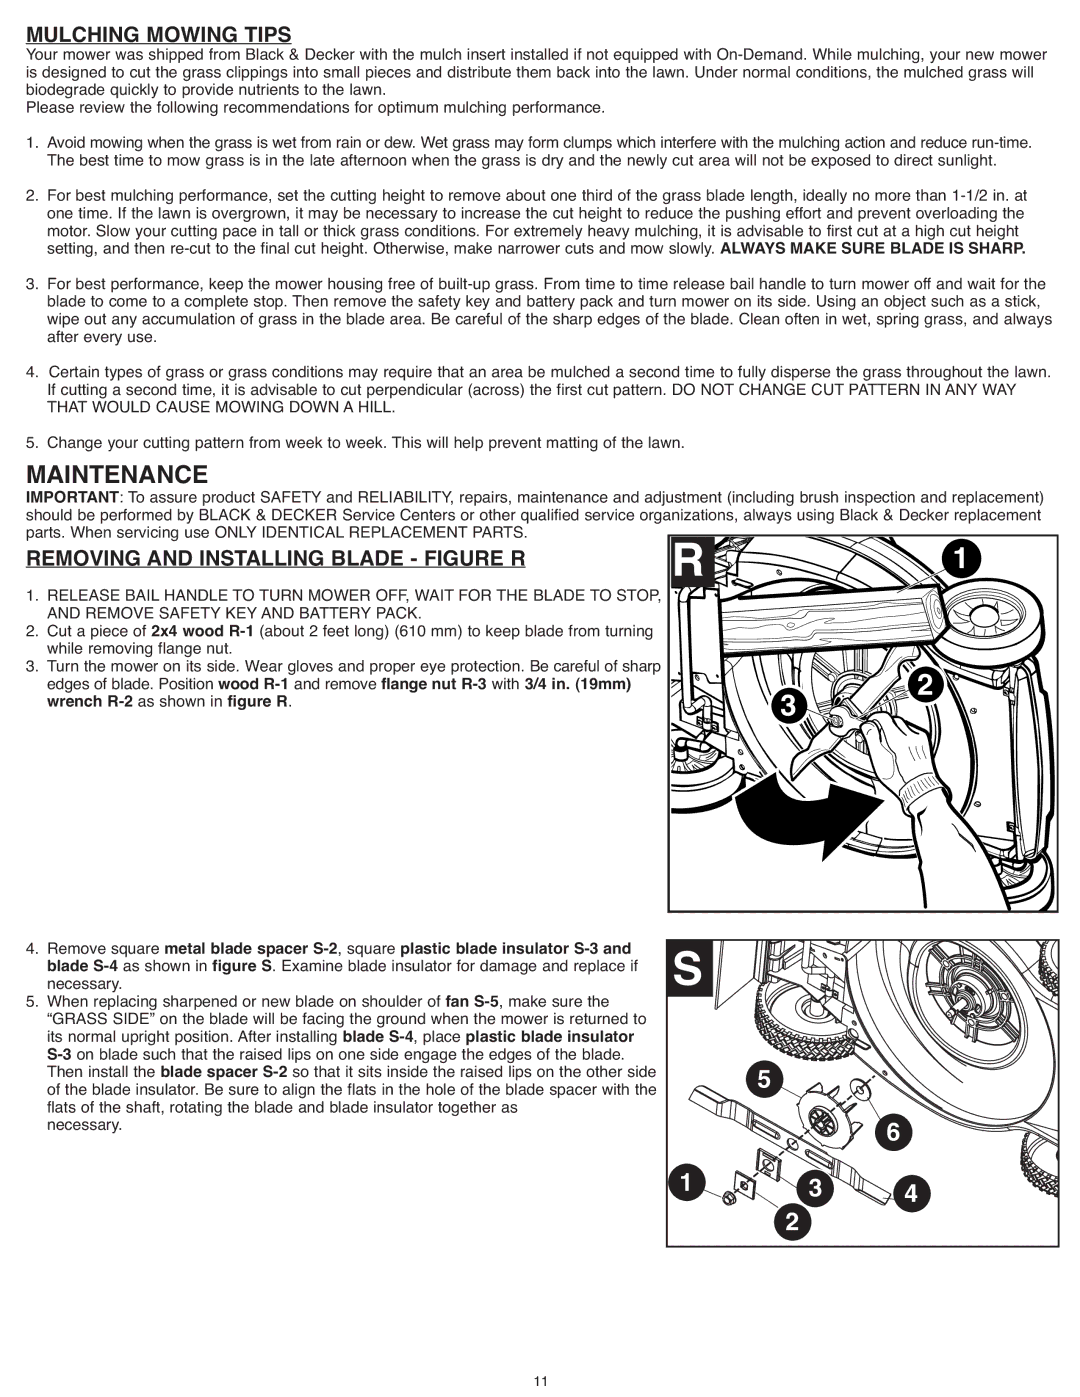
REMOVING AND INSTALLING BLADE - FIGURE R |
|
| 1 |
| |
1. | RELEASE BAIL HANDLE TO TURN MOWER OFF, WAIT FOR THE BLADE TO STOP, |
|
|
| |
|
|
| |||
2. | AND REMOVE SAFETY KEY AND BATTERY PACK. |
|
|
|
|
Cut a piece of 2x4 wood |
|
|
|
| |
3. | while removing flange nut. |
|
| 2 |
|
Turn the mower on its side. Wear gloves and proper eye protection. Be careful of sharp |
| 3 |
| ||
| edges of blade. Position wood |
|
| ||
| wrench |
|
| ||
|
|
|
|
|
|
|
|
|
|
|
|
4.Remove square metal blade spacer
necessary.fan
5.When replacing sharpened or new blade on shoulder of , make sure the “GRASS SIDE” on the blade will be facing the ground when the mower is returned to its normal upright position. After installing blade
necessary.
| 5 |
| 6 |
1 |
| 3 | |
2 | 4 | ||
|
|
|
11