Please Read Before Returning this Product for ANY Reason
KEY Information YOU should Know
VEA EL Español EN LA Contraportada
Before crossing walk, roads, patio and gravel drives
Read ALL Instructions
Personal injury, including the following
To Reduce Risk of Injury
USE of Extension Cords
With no cracks or deterioration
Contain long hair
Never wear radio or music headphones while operating mower
Unclog the chute or remove anything from under the deck
Keep Hands and feet away from cutting area
Handle Assemblyfigure C
Assembly
Handle Adjustment Figure D
Preparation
Grassbag Frame Clip
Assembling the Grass Catcher Figures E1, E2, E3, E4
Removing Battery from Mower Figure H
Battery
Charger Safety Rules
Important Safety Instructions
Operation
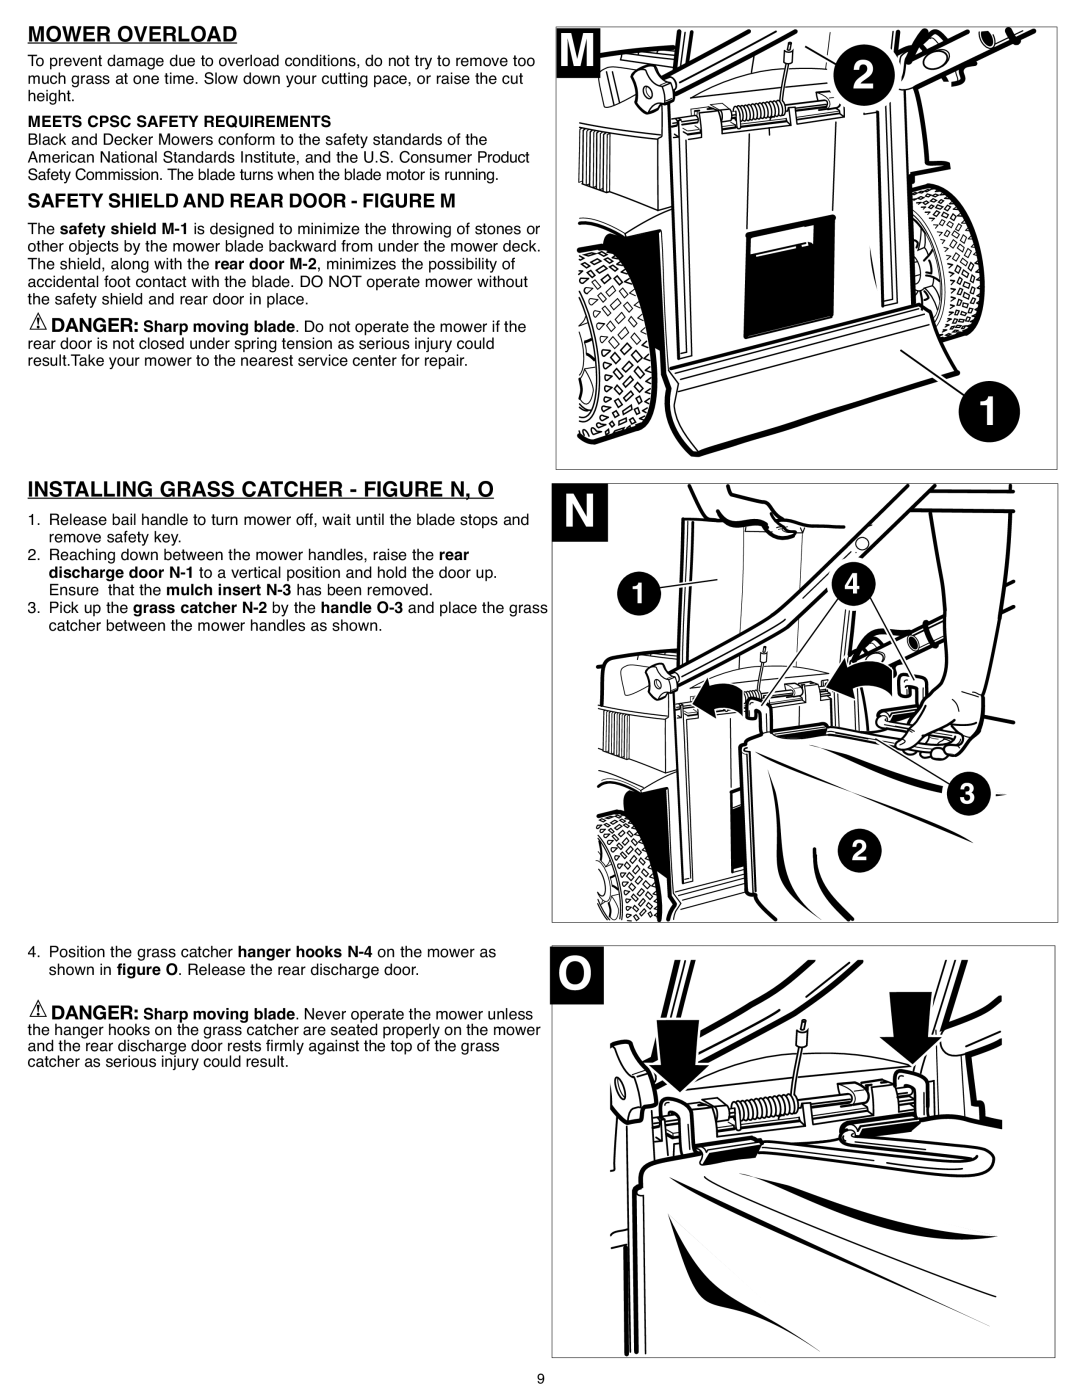
Safety Shield and Rear Door Figure M
Installing Grass Catcher Figure N, O
Meets Cpsc Safety Requirements
Mower Overload
Your mower is now in Bagging mode Mulching Mode
Discharge Mode
ON-DEMAND
Mowing Tips
Removing and Installing Blade Figure R
Maintenance
Mulching Mowing Tips
Wrench R-2 as shown in figure R
Blade Sharpening
Cleaning
Blade Balancing
Lubrication
Rbrc Seal Battery Recycling
Battery Service and Installation
Storage Position
OFF-SEASON Storage
Battery and mower perform much better if charged fully
Problem Solution
Bag full. Empty bag more often
Warranties
Guide DʼUTILISATION
Lire Toutes CES Directives
Conserver CES Mesures
Pièce, est endommagé, il faut faire
Bon calibre à utiliser, consulter le tableau suivant
Assemblage
Préparation
Déballage Illustrations A, B
Avertissement
Ensemble DE Poignée Figure C
Réglage DE LA Poignée Figure D
Dans les plaques
Pile
Réglage DE LA Hauteur DES Roues 38 MM À
Retrait DE LA Pile DE LA Tondeuse Illustration H
Reporter À LA Section SUR LE Rangement Hors Saison
Procédure DE Charge ILLUSTRATIONSI, J
Fonctionnement
Connaître SA Tondeuse
CLÉ DE Sûreté
Interrupteur DE MARCHE/ARRÊT Anse Illustration L
Démarrage DE LA Tondeuse
Surcharge DE LA Tondeuse
Écran Protecteur ET Panneau Arrière Illustration M
« Sélection DE Mode »
Installation DU Collecteur Dherbe
Mode de déchiquetage
Conseils Pour Tondre LA Pelouse
Conseils Pour LE Déchiquetage
Entretien
Retrait ET Installation DE LA Lame Illustration R
Affûtage DE LA Lame
Lors DE Laffûtage DE LA Lame
Nettoyage
Équilibrage DE LA Lame
Prévention DE LA Corrosion
Transport ET Rangement
Rangement Hors Saison
Entretien ET Installation DE LA Pile
LE Sceau Srprc Recyclage DES Piles Rechargeables
800
Problème Solution
Remarque
Problème
La tondeuse ne ramasse pas lherbe coupée dans le sac
Moins. Ne pas couper plus du tiers de la longueur totale
Manual DE Instrucciones
Pautas DE SEGURIDAD/DEFINICIONES
Page
Deterioro
USO DE Cables Prolongadores
Deben usarse piezas de repuesto idénticas
Ensamblaje
Preparación
Desembalaje Figuras A, A1, A2
Descripción DE LAS Funciones CM1936ZF2
Ajuste DEL Mango Figura D
Ensamblaje DEL Mango Figura C
Ensamblado DEL Recolector DE Césped Figuras E1, E2, E3, E4
Ubique el mango de manera que los orificios de éste queden
Retiro DE LA Batería DE LA Podadora
Batería
La empuñadura F-2 y manténgala así
Sección DE Almacenamiento Fuera DE Temporada
Operación
Sobrecarga DE LA Podadora
Para Encender LA Podadora
Instalación DEL Recolector DE Césped
DE Seguridad Y Puerta Trasera
Operación Según Requerimiento
Consejos Para EL Corte DE Césped
LA Deje SIN Supervisión Aunque SEA Durante UN Período Breve
Consejos Para EL Corte DE Césped Para Formar Mantillo
Mantenimiento
Retiro E Instalación DE LA Hoja Figura R
Inalámbrica
Simetría DE LA Hoja
Afilado DE LA Hoja
Lubricación
Limpieza
Posición DE Almacenamiento
Transporte Y Almacenamiento
Almacenamiento Fuera DE Temporada
Mantenimiento E Instalación DE LA Batería
Garantías
Problema Solución
Nota
Años DE Garantia
Esta Garantia no Aplica Cuando
Solamente Para Propositos DE Mexico