MOUNTING THE CHARGER BRACKET (FIGURE 4) | |||
1. | If you intend to mount the | 4 |
|
| charger bracket on a wall, |
| |
| follow the instructions |
|
|
2. | listed below. |
|
|
Use the hardware |
|
| |
| provided (Figure 1D) only |
|
|
| if hanging on conventional |
|
|
| hollow wall construction |
|
|
| such as drywall over studs. |
|
|
| If not, use the appropriate |
|
|
| fasteners for the particular |
|
|
3. | wall material. |
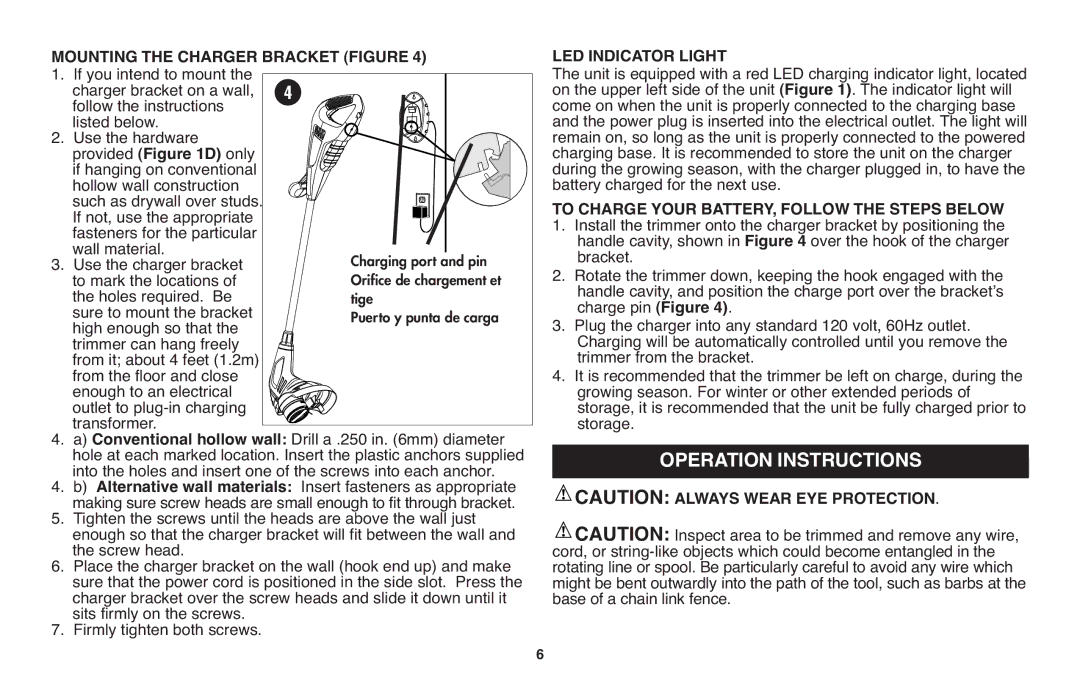
| Charging port and pin |
Use the charger bracket |
|
| |
| to mark the locations of |
| Orifice de chargement et |
| the holes required. Be |
| tige |
| sure to mount the bracket |
| Puerto y punta de carga |
| high enough so that the |
|
|
| trimmer can hang freely |
|
|
| from it; about 4 feet (1.2m) |
|
|
| from the floor and close |
|
|
| enough to an electrical |
|
|
| outlet to |
|
|
4. | transformer. |
|
|
a) Conventional hollow wall: Drill a .250 in. (6mm) diameter | |||
| hole at each marked location. Insert the plastic anchors supplied | ||
4. | into the holes and insert one of the screws into each anchor. | ||
b) Alternative wall materials: | Insert fasteners as appropriate | ||
5. | making sure screw heads are small enough to fit through bracket. | ||
Tighten the screws until the heads are above the wall just | |||
| enough so that the charger bracket will fit between the wall and | ||
6. | the screw head. |
|
|
Place the charger bracket on the wall (hook end up) and make | |||
| sure that the power cord is positioned in the side slot. Press the | ||
| charger bracket over the screw heads and slide it down until it | ||
7. | sits firmly on the screws. |
|
|
Firmly tighten both screws. |
|
| |
LED INDICATOR LIGHT
The unit is equipped with a red LED charging indicator light, located on the upper left side of the unit (Figure 1). The indicator light will come on when the unit is properly connected to the charging base and the power plug is inserted into the electrical outlet. The light will remain on, so long as the unit is properly connected to the powered charging base. It is recommended to store the unit on the charger during the growing season, with the charger plugged in, to have the battery charged for the next use.
TO CHARGE YOUR BATTERY,FOLLOW THE STEPS BELOW
1. Install the trimmer onto the charger bracket by positioning the handle cavity, shown in Figure 4 over the hook of the charger bracket.
2. Rotate the trimmer down, keeping the hook engaged with the handle cavity, and position the charge port over the bracketʼs charge pin (Figure 4).
3. Plug the charger into any standard 120 volt, 60Hz outlet. Charging will be automatically controlled until you remove the trimmer from the bracket.
4. It is recommended that the trimmer be left on charge, during the growing season. For winter or other extended periods of storage, it is recommended that the unit be fully charged prior to storage.
OPERATION INSTRUCTIONS CAUTION: ALWAYS WEAR EYE PROTECTION. CAUTION: Inspect area to be trimmed and remove any wire,
cord, or
6