Motor
Be sure your power supply agrees with nameplate marking. 120 Volts AC only means your tool will operate on standard 60 Hz household power. Do not operate AC tools on DC. A rating of 120 volts AC/DC means that your tool will operate on standard 60 Hz AC or DC power. This information is printed on the nameplate. Lower voltage will cause loss of power and can result in
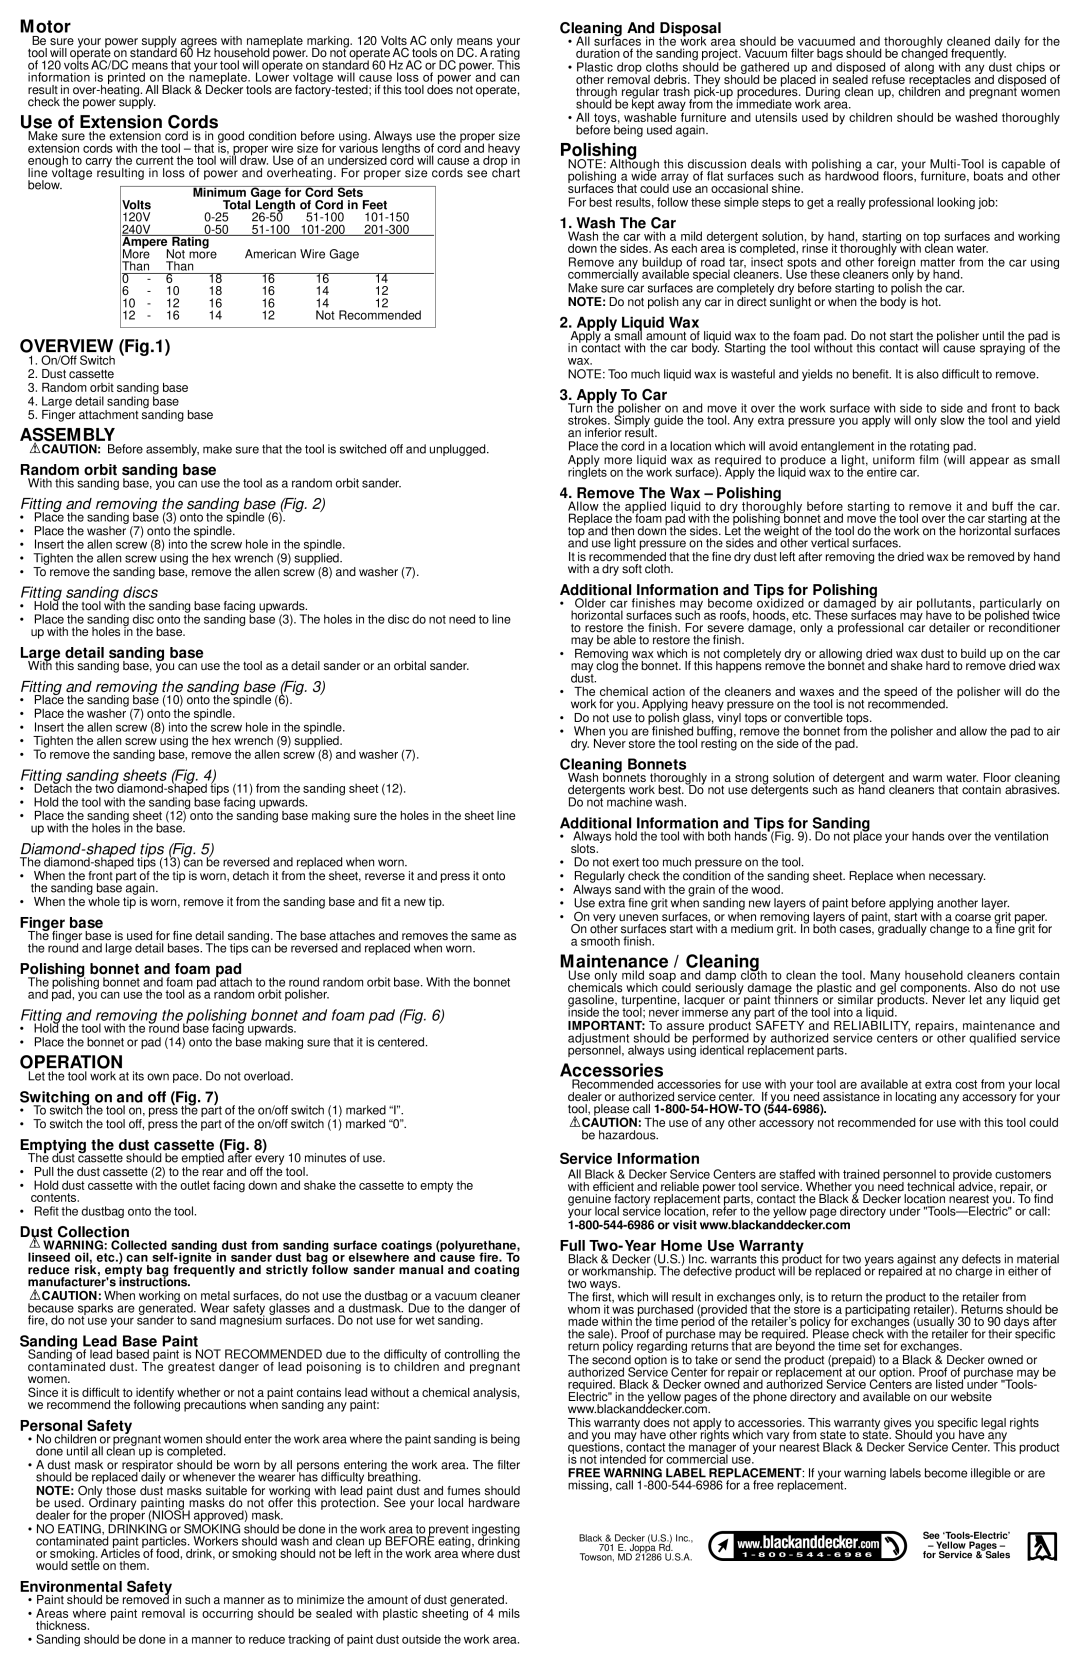
Use of Extension Cords
Make sure the extension cord is in good condition before using. Always use the proper size extension cords with the tool – that is, proper wire size for various lengths of cord and heavy enough to carry the current the tool will draw. Use of an undersized cord will cause a drop in
line voltage resulting in loss of power and overheating. For proper size cords see chart | ||||||||||
below. |
|
|
|
|
|
|
|
|
| |
|
|
|
| Minimum Gage for Cord Sets |
|
|
| |||
|
|
|
|
|
|
|
| |||
|
| Volts |
| Total Length of Cord in Feet |
| |||||
|
| 120V |
|
|
| |||||
|
| 240V |
|
|
| |||||
|
| Ampere Rating |
|
|
|
|
| |||
|
| More | Not more | American Wire Gage |
|
|
| |||
|
| Than | Than |
|
|
|
|
| ||
|
| 0 | - | 6 | 18 | 16 | 16 | 14 |
|
|
| 6 | - | 10 | 18 | 16 | 14 | 12 |
|
| |
| 10 | - | 12 | 16 | 16 | 14 | 12 |
|
| |
| 12 | - | 16 | 14 | 12 | Not Recommended |
| |||
|
|
|
|
|
|
|
|
|
|
|
OVERVIEW (Fig.1)
1.On/Off Switch
2.Dust cassette
3.Random orbit sanding base
4.Large detail sanding base
5.Finger attachment sanding base
ASSEMBLY
![]() CAUTION: Before assembly, make sure that the tool is switched off and unplugged.
CAUTION: Before assembly, make sure that the tool is switched off and unplugged.
Random orbit sanding base
With this sanding base, you can use the tool as a random orbit sander.
Fitting and removing the sanding base (Fig. 2)
•Place the sanding base (3) onto the spindle (6).
•Place the washer (7) onto the spindle.
•Insert the allen screw (8) into the screw hole in the spindle.
•Tighten the allen screw using the hex wrench (9) supplied.
•To remove the sanding base, remove the allen screw (8) and washer (7).
Fitting sanding discs
•Hold the tool with the sanding base facing upwards.
•Place the sanding disc onto the sanding base (3). The holes in the disc do not need to line up with the holes in the base.
Large detail sanding base
With this sanding base, you can use the tool as a detail sander or an orbital sander.
Fitting and removing the sanding base (Fig. 3)
•Place the sanding base (10) onto the spindle (6).
•Place the washer (7) onto the spindle.
•Insert the allen screw (8) into the screw hole in the spindle.
•Tighten the allen screw using the hex wrench (9) supplied.
•To remove the sanding base, remove the allen screw (8) and washer (7).
Fitting sanding sheets (Fig. 4)
•Detach the two
•Hold the tool with the sanding base facing upwards.
•Place the sanding sheet (12) onto the sanding base making sure the holes in the sheet line up with the holes in the base.
Diamond-shaped tips (Fig. 5)
The
•When the front part of the tip is worn, detach it from the sheet, reverse it and press it onto the sanding base again.
•When the whole tip is worn, remove it from the sanding base and fit a new tip.
Finger base
The finger base is used for fine detail sanding. The base attaches and removes the same as the round and large detail bases. The tips can be reversed and replaced when worn.
Polishing bonnet and foam pad
The polishing bonnet and foam pad attach to the round random orbit base. With the bonnet and pad, you can use the tool as a random orbit polisher.
Fitting and removing the polishing bonnet and foam pad (Fig. 6)
•Hold the tool with the round base facing upwards.
•Place the bonnet or pad (14) onto the base making sure that it is centered.
OPERATION
Let the tool work at its own pace. Do not overload.
Switching on and off (Fig. 7)
•To switch the tool on, press the part of the on/off switch (1) marked “I”.
•To switch the tool off, press the part of the on/off switch (1) marked “0”.
Emptying the dust cassette (Fig. 8)
The dust cassette should be emptied after every 10 minutes of use.
•Pull the dust cassette (2) to the rear and off the tool.
•Hold dust cassette with the outlet facing down and shake the cassette to empty the contents.
•Refit the dustbag onto the tool.
Dust Collection
![]() WARNING: Collected sanding dust from sanding surface coatings (polyurethane, linseed oil, etc.) can
WARNING: Collected sanding dust from sanding surface coatings (polyurethane, linseed oil, etc.) can
![]() CAUTION: When working on metal surfaces, do not use the dustbag or a vacuum cleaner because sparks are generated. Wear safety glasses and a dustmask. Due to the danger of fire, do not use your sander to sand magnesium surfaces. Do not use for wet sanding.
CAUTION: When working on metal surfaces, do not use the dustbag or a vacuum cleaner because sparks are generated. Wear safety glasses and a dustmask. Due to the danger of fire, do not use your sander to sand magnesium surfaces. Do not use for wet sanding.
Sanding Lead Base Paint
Sanding of lead based paint is NOT RECOMMENDED due to the difficulty of controlling the contaminated dust. The greatest danger of lead poisoning is to children and pregnant women.
Since it is difficult to identify whether or not a paint contains lead without a chemical analysis, we recommend the following precautions when sanding any paint:
Personal Safety
•No children or pregnant women should enter the work area where the paint sanding is being done until all clean up is completed.
•A dust mask or respirator should be worn by all persons entering the work area. The filter should be replaced daily or whenever the wearer has difficulty breathing.
NOTE: Only those dust masks suitable for working with lead paint dust and fumes should be used. Ordinary painting masks do not offer this protection. See your local hardware dealer for the proper (NIOSH approved) mask.
•NO EATING, DRINKING or SMOKING should be done in the work area to prevent ingesting contaminated paint particles. Workers should wash and clean up BEFORE eating, drinking or smoking. Articles of food, drink, or smoking should not be left in the work area where dust would settle on them.
Environmental Safety
•Paint should be removed in such a manner as to minimize the amount of dust generated.
•Areas where paint removal is occurring should be sealed with plastic sheeting of 4 mils thickness.
•Sanding should be done in a manner to reduce tracking of paint dust outside the work area.
Cleaning And Disposal
•All surfaces in the work area should be vacuumed and thoroughly cleaned daily for the duration of the sanding project. Vacuum filter bags should be changed frequently.
•Plastic drop cloths should be gathered up and disposed of along with any dust chips or other removal debris. They should be placed in sealed refuse receptacles and disposed of through regular trash
•All toys, washable furniture and utensils used by children should be washed thoroughly before being used again.
Polishing
NOTE: Although this discussion deals with polishing a car, your
For best results, follow these simple steps to get a really professional looking job:
1. Wash The Car
Wash the car with a mild detergent solution, by hand, starting on top surfaces and working down the sides. As each area is completed, rinse it thoroughly with clean water.
Remove any buildup of road tar, insect spots and other foreign matter from the car using commercially available special cleaners. Use these cleaners only by hand.
Make sure car surfaces are completely dry before starting to polish the car. NOTE: Do not polish any car in direct sunlight or when the body is hot.
2. Apply Liquid Wax
Apply a small amount of liquid wax to the foam pad. Do not start the polisher until the pad is in contact with the car body. Starting the tool without this contact will cause spraying of the wax.
NOTE: Too much liquid wax is wasteful and yields no benefit. It is also difficult to remove.
3. Apply To Car
Turn the polisher on and move it over the work surface with side to side and front to back strokes. Simply guide the tool. Any extra pressure you apply will only slow the tool and yield an inferior result.
Place the cord in a location which will avoid entanglement in the rotating pad.
Apply more liquid wax as required to produce a light, uniform film (will appear as small ringlets on the work surface). Apply the liquid wax to the entire car.
4. Remove The Wax – Polishing
Allow the applied liquid to dry thoroughly before starting to remove it and buff the car. Replace the foam pad with the polishing bonnet and move the tool over the car starting at the top and then down the sides. Let the weight of the tool do the work on the horizontal surfaces and use light pressure on the sides and other vertical surfaces.
It is recommended that the fine dry dust left after removing the dried wax be removed by hand with a dry soft cloth.
Additional Information and Tips for Polishing
•Older car finishes may become oxidized or damaged by air pollutants, particularly on horizontal surfaces such as roofs, hoods, etc. These surfaces may have to be polished twice to restore the finish. For severe damage, only a professional car detailer or reconditioner may be able to restore the finish.
•Removing wax which is not completely dry or allowing dried wax dust to build up on the car may clog the bonnet. If this happens remove the bonnet and shake hard to remove dried wax dust.
•The chemical action of the cleaners and waxes and the speed of the polisher will do the work for you. Applying heavy pressure on the tool is not recommended.
•Do not use to polish glass, vinyl tops or convertible tops.
•When you are finished buffing, remove the bonnet from the polisher and allow the pad to air dry. Never store the tool resting on the side of the pad.
Cleaning Bonnets
Wash bonnets thoroughly in a strong solution of detergent and warm water. Floor cleaning detergents work best. Do not use detergents such as hand cleaners that contain abrasives. Do not machine wash.
Additional Information and Tips for Sanding
•Always hold the tool with both hands (Fig. 9). Do not place your hands over the ventilation slots.
•Do not exert too much pressure on the tool.
•Regularly check the condition of the sanding sheet. Replace when necessary.
•Always sand with the grain of the wood.
•Use extra fine grit when sanding new layers of paint before applying another layer.
•On very uneven surfaces, or when removing layers of paint, start with a coarse grit paper. On other surfaces start with a medium grit. In both cases, gradually change to a fine grit for a smooth finish.
Maintenance / Cleaning
Use only mild soap and damp cloth to clean the tool. Many household cleaners contain chemicals which could seriously damage the plastic and gel components. Also do not use gasoline, turpentine, lacquer or paint thinners or similar products. Never let any liquid get inside the tool; never immerse any part of the tool into a liquid.
IMPORTANT: To assure product SAFETY and RELIABILITY, repairs, maintenance and adjustment should be performed by authorized service centers or other qualified service personnel, always using identical replacement parts.
Accessories
Recommended accessories for use with your tool are available at extra cost from your local dealer or authorized service center. If you need assistance in locating any accessory for your tool, please call
![]() CAUTION: The use of any other accessory not recommended for use with this tool could be hazardous.
CAUTION: The use of any other accessory not recommended for use with this tool could be hazardous.
Service Information
All Black & Decker Service Centers are staffed with trained personnel to provide customers with efficient and reliable power tool service. Whether you need technical advice, repair, or genuine factory replacement parts, contact the Black & Decker location nearest you. To find your local service location, refer to the yellow page directory under
Full Two-Year Home Use Warranty
Black & Decker (U.S.) Inc. warrants this product for two years against any defects in material or workmanship. The defective product will be replaced or repaired at no charge in either of two ways.
The first, which will result in exchanges only, is to return the product to the retailer from whom it was purchased (provided that the store is a participating retailer). Returns should be made within the time period of the retailer’s policy for exchanges (usually 30 to 90 days after the sale). Proof of purchase may be required. Please check with the retailer for their specific return policy regarding returns that are beyond the time set for exchanges.
The second option is to take or send the product (prepaid) to a Black & Decker owned or authorized Service Center for repair or replacement at our option. Proof of purchase may be required. Black & Decker owned and authorized Service Centers are listed under "Tools- Electric" in the yellow pages of the phone directory and available on our website www.blackanddecker.com.
This warranty does not apply to accessories. This warranty gives you specific legal rights and you may have other rights which vary from state to state. Should you have any questions, contact the manager of your nearest Black & Decker Service Center. This product is not intended for commercial use.
FREE WARNING LABEL REPLACEMENT: If your warning labels become illegible or are missing, call
Black & Decker (U.S.) Inc., |
| See | |
701 | E. Joppa Rd. |
| – Yellow Pages – |
Towson, | MD 21286 U.S.A. |
| for Service & Sales |